Charge Your RV Batteries With A Portable Solar Panel Charger When Boondocking/Dry Camping
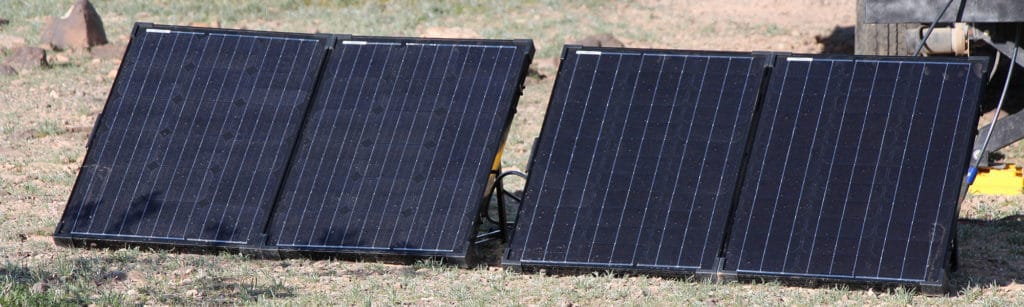
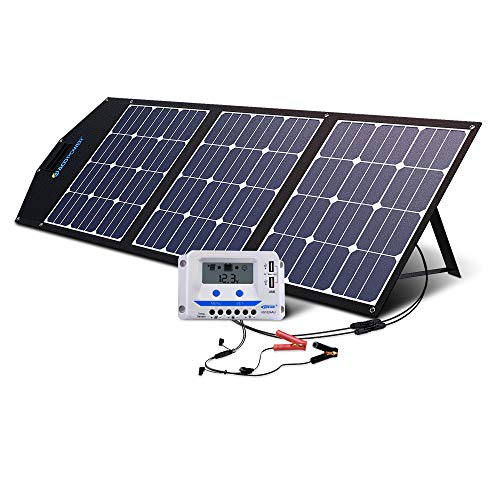
I use a portable 100W Renogy suitcase solar panel (click to view on Amazon) to charge my RV batteries when I am boondocking.
It’s incredible how much power can be generated on a sunny day, even in the winter.
The battery in your RV is there for when you don’t have access to electricity from shore power.
It will let you use your 12V lights, run a tv if it’s a 12V model, and power the bathroom fan, water pump, etc.
The RV battery charges in several ways.
As soon as you plug your RV in at the campground, it will start charging your battery and keep it charged.
If you’re out boondocking/dry camping, gas generators and solar panels are popular ways to generate power for the batteries.
Today we’re talking about portable solar panels.
Portable panels are an excellent option for people just getting started with solar that wants to try it out without having to mount something to their RV roofs.
Related Post: How Good Is A 170W Solar Panel That Costs Less Than $100?
By being portable, often with built-in stands, you can bring the panel out when you want to and connect it directly to your RV battery or a quick-connect port.
They’re also nice to have if you’re camping in the shade since you can place it in the sun and still generate energy.
If your RV or trailer has a quick-connect port, I recommend reading this post if it’s a Zamp solar port, or this post if it’s a Furrion solar port.
The most important thing you need to know when choosing a portable solar panel to charge RV batteries is that you need to use a solar charge controller between the solar panel and the battery.
Every product I recommend below come with charge controllers built-in, but if you’re considering a different product, make sure it has one wired in-between.
In the frequently asked questions-section, I have answered the most frequent questions about solar and accessories surrounding them.
I have done my best to explain how they work and how you can monitor your batteries to make sure they stay alive.
If you have a question that hasn’t been answered, please leave a question in the comment section, and I will do my best to help you.
Now, let’s get to today’s comparison of portable solar panels.
Product Summary (Links to Amazon)
- Acopower 60W Foldable Panel
- Most Portable – ECO-WORTHY 120W Foldable Solar Panel
- My Choice – Renogy 100 Watt Suitcase
- Most Features – ACOPOWER 120W Portable Foldable Suitcase
- Most Watts – Renogy 200 Watt Eclipse

Most Portable
My Choice
Most Features
Most Watts
Last update on 2024-04-18 / Affiliate links / Images from Amazon Product Advertising API
Best Portable Solar Panels Reviewed
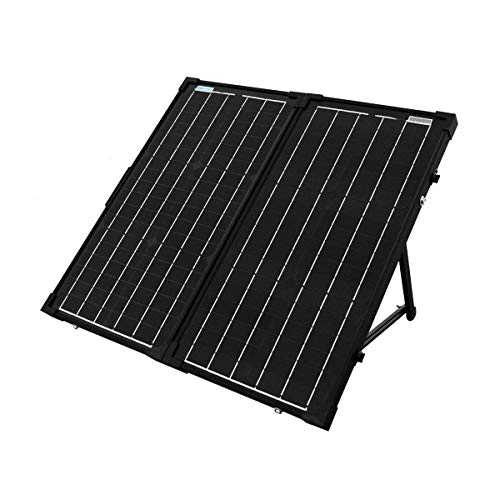
1. Acopower 60W Foldable Panel
Let’s start with the smallest panel on today’s list. The Acopower 60W.
As the name implies, it’s a 60W solar panel made up by two efficient 30W monocrystalline panels.
A 10A solar charge controller is built-in as well to protect your 12V RV batteries from overcharging.
Since it’s a 60W setup, it’s the most portable panel to deal with in terms of weight.
Portable 100W solar panel chargers aren’t light unless you choose one of the flexible, foldable options.
So the Acopower 60W is a good mix of efficient solar charging and portability.
The solar charge controller on this unit is not waterproof, but won’t get the same kind of wear that foldable solar panels will if left outside for an extended amount of time.
A built-in kickstand makes it easy to set up and angle the solar panel towards the sun.
It’s what you should do in the morning and evening hours to get a good charge even when the sun is low on the horizon.
This is very helpful if you go camping during the winter months as well since the sun won’t be right above you.
Related: Best Deep Cycle RV Battery (AGM, SLA, 12V, 6V)
Acopower also includes a carrying bag to keep the solar panels protected while you’re traveling.
The built-in handle makes it easy to carry around and pack into storage.
To connect this solar panel to a prewired trailer, you’re going to need a MC4 to SAE adapter if you have a Zamp solar port, or a MC4 to 2 Pin if your RV camper/trailer has a Furrion solar port/quick-connect.
Something Acopower has started doing with their portable solar chargers is adding a built-in bypass.
This lets you bypass the solar charge controller and plug the panel into a solar generator/power station like the Acopower 150Wh (click to view on Amazon).
The Acopower 60W comes with alligator clips that you connect to the positive and negative terminal on your battery.
These cables are fused to protect the charge controller and your batteries.
Overall, this 60W panel has a lot of things going for it, and it’s a great choice for campers that are looking for an easy way to keep their RV batteries fully charged when boondocking.
If you only use your water pump, 12V TV, lights, and fans, this solar panel will let you stay out dry camping forever.
PROS
- Foldable and portable
- Built-in bypass for solar generators
- Kickstand built-in
- 10A Charge controller
- Includes carrying case
- Monocrystalline panels
CONS
- Heavy compared to flexible solar panels
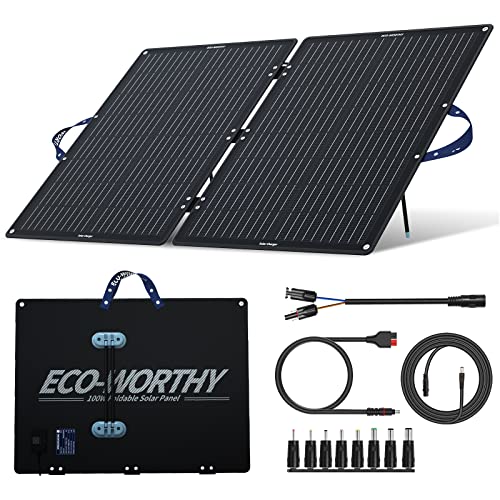
2. ECO-WORTHY 120W Foldable Solar Panel
This is one of the most versatile solar kits I have seen.
It comes with a built-in solar charge controller, so you can connect it to 12V RV batteries or car batteries without overcharging them.
But you can also skip the solar charge controller and connect it to portable power stations/solar generators directly.
At 8 pounds, this is a very lightweight 120W kit, perfect for RV travelers or campers that don’t want to mount solar panels on top of their roofs.
This is easy to bring out every day and angle towards the sun.
You should expect this panel to generate about 70-80 watts, so if you have a total of 100Ah of battery capacity, it would recharge from 50% in about 8 hours.
In addition to the MC4 and alligator clips, you get 8 different DC output adapters so you can connect it to your specific solar generator, or to an electronic device.
Related: Best 12 Volt RV Lithium Battery Reviews + How To Charge
It’s compatible with a portable solar generator like the right out of the box.
The PWM solar charge controller has USB ports so you can connect phones, tablets, lights, and speakers directly to it and charge it while the solar panel is under the sun.
One of the most important things you can do to improve the charging efficiency with a foldable solar panel like this is to make sure it’s not shaded, and that it is angled towards the sun.
You will generate a lot more power in the morning and evening if you angle the panel towards the sun.
This is important if you go camping during the wintertime as well, as the sun sits lower on the horizon.
Overall, the ECO-WORTHY 120W Foldable Solar Panel is an excellent way to get started with solar power.
If you’re an RV traveler, vandweller, or car camper, this is the kind of portable solar panel you’ll come to love.
Lightweight, easy to set up, built-in handle, and a total of 120W of solar panels, it’s a winner.
PROS
- 20A PWM Charge Controller with USB port
- 10 feet wiring
- Several different DC outputs
- Folds and becomes very portable
- Handle
CONS
- No kickstand
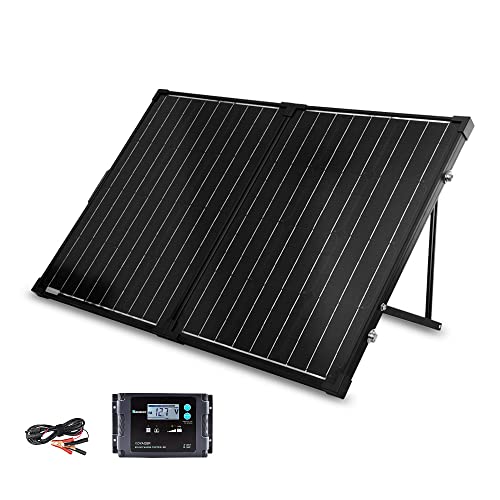
3. Renogy 100W Suitcase
This is Renogy’s take on a portable 100W suitcase.
Renogy is a well-known company in the solar panel business, and this solar panel is just one of the great products that it makes.
I own two of these, one with and one without a built-in charge controller.
The reason is that I wanted to bypass the charge controller on one of them, so I could either use them both to charge my 12V trailer batteries or my Goal Zero Yeti 1000X power station (click to view on Amazon) which is my portable solar generator that I plug my camper into when I want to use the outlets.
I have been told that some of the latest models of this panel come with a prewired bypass.
If you plan on doing the same thing I mentioned above, there might be no work involved.
The Renogy suitcase comes in different configurations, with different sizes of panels and charge controllers.
I decided to put the 20A waterproof controller model on the list because it’s the one I believe most RV campers are interested in.
As I mentioned, the solar charge controller is waterproof, and I have left mine out for about a year now without any issues.
The charge controller has a screen that tells you amperages, and other data. It’s compatible with gel, sealed, lithium, and flooded lead-acid batteries.
Related Post: Do Cell Phone Boosters Work For Data + Best Options
A kickstand makes the solar panel easy to set up and angle towards the sun, and a handle makes it easy to carry the panel and place it in the included carrying case.
To connect the Renogy 100W suitcase to your 12V battery, you can use the included alligator clips.
If your RV camper has a prewired solar port, you’re going to need a MC4 to SAE adapter if you have a Zamp solar port, or a MC4 to 2 Pin if your RV camper/trailer has a Furrion solar port/quick-connect.
The included alligator clips cables are 10 feet long, but you can extend them with WindyNation 20ft 12 Gauge MC4 extension cables.
I own a pair of these and have taped them together with electrical tape to make them easier to deal with.
As we’ll see below, Renogy also makes the 100W Eclipse panel (click to view on Amazon).
The Eclipse panel is basically the same thing as this kit but with the newer, more efficient Renogy solar panels.
In conclusion, you can’t go wrong with Renogy panels, especially their portable suitcase panels.
With a built-in kickstand, handle, carrying case, and alligator clips, it’s a perfect plug-and-play system for dry camping that will keep your 12V batteries charged.
PROS
- 20A waterproof charge controller
- 10 ft alligator clips cable
- Robust handle
- Built-in kickstand
- Monocrystalline panels
- Carrying case included
CONS
- No built-in bypass for solar generators
4. ACOPOWER 120W Portable Foldable Suitcase
The first solar panel we looked at was the 60W one from Acopower, here is another one from the same company, but with twice the wattage.
This 120W panel consists of three flexible 40-watt panels that fold and becomes almost flat, which makes it a very lightweight, portable, and easy-to-store option.
The three 40W panels are efficient monocrystalline panels with MC4 connectors that connect to the charge controller.
With a built-in bypass like this, you can connect the panel directly to solar generators.
The Acopower 400Wh is a great solar generator to go with this panel.
Acopower has put a 10A charge controller on this solar kit, which also has two USB ports.
This lets you charge devices like phones, tablets, lights, and speakers directly from the solar charge controller.
Even though it’s a flexible solar charger, Acopower has put a kickstand on it so you can tilt the panels as needed to improve the charging efficiency when the sun is low on the horizon.
You can put it on the ground, hang it up, or use the built-in stand.
See Also: How We Store & Transfer Extra Water To Our RV When Camping
It’s not the kind of panel you leave out when it’s raining, and the charge controller is not waterproof.
But since it only takes a couple of seconds to set it up or fold it up, that’s not a dealbreaker.
To plug this solar panel into a prewired camper, you can use the included SAE cable if you have a Zamp solar port, although you might need a 25ft SAE to SAE extension cable.
Make sure the polarity is correct (positive to positive, negative to negative) and use the reverse polarity adapter included with the extension cable if needed.
If you have a Furrion solar port, the Acopower Sae to Furrion (click to view on Amazon) is the correct adapter.
To extend the cable, you can use the SAE extension cable I mention above.
To charge RV/12V batteries, you use the included SAE to Alligator clips included with the solar charger.
Connect the red clip to the positive terminal on your battery, and the black clip to the negative terminal.
It’s recommended to connect the charge controller to the battery before you connect the solar panel.
On the back of the panel, there is a built-in bag where you can store your cables. There is also a handle to make the kit easier to carry.
Overall, the ACOPOWER 120W Suitcase is an excellent portable solar charger.
The details are what make this an impressive and complete solar panel.
PROS
- 120W solar power
- Monocrystalline panels
- Stand
- Bag to store cables in
- Handle
- 10A charge controller with USB ports
- Built-in bypass for solar generators
- Lightweight
CONS
- Not waterproof
5. Renogy 200 Watt Eclipse
Last up, the big brother to the Renogy Eclipse 100W panel kit.
This is a 200W kit with two 100W monocrystalline panels. High quality and efficiency.
The charge controller called Voyager is the same waterproof model we saw on the Eclipse 100W above.
It will let you know the battery voltage, how many amps you’re currently bringing into your battery, and has temperature and battery voltage sensors for easy monitoring.
It comes with a rugged carrying case to protect the panels during transport, and the panels themselves lock with latches when folded for easy carrying and safe storage.
Plastic protectors on the edges protect the panels even more during transport, and will also take the biggest hit if the panels ever were to fall over.
Related Post: How To Find Nearby RV Dump Stations & Fresh Water Fill-up
An aluminum frame and stand will keep the suitcase relatively light at 36 lbs.
Much lighter than the Acopower above with the same wattage.
The adjustable legs make it easy to follow the sun during the morning, day, and night to keep the charging efficiency high.
Connecting the charge controller to your RV battery is easy with the included alligator clips and 10 feet of wiring.
The Renogy 200 Watt Eclipse is my top pick this year for portable solar panels.
It comes with everything you need in a plug and play system to keep your RV batteries at a healthy level of charge as long as the sun is up.
Add a 100ah AGM battery and an inverter and you’ve got yourself a sweet solar setup.
If you feel like it’s too much money, you can always do a DIY system.
It’s not as hard as it might look and I will help you build one down below.
PROS
- 200W
- Adjustable stand
- Waterproof 20A charge controller with 4-stage charging
- Temperature and voltage sensor
- 10 feet wiring
- Rugged carrying bag
- Robust handle
- Monocrystalline panels
CONS
- Should include extension cord for this price
Conclusion And Portable Solar Panel Recommendations
If you’re not sure about how many watts and panels you need, you should read through what to consider and the frequently asked questions below.
The best option for you is the one that fits your needs, no more and no less.
See Also: The New EcoFlow Delta 2 Tested & Reviewed
I always recommend getting more solar than you need though, as you won’t have perfect sunny conditions every day of the year.
Some days you’re going to have to use the power you generated a day or two before, and some days you might be able to generate energy for an hour before a storm comes in.
Now, here are my solar panel recommendations.
Most Versatile: ACOPOWER 120W Portable Foldable Suitcase
The Acopower is not only lightweight and portable, but it’s also powerful with a total of 120W solar panels.
It has a kickstand, a charge controller with USB ports, a bag to store cables in, a handle, and a built-in bypass so you can charge solar generators/power stations with it.
I’m impressed and applaud Acopower for the thought they’ve put into this solar panel. It’s exactly what a boondocker needs.
Best For Charging RV Batteries: Renogy 200 Watt Eclipse
I wouldn’t go any higher than 200W with portable panels.
If you need more, I recommend mounting them onto your RV or van roof, for practical reasons.
But if you’re looking for the best portable panel to put outside your vehicle to charge your 12V batteries within hours, this is it.
With 200W monocrystalline panels, adjustable legs, a waterproof charge controller, and a great rugged carrying case, it’s the best plug-and-play system on the market today.
Note that it’s also available in a 100W kit.
What To Consider When Buying Solar Panels
When shopping for a portable solar panel there are a few things to consider. Let’s name a few.
Watts
Each of us uses a different amount of energy every day.
How many watts you need depends on what you plan on running on the battery and for how long.
If you’re only running 12V lights and the bathroom fan for an hour a day, I can almost guarantee that 100 watts will be enough for you.
If you have a 12V tv that you plan on watching every day, at least 200 watts is recommended.
Those are extremely general guidelines and there are so many factors that play into whether 100 or 200 watts is enough for you.
In the end, it’s about how many hours of the day the solar panel can generate energy to charge your battery.
A 200W panel won’t be any more useful than a 100W panel on a completely cloudy winter day.
Weight
If you travel a lot and would have to pack the panel in and out several times a week, weight becomes important.
If you leave the panel out for a week, maybe not so much.
I know people often get surprised at how heavy solar panels are, so before you buy anything, check how many pounds you’re going to have to deal with on a daily or weekly basis.
Related: RV Truck & Trailer Towing Capacity – How Much Can I Tow?
Cord Length
If you often park in the shade, you’re going to need a longer cable to reach your battery.
The longer the cable, the more power loss in DC power though, so try to have a short wire as possible going from the solar panel to the charge controller and onto the 12V battery.
DIY Solar Setup
If you ever go on forums to look for opinions on portable solar panels, you’ll probably run into somebody that says: “Just build your own solar panel system, much cheaper.”
While it’s true that you sometimes can build your own system for a lower price than buying a plug-and-play system, it does take some learning and understanding of how to put the pieces together if you do it yourself.
Buying a plug-and-play system is, in my opinion, a great option that might cost extra but will save you time if you’re totally new to solar.
Not only do you have to learn how to put the panels, cables, and solar charge controller together, you will have to build your own stand, corner protectors, and stitch together a carrying bag to protect your panels during transport.
Not everybody has the free time or will power to do this.
I went out to find the easiest DIY system to put together to save at least some of the money from a plug-and-play system, and this is what I would do:
Panels (100% Necessary): I recommend going with 100W 12V monocrystalline panels. The lighter, the better. I recommend the Renogy 100 Watt 12 Volt Monocrystalline Solar Panel (Compact Design).
You can buy as many panels as you need but the charge controller I recommend below has a max of 260W input at 12V, so I recommend two panels.
If you want more panels you have to buy a solar charge controller that can handle the amp input all the panels will put out together if they’re wired in parallel.
You would also have to consider how many amps the panels are going to be outputting and use the right wire gauge.
To understand parallel vs series, check out the frequently asked question section.
Solar Charge Controller (100% Necessary): The solar charge controller will regulate the amount of voltage being transferred to your RV battery and is a necessary part of a safe solar system.
With two panels, a 20A solar charger will do the job. Like the .
The Renogy Voyager 20A solar charge controller is a 4-stage PWM model compatible with Gel, AGM, lithium, and flooded batteries.
It does not include the cables required to connect your solar panel and 12V battery, so that’s something we need to purchase.
I recommend buying two pairs of the Renogy Adaptor Kits (click to view on Amazon). Both of them will be connected to the charge controller.
They’re sold in different lengths, so you should buy the appropriate length for your installation. If the solar panel is going to be up on a roof and the charge controller in a storage compartment next to the battery, you should get a long cable for the panel and a short one for the battery.
Then you should decide whether you want to be able to quickly connect and disconnect the charge controller from the battery, or if you want it to be a more permanent installation.
For a quicker connection, use battery clamps like the Renogy MC4 to alligator clips (click to view on Amazon).
For a more permanent install, use 10 gauge tray cable (click to view on Amazon).
Stand (Not 100% Necessary): You can use a 5-gallon bucket as a stand to lean your panel on. But if you want adjustable legs there are stands for sale.
I recommend the Adjustable Solar Panel Mount (click to view on Amazon) by Link Solar.
These fit the Renogy 100W panel I recommended and will let you adjust the angle your panels are sitting at.
Fuses (100% Necessary): A very important thing when dealing with electricity is fuses.
I recommend having an inline fuse between both the connection between the solar panel and the charge controller, and the connection between the charge controller and the batteries.
Cables, Connectors (Necessary Depending On Use): There are a couple of cables and connectors we can use depending on your needs.
Renogy MC4 Y Branch Connectors – These will let you connect two panels together in parallel so if you plan on having at least two panels, this will be necessary.
If the cable coming from the solar charge controller isn’t long enough to reach your 12V battery, this is the kind of cable you’ll need.
WindyNation MC4 Extension Cable – If you want the solar charge controller sitting by the battery instead of behind the solar panels, you can use an MC4 extension cable like this to be able to put the solar panels further away.
There are several lengths to choose from.

How to connect the parts above
1. Connect Charge Controller to Battery
The first thing we need to do is connect the charge controller to the battery.
To be able to use the charge controller we must make sure that we have a sealed, gel, lithium, or flooded kind of battery.
The label on the battery should tell you what kind it is.
You must set what kind of battery you have on the charge controller so it can charge and protect your specific kind of battery. Read the product manual on how to do this.
It has to be connected to a battery before you can change it, and it’s okay to connect it before changing it since the solar panel isn’t connected yet.
Start by connecting the Renogy adapter kit wires to the charge controller. All you need is a screwdriver.
On the bottom/back of the charge controller you will see four places to connect wires. Two for the solar panel and two for the battery. One is positive (+) and one is negative (-).
RED is POSITIVE. BLACK is NEGATIVE. Never connect the red to the negative.
If you went with the more permanent solution and bought the cable with battery terminal rings on it, there won’t be any MC4 connectors and you can simply connect the red cable to the positive and the black to the negative.
If the plan is to use battery clamps: Starting with the battery side, connect the MC4 to wire cable that has a male MC4 connector on one end to the positive (+) . Then the MC4 to wire cable with a female MC4 connector to the negative (-). Use the screwdriver to loosen and tighten the screw to secure the cables.
Now there should be an MC4 male connector on the positive battery side, and an MC4 female connector on the negative battery side. That will make it possible to connect the Renogy alligator clamps.
The positive cable from the charge controller should be able to plug into the positive female connector on the clamp adapter.
Connect the alligator clips to your 12V or 24V battery, starting with the red positive clamp. The charge controller should turn on, and you should be able to set the battery type.
Next up, the solar panel. Connect the other pair of adapter kits to the solar side of the charge controller.
The positive side needs to have the MC4 female connector on this one, so it will the opposite of the battery connection you just made. The reason for that is that the MC4 male connector from the solar panel is positive, so it needs to meet a positive female connector.
Positive will still end up with positive and you should be able to follow it from the panel, to the charge controller, to the battery.
When both cables have been connected to the charge controller, you’re ready to connect the solar panel.

2. Connect Charge Controller To Panel
Connect the solar panels to the charge controller. If you only have one panel this is done quickly through the MC4 connectors.
I recommend placing a Renogy 20A in-line fuse (click to view on Amazon) in the positive connection between the panel and controller.
Positive to positive, negative to negative. If you have two panels, you’re going to need to connect them in parallel with Renogy MC4 Y Branch Connectors.
A parallel connection means that you have all positive wires connected to each other, and all negative connected to each other.
So you will take the positive connection from each solar panel, plug it into the MC4 Y Branch Connector, then plug that connector into the MC4 coming from the solar charge controller.
Then do the same with the negative wires. What this does is that it keeps the voltage the same, but the amps add up.
So if you have two 12V panels rated at 5 Amps in a parallel connection, they will output 12V (more like 18V) and 10 Amps.
Positive to positive, negative to negative. Red is positive. Black is negative.
3. Place your solar panels in the sun and start generating power!
That is essentially the most basic setup that you could do on your own.
From there, you can buy an inverter like the Power TechOn 600W Pure Sine Wave Inverter and put it in your RV so you can run regular 120V AC appliances.
There would be another fuse here between the batteries and the inverter.
Frequently Asked Questions About Solar Power And Solar Panels
How much solar power do I need?
To know how many solar panels we need to have to be able to use the appliances we do daily, we need to know how much energy they consume.
I recommend getting something like the Poniie PN2000 Plug-in Kilowatt Electricity Usage Monitor.
You can plug your appliances into this and see exactly how many watts it uses. Its max is around 1900 Watts though so don’t plug your RV into it and start the air conditioner.
When you know the watts, make a table with each item that uses electricity in the trailer.
It will be easier to know how long an appliance can run on the 12V battery if we turn those watts into amps.
Take the watts, divide it by 12, and that’s the amps.
For example, if your microwave is rated at 900 watts, it uses 75 amps per hour to run (900/12).
Let’s say you have a 12V battery with 100AH capacity.
We can fit 75 in 100 at least once, so if you have a 100AH battery and want to run the microwave through an inverter, you’ll be able to run the microwave for at least an hour before the battery is dead.
An inverter uses some amps when it turns DC into AC though, and it also uses energy so don’t expect the microwave to run 1.3 hours just because 75 fits in 100 1.3 times.
It’s good to overestimate how many amps an appliance uses, rather than underestimating.
See Also: How Long Will An RV Battery Run The Furnace? + Calculations
If you would rather look at the appliance to figure out amps instead of using an electricity usage monitor, we need to know if it’s a 12V or 120V item.
If it’s 12V, like the water pump in your RV, we can write down the amps it says on the pump without changing them.
If it’s 120V, like a laptop charger, we’ll take the amps and multiply it by 10. So a 120V appliance rated at 2 amps would be 2*10=20 amps.
If it tells you watts it doesn’t matter if it’s a 12V or 120V, we’ll just divide it by 12 as we did with the microwave above.
The sucky part with batteries and Amp Hours is that you should never run a battery to 0%.
Most deep cycle batteries should only go to a 50% state of charge before being recharged, or you’ll shorten their life.
Lithium batteries are better in that sense and can often be run down to 20% without hurting the battery. Ask the manufacturer of the battery what they recommend to be sure.
For example, if you have a 100AH Deep Cycle Battery, never use more than 50AH before charging it up again.
If you have no idea how many amp hours your battery has, we can figure it out as long as we have access to the Battery Reserve Capacity.
This number is sometimes written on the label of the battery, and if it isn’t, there should be a model number.
If you Google that number and find the exact battery on the manufacturer’s website or a store you might be able to find the Reserve Capacity (RC) in the specifications.
If you find several Reserve Capacity numbers, look for the one that says minutes @ 25 amps. What we’re going to do with that number is divide it by 2.4.
So if it says in the specifications that the battery has 120 minutes of RC (Reserve Capacity) at 25 amps, we’ll take 120/2.4=50. That means it’s a 50AH battery.
Now let’s say that we want to watch TV in the RV, and we have a TV that says on the back that it uses 60 watts.
We’ll start by dividing that by 12 to know the amps, 60/12=5 amps per hour.
If we know that we have a 100AH battery and can safely use 50AH of that, let’s see how many hours we can watch TV.
50 (how many amp hours we can safely use in our battery) divided by 5 (how many amps our TV uses per hour) equals 10.
So 10 hours of TV-watching, right? Well, unfortunately, as I earlier stated, an inverter isn’t 100% efficient when it turns DC (our 12V battery power) into AC (household plug, what our tv uses).
It’s more realistic to assume 80% efficiency. We’ll take the 10 and multiply it by 0.8 (80% efficiency) and end up with 8 hours.
So what we learned from all of this is that we can watch a 60W TV for 8 hours with a 50AH battery if we’re using an inverter with 80% efficiency.
Without an inverter, we can’t run the 120V TV unless we’re connected to shore power or a generator.
You can use 12V TVs wired to the 12V battery without an inverter.
I have written a post about the best 12v TVs for RVs that you can find by clicking here.
I recommend investing in a big battery before spending a lot of money on solar panels. The more power we can store and use for rainy days, the better.
Now that we’ve gotten a basic understanding of amp hours, let’s look at the table I have made for my needs:
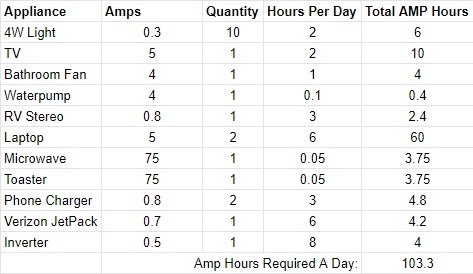
The total amp hours found in the furthest right column is found by taking amps x quantity x hours per day.
For example, on the first 4W light in the table, the calculation is 0.3*10*2=6.
My very rough estimate is that I need 103.3 amp hours a day to live the way I want in the RV.
If I don’t have a lithium battery and want to keep my batteries at 50%+, I’m going to need a battery with at least 206.6AH of capacity (103.3*2).
If I buy the NP6-225Ah 6V 225Ah AGM 2pcs and wire them in series to make them 12V, I will have 112.5 usable amp hours.
Now, back to the question about how much solar power I need. A good 100W solar panel like the Newpowa 100 Watt Monocrystalline generates about 5 to 5.82 amps in good sunlight.
So now we must need how many hours of sun we get, here’s a picture of the average sun hours a day for the lower 48 states.

I’m in Utah, so the average is 5 hours. If I had one solar panel pulling in 5 amps, 5 hours a day, my panel would generate 25 amps (5*5).
But I need to generate at least 103 amps a day as we calculated above.
So let’s say I have 4 solar panels equaling 400W. They should be able to generate 20 amps an hour to my batteries (5*4), and if they get 5 hours of sun per day, that’s 100 amps (20*5).
A little bit closer to what I need. I will add a fifth panel since my solar charge controller and inverter isn’t 100% efficient.
That way I will generate 25 amps per hour and 125 amps per day.
There will always be cloudy days when I won’t get another 125 amps in my battery, but that’s the way it goes when you rely on solar power.
By having more than I need, clouds won’t hurt me as much.
To conclude, five 100W panels will bring in 125 amps per day in great sunshine to charge my 225AH battery of which 112.5 are safe to use before my battery goes under 50%.
If I use 100 amps a day I better hope I won’t get any cloudy days.
If I see that the forecast says rain for the next four days, it would be smart to charge up my battery on the last sunny day and only use about 20-30 amps a day so I don’t run out of juice before the sun comes back.
How much my panels can actually generate depends on several factors, but I will talk about that in a question below about how long it takes to charge an RV battery with solar.
How long will it take to charge my RV battery with solar panels?
How long it will take to charge your RV battery with solar depends on several factors, let’s name a few:
- Battery Size – How long it takes to charge your specific 12V battery depends on how big the battery is in Amp Hours.
- Solar Panels – How many solar panels you have and how efficient they are will determine how long it takes to charge your battery.
- Charge Controller – Do you have a PWM or MPPT charge controller? MPPT is more efficient and will bring in more amps in worse conditions like early morning/late afternoon and in the winter.
- Weather – A solar panel rated at 5 amps might only generate 0.5 amps when it’s cloudy. It can be a mistake to do a calculation based on perfect conditions because you won’t have 365 sunny days every year. It also matters if it’s summer or winter. The sun is lower on the horizon in the winter, so it will be harder for the solar panels to generate their max amperage.
Remember that these factors play into how long it will take to charge your RV battery. But let’s do a rough estimate.
Let’s say that this is my setup:
100AH 12V Battery
200W 12V Solar Panels Wired In Parallel
I wake up at 8 am with my batteries at 50%, at 10 am I put my solar panels in the sun and it’s sunny all day until 3 pm, so my panels got five hours of sun.
My panels generate 5 amps each per hour, so 10 amps together each hour, equaling 50 amps after five hours.
Since my 100AH battery was at 50% I needed 50 amps to recharge it, and that’s exactly what I got. So it took five hours to recharge my battery from 50% to 100%.
The real world isn’t perfect though, and there are more factors to it than the size of the battery and the solar panel.
See Also: How To Install Solar Panel On RV Roof & Connect To Battery
I recommend adding an hour or two to the charging time for a more realistic number to count in for inefficiency, and the different charging stages that control how fast the battery charges.
At higher temperatures in the summer, batteries self-discharge at a higher rate than when they’re cold, which will also play in when calculating charging times.
On the other hand, when the batteries are cold and in low temperatures, the total battery capacity is reduced.
The battery capacity of an AGM battery can be substantially different in cold weather.
Do solar panels work at all when it’s cloudy?
It depends. What time of the year is it? Do you have an MPPT charge controller?
Are your panels angled directly towards the sun behind the clouds? Are your panels monocrystalline and high-quality?
Using an MPPT charge controller will increase the chances of generating a couple of amps when it’s cloudy.
Sometimes if it’s really cloudy you won’t generate any power at all.
How do I get the most out of my solar panels?
- Keep them clean – If they’re on your roof, remember to clean them. If a storm comes through and it suddenly takes longer to charge your batteries, you might just have to clean them with some glass cleaner.
- Angle – Especially important during the winter months. Tilt your panels so they face the sun.
- Kind of charge controller – By using an MPPT charge controller you will usually generate more amperage when the sun is weaker. Like in early mornings and late afternoons, winter months, and when it’s cloudy.
- Monitor your system – By monitoring your system you will learn what generates the most amps. Tilt your panels and experiment to see which angle works the best in the winter or late afternoons.
Do solar panels work in the winter?
They do, but fewer hours from a sun lower on the horizon will make it harder for your panels to generate energy.
Tilting your panels and using an MPPT charge controller are two ways to improve the number of amps you can generate in a day.
Related: BougeRV MPPT Solar Charge Controller – Worth It Over PWM?
Are solar panels better than generators?
Better for your wallet? No. Better for the environment? In the long run, yes.
Buying a solar system is something you do to leave a smaller footprint on the earth.
Producing your own clean energy feels great, and it’s also more peaceful when you’re camping because you won’t have to listen to a loud generator (unless your neighbor has one).
Solar panels are an investment that will cost you, and buying a generator is much cheaper even if you have to spend money on gas or propane, that’s just a fact.
Hopefully, it will change in the future to where solar systems can compete more in terms of cost.
What is a solar charge controller and do I need one?
Yes, you do need one. A charge controller will regulate the voltage to your batteries to protect them from overcharging.
Even though a solar panel might be 12v, it will often put out between 16 to 20 volts when the sun is out.
If a solar charge controller isn’t there to regulate the voltage going into your battery, it could damage it.
Solar charge controllers have a neat function that prevents reverse-current flow.
Without them, electricity could actually flow back from the battery to your panels and waste power.
The way it works is that the charge controller opens the circuit when it senses voltage from the solar panels, and stops it when there is nothing to gain.
There are different kinds of charge controllers, but the most popular kinds when it comes to solar are PWM and MPPT.
PWM, short for pulse width modulation) is cheaper than MPPT but less efficient at around 70-80% efficiency.
PWM controllers will take the voltage coming from your panel and turn it into 12V to safely charge your battery and avoid overcharging.
MPPT, short for maximum power point tracking, costs more than PWM but are more efficient with 90-98% efficiency.
MPPT controllers take the excess voltage and turn it into amperage, instead of wasting it like PWM controllers.
They also allow higher voltages through the wires, resulting in reduced power loss.
So is it worth the cost for 10-20% more efficiency? I would argue that it depends on how big your solar system is.
If you have 1000W worth of solar panels it can be worth it since the 20% increase would be a lot of amps per hour.
PWM controllers are only available in sizes up to 60 amps, while MPPT goes up to 80 amps, so if you have a really big system it might be your only option.
If you only have one 100W solar panel, then I would spend that money on another panel or a bigger battery.
All the portable solar panel kits we looked at in this post today come with PWM charge controllers so there’s no need for any additional purchases.
A feature often found on solar charge controllers is 3 or 4 stage charging.
These are different stages that charge your battery in specific ways to prolong life and protect your battery.
It’s important to set the settings of these stages depending on what kind of battery you have.
If your charge controller is capable of 4-stage charging you should read the manual of both the charge controller and the battery to be able to set the right values to keep your battery charged safely.
The 4 most common stages are:
Bulk – Often the first stage of charging your battery. When your battery is under 80% state of charge and the sun is hitting your panels or a generator is turned on, the bulk stage tries to put as much amperage as possible into your batteries.
Absorb – When a battery reaches around 80% state of charge, the absorb stage comes into play. Now the batteries will stay at a preprogrammed voltage and the amperage coming in from your solar panels will reduce.
The absorption stage helps retain the energy the panels generated during the bulk stage. When the absorption stage is completed, the battery is fully charged.
Float – When the charge is complete, we enter the float stage. Now the voltage is dropped further to a preset value so setting the right value for your battery here is critical.
Equalization – The goal of the equalization stage is to equally charge every single cell in the battery to the exact charge, basically a controlled overcharge.
Does a charge controller charge my batteries any different from the built-in converter charger in my RV?
The converter that came with your RV is most likely a “dumb” charger with only one stage, the bulk stage.
This won’t fully charge your battery to 100% and have the other stages that can make your battery last longer.
Look in the manual you received with your RV to learn how many stages your specific converter has.
It might be smart to upgrade the converter if it’s one stage and you’re spending money on big batteries.
A lot of inverters nowadays come with a built-in smart converter charger with 3 or 4 stage charging.
How do I connect a solar panel to my RV battery?
Your solar panel will be connected to a solar charge controller, and the charge controller will be connected to your battery.
Read above about why you need a charge controller and the purpose it has.
Connecting the charge controller to the battery can be done in different ways, both “permanent” and temporary ways.
Standard ring terminals are the more permanent way since bolts will be sitting on top to hold the terminals fastened and connected.
A temporary way can be alligator clips like the clamps you probably have seen on jumper cables.
For portable solar panels, alligator clips are the way to go since you can connect them so easily.
If you have solar panels on your RV roof and don’t have to disconnect your cables every other day, ring terminals will be the better solution.
When connecting any cables to your RV battery, remember that RED is POSITIVE. BLACK is NEGATIVE.
See Aslo: How To Install Solar Panel On RV Roof & Connect To Battery
How do I know how charged my RV battery is? Percentage?
Manufacturers really do a crappy job when it comes to helping you monitor your RV battery.
The high-end brands are starting to get better, but most trailers come with a 0 – 25 – 50 – 100% monitoring screen.
Push a button, and we will let you know. The problem is that this value isn’t accurate at all.
Some solar charge controllers have a screen with features and on some models, it will tell you the battery voltage. Unfortunately, these aren’t 100% correct either.
The best way to know the state of charge of your battery is with a battery monitoring system.
It’s done with a shunt hardwired to the battery. A popular option is the Victron BMV-700 Battery Monitor.
The monitor can be put in your RV and once you’ve set how big your battery bank is in total amp hours, it will give you a percentage.
It will also tell you the current voltage and how many amps you’re consuming at the moment.
If you do know the voltage and believe it’s somewhat accurate, here are some general guidelines for a 12V AGM and wet cell battery based on voltages and their corresponding state of charge percentage.
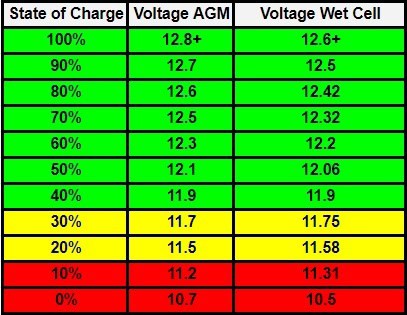
As always with general info, this is a general guideline and you should always read the manual or contact your battery manufacturer to know what is best for your specific 12V battery.
How low can I safely discharge my RV battery?
The safe depth of discharge and usable amp hours depends on what battery type it is.
Most RVs and trailers come with flooded cell batteries installed, and we should never bring those under 50% state of charge.
If you have gone out and bought lithium batteries, you probably know already that they’re usually safe to discharge all the way down to 20% without the risk of damaging them.
Now, will you kill the batteries completely if you go to 10%?
No, but if you want the batteries to last longer and not have to buy new batteries every year it’s smart to not discharge them under 50% or 20% with lithium.
Again, these are general guidelines and you should read the manual or contact the battery manufacturer to get the exact recommended safe discharge voltage and percentage for yours.
What is the best 12V battery for RVs?
I recommend watching this video (less than 10 minutes) about the different lead-acid battery types often used in RVs and what each of them does good and bad.
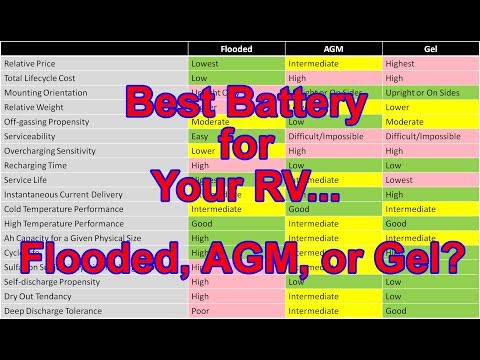
What is not talked about in the video is lithium batteries which are becoming more and more popular, although at a much higher cost than flooded, AGM, and cell.
If you plan on living full-time in your RV it can definitely be worth the investment. I recommend purchasing 12V lithium batteries from reputable companies like Battle Born or Renogy.
Click here to see Battle Borns 100AH 12V Lithium on Amazon or Click here to see Renogy 100AH 12V Lithium on Amazon.
Both of these are “drop-and-replacement” which means that they’re extremely easy to install on RVs.
You should, however, make sure that the converter charger in your RV supports lithium batteries.
See Also: Best Deep Cycle RV Battery (AGM, SLA, 12V, 6V)
Parallel Vs Series?
You can wire both solar panels and batteries in parallel or series.
When you do combine several panels you need to make sure that the wire you use is thick enough to handle the extra amperage and voltage.
In a series connection, the positive wire from one panel is connected to the negative wire from a second panel, and so on.
In a parallel connection, each positive wire meets with a so-called Mc4 Y branch and is separate from each negative wire.
So what difference does it make? In series, the voltage will add up while the amps stay the same.
Meaning that if you have two 12V solar panels outputting 18V and 5 amps each, in series they will put out 36V at 5 amps.
In the parallel connection, the voltage stays the same while the amps add up.
So our two 12V solar panels generating 5 amps each would still output 18V, but 10 amps.
So which one should you use? It depends on what type of solar charge controller you have and what it’s rated for.
Some charge controllers can’t handle more than 10A (120W input), so you need to figure out what your specific charge controller can handle and what’s safe to connect.
What is the difference between solar panel types (Poly vs. Mono)?
Both monocrystalline and polycrystalline have their pros and cons.
Monocrystalline panels are more expensive than polycrystalline but have a higher efficiency rate.
On average 15-20% versus poly 13-16%. Monocrystalline panels are also more space-efficient, meaning that it takes less space to generate the same amount of power as poly.
Polycrystalline panels cost less to make, which turns into a lower cost to you.
They don’t handle heat as well as monocrystalline and can perform slightly worse in high temperatures.
I recommend monocrystalline panels for their efficiency and reliability.
Can I use the electrical outlets in my RV if I have solar panels?
To use the electrical outlets in your RV, the outlets must be getting power from somewhere.
If you’re connected to shore power, that’s how your outlets get power.
Solar panels can not directly deliver power to your outlets since they generate 12V DC power to your battery and your outlets are 120V AC power.
To use the energy that the solar panels have generated for our batteries, we’re going to need an inverter.
An inverter turns DC into AC, and if wired to your AC panel, it can power your AC outlets.
Here’s an example of an inverter on Amazon that works great with 12V RV batteries.
I have done my best to explain solar power and how it works with the products surrounding them. Please let me know if you have a question, or if there is something you feel should be corrected or added.
It would be great if we could create a discussion in the comment area and help each other out. Making solar easy to understand isn’t easy, but together we can make it work.
Hi, was wondering if any/all of your solar panel recommendations would work to just keep our 12v battery in our 5th wheel charged while being stored. And, if it’s ok to leave it hooked up and left alone for weeks st a time.
Hello Lori,
While all of the panels in this post would work for that, it would be overkill to use one of them only to trickle charge your batteries. If you don’t plan on using the solar panel when you’re out camping as well, I would recommend something smaller like this 8W trickle charging kit (https://amzn.to/2F1RBYm) that will keep your batteries charged up while your 5th wheel is in storage. These kind of trickle chargers are safe to leave hooked up to your battery unattended.
Hi Jesse,
This is one of the best overviews of solar PV for RV owners. One that I’ll recommend.
I’m a bit surprised, though, about your statement, “I recommend polycrystalline panels,” after your foregoing discussion seems to attribute the cited advantages to the monocrystalline panels.
I’d like to suggest to add, as a rule of thumb, about 2 hours to your charge time calculations to allow for the tapered charging that is necessary to reach close to 100% capacity (although some of that may be accommodated in the fringe hours later in the day when panel output is dwindling). Users who might rely on your examples to calculate panel sizes and never verify the outcome, or who, lacking precise monitoring instruments, just count recharge hours, could be unaware that regularly using 50 % of capacity may cumulatively result in significant undercharging and even battery damage.
Also one should account for some 2% to 12% cycle overhead/inefficiency between charging input and usable output.
I think it is good to keep the explanations and examples as easily understandable as you have stated them. However, an additional paragraph could mention (a) that at higher temperatures (summer heat waves plus inside vehicle) batteries get so hot that their self-discharge is substantially increased. And (b) that at low temperatures capacity is reduced such that one needs to figure about 60% more (AGM) capacity to sustain the same demand around freezing temperatures, about twice as much around -10 and about four times as much around -40 degrees.
Cheers!
Wolf Naegeli, PhD, co-founder (1974) Swiss Society for Solar Energy
Hello Wolf,
First, I would like to thank you for stopping by, reading, and commenting. I really appreciate you taking the time to help me improve the post and clear some things up.
The sentence about polycrystalline panels was an error that went through somehow, thanks for pointing that out!
I’m going to learn more about the suggestions you made to understand them fully and update the post.
Again, thank you very much!
Hi folks,
I am a newbie suv mostly boondocking camper. I am a bit overwhelmed by solar power, but your information makes more sense of it all than other sources. Even with that said, I cannot decide on what i need so i am asking for your help. My main priorities are to run a portable cooler (like: cho Power Sports Portable Freezer Cooler AC/DC Compressor Refrigerator Fridge Trolley Wheels for Truck RV Boat Party Picnic Camping (40 Liter) – Amazon, rechargeable fan (Geek Aire Rechargeable Outdoor High Velocity Floor Fan,10” Portable 7800mAh Battery Operated Fan with Metal Blade,360°Vertical Tilt, 24 h Run Time Cordless Fan for Camping – Amazon), cell phone and laptop.
Hello Cindi, thanks for your comment.
So the solar panel will generate 12V electricity when it’s sunny, but that power has to be stored somewhere for it to be practical. Is the plan to use the batteries in your vehicle?
Based on your needs, I recommend getting a portable power station. The Jackery Explorer 500 (click to view on Amazon) would be one option, but the larger Jackery Explorer 1000 is what I would get to make sure your fridge will keep running even if it’s cloudy for a couple of days.
When you have a power station you can start looking for solar panels to recharge it with. For permanent installs on top of your vehicle, the Renogy 100W solar panels are great. If you’d rather have a portable panel that you take out when needed, the Renogy 100W suitcase is a good one. Both of them would connect to the Jackery via an MC4 to 8mm adapter. To extend the cables, I use Windynation MC4 extension cables.
There are more ways to go about it as well that would be cheaper but more complicated and not as neat, like buying a deep cycle 12V battery, an inverter, a solar panel, and a charge controller.
I get that it can be overwhelming, so let me know if you have any questions about any of this.
Jesse
Thank you for the incredible resources you provide on our site – I am so happy to have discovered The Camping Nerd! We recently purchased an older 23′ RV to enjoy boondocking. We’ve never used solar before but would like to start. The two existing 6v Trojan T-105 batteries need to be replaced and we want to have a relatively simple setup for solar charging for the RV. We’re a bit confused as to whether we should be purchasing replacement batteries that are specifically designed for solar charging, or whether we can use a new pair of standard 6v deep cycle RV batteries to connect to one of the solar panels and charging stations you recommend. Thanks for your advice,
Christy & Greg
Thanks for the kind words!
The Trojan 6v batteries are great, are they damaged or do you plan to make a battery bank larger than 225Ah?
You can definitely replace them with 6V batteries, but if it was me I would replace them with 12V AGM batteries. The main reason for this is that if one battery stops working you won’t be without 12V power. If you do buy 6V batteries, just make sure it’s a battery type supported by the charge controller that comes with the solar panel.
Jenni has written this article regarding the best RV batteries. Let me know if you have any questions.
We appreciate your help – we need to replace the Trojan 6v batteries as they appear to be damaged, not because we need a larger battery bank. We’ll see if there’s a way to fit a 12V AGM and snap-top battery box you recommend in front of our trailer. In order to go solar, it sounds like we need a working battery system (two 6V or a single 12V AGM) and a solar panel like the Renology 100W suitcase solar panel (should we get a 10A or 20A controller w it?) Do we also need a portable power station like the Ecoflow, or does the solar panel connect to the main batteries? Thanks!
With a 100W panel, a 10A charge controller is enough since one 12V 100W panel outputs around 6A.
A portable panel like the Renogy 100W will connect to the batteries via a charge controller and charge your 12V batteries. It will not provide electricity to the outlets in your RV, since the 12V (or 2x6V) batteries only power 12V devices in your RV like the water pump, lights, kitchen/bathroom fan, etc. A power station like the ones from Ecoflow is basically a battery bank with a charge controller and an inverter built-in. The inverter turns the 12V battery power into 120V AC power so you can power household devices and appliances. So if the plan is to just have a solar panel to keep your RV batteries charged you don’t need anything but a solar panel and a charge controller.
That’s great news! We’ll order the battery and portable panel through your links. One more question – we have a small slide-out – will that work off the 12V or should we plan on hand cranking only?
Awesome! Yes, slide outs run on 12V DC power so there is no need to manually extend or retract it as long as your batteries are charged.
Bless and thank both of you for the solar article and service, I will be a new RV class c camper October 10, 2021. I have ordered a 2022 Conquest 6237D. What are your feelings about the Zamp products? I was thinking I would need a 300 – 500 amp system. My older brother has convinced me that with the limited mobility I need to use a portable system as there is no way I’ll be able to climb up on the roof to clean solar panels daily.
My background: I will be camping out in the AZ desert near Rich Hill AZ, North of Phoenix. I will be 70 years old in July, bad knees, weigh 440lbs, very hard to move around, living by myself trying to live a dream of prospecting/metal detecting! My Wife may or may not be coming out. I will leave Central Ohio as soon as RV checks out and not come back till May 2022.
There will not be any public utilities for 95% of the time I camp, so to maximize day count before needing to dump and refill water tanks, gasoline, and propane, I need to maximize my solar usage instead of gasolene and propane!
Can you both give me your thoughts and recommendations!
Hi Randall,
Awesome, I’m excited for you! I have some questions.
Do you know whether your Class C has a solar prep plug or not? It’s usually either a Furrion or a Zamp solar prep port and it’s basically a quick connection to your RV batteries.
If you would rather connect panels directly to your RV batteries there are lots of options, but how big of a panel you need depends on how many amps you’re going to use daily.
What do you plan on using in the RV that runs on 12V DC power?
Thanks for this article… it’s a really terrific run down of options. Well written, and clear for us novices.
I am leaning toward the Renogy 200 watt kit to plug into the side of my travel trailer (it’s a Go Power solar on the side plug)
I’m considering this panel: https://ca.renogy.com/200-watt-12-volt-monocrystalline-solar-suitcase-with-voyager/ but the Renogy website is not clear… it comes with clips for the batter, but do I need to buy an adapter for the SAE plug? Are the battery connectors removable? Unfortunately, Renogy does not seem to answer emails…
Would really appreciate your insight if you know the answer.
Hi Rob,
First I’d like to make sure that the GoPower plug can handle the amperage (11.7A) from the 200W panel. There might be a sticker by the port or a manual that tells you the max amperage.
The way those Renogy panels are wired is like this: Solar panel -> charge controller -> MC4 cables -> optional Battery clamps cable. So you don’t have to use the battery clamps cables, and can use an MC4 to SAE adapter instead. If it has a 20A max you’re good to go, but if it has a 10A max you’ll have to stick to a 100W panel.
The male MC4 connector from the charge controller is a positive wire (check the wiring on the panel to be sure) and the female is negative, so you should look for an adapter with a positive female, like this MC4 to SAE (click to view on Amazon CA).
It’s also important to know how the SAE plug on your camper is wired since not all manufacturers wire them the same way. If you have a multimeter you can check the polarity of the solar plug and make sure that the adapter I linked to is compatible.
If the solar plug has a positive female, just like the adapter above, you could get this adapter instead even though the colors are wrong, or you can simply get an SAE reverse polarity adapter. As long as the positive wire coming out of the charge controller is ending up in the positive end of the solar plug you’re good.
To extend the wiring between the solar panel and the MC4 to SAE adapter, use MC4 extension cables.
Sorry if my answer is confusing, let me know if I can make something more clear.
This is fantastic advice, thank you. I went ahead and ordered what I thought were the necessary adapters and will attempt to wire everything up this week. The adapters also included a secondary adapter to reverse the polarity, in case I need it. I’m sure I’ll be checking back to your explanation once or twice more. Thanks again!
Jenny, can you tell the difference in these, both with the less efficient PWM controllers – is the difference the ‘waterproofing and kickstand’? Price difference is substantial:
Renogy 200 Watt Monocrystalline Foldable Solar Suitcase, 200W Panel-20A Controller – $340
Max Power at STC: 200W
Short Circuit Current: 11.7A
Open Circuit Voltage: 21.8V
Opitmum Operating Current: 10.5A
Optimum Operating Voltage: 18.5V
Operating Temperature: -4℉ ~ 140℉ / -20℃ ~ 60℃
Dimension: 35.6 x 25.9 x 3.1 in
Weight: 35.9 lbs
Renogy 200 Watt Off Grid Portable Foldable Solar Panel Suitcase Built-in Kickstand with Waterproof 20A Charger Controller, 200W-Waterproof – $594
Maximum System Voltage: 600VDC(UL)
Open-Circuit Voltage: 21.2 V
Optimium Operating Voltage: 17.7V
Short-Circuit Current: 11.72A
Optimium Operating Current: 10.35A
Folded Dimension: 41.3 x 21.1 x 3.1 inches
Weight: 33.60 lbs
They both use water resistant charge controllers and have a stand. The difference is that the Renogy Eclipse panels are supposedly more efficient panels. Not worth the much higher cost, in my opinion.
Oh gosh, I think the difference is that the less expensive one isn’t using the ‘eclipse’ solar panels. Both use the same 20amp PWM waterproof controller as far as I can tell.
Jesse, I know I’m probably making you nuts, but I keep coming back to your post. So in the FAQs you talk about doing the conversion from watts to amps (watts/12=amps) to make things easier, but in my newbie mind I’m thinking this only applies if you have an inverter from your house battery(s) to the AC plugs in RV.
If I’m understanding it right, you guys use a ‘Solar Generator’ that has built in inverter and plug it into your RV to use your AC plugs. Do you also have an inverter setup from house battery(s) to AC plugs in RV?
If not, since most if not all the ‘solar generators’ are based in watts how do you calculate this? Does my question even make sense? An example, the 800w kcup coffee pot you mention in another post. If it was used 15 min/day, how would I determine battery draw based on the watts? In amps that would equate to 16.67 amps/day (800/12= 66.27 x .25 (15min/day) = 16.67amps/day for coffee pot.
Well crud, I could just take the watts of ‘solar generator’ and divide by 12 for it’s total amps and then keep everything in amps. Could it be this simple?
I’m happy to help in any way I can, even though I’m not an expert in any way.
We only use solar generators and do not have an external inverter setup.
With solar generators, it’s easiest to just look at the rated watt-hours when comparing them, since the amps and volts differ depending on the manufacturer and batteries used. For example, my Goal Zero Yeti 1000 is rated at 96.8Ah @ 10.8V, while my Explorer 1000 is rated at 46.4Ah @ 21.6V.
That said, there is nothing stopping us from dividing the rated watt-hours by 12 to get an idea of the capacity, especially if you’re comparing it to other 12V batteries or know how many amp-hours you use daily.
With campers that use 12V batteries, it’s easier in my opinion to think in amp-hours since it’s relatively easy to figure out the battery capacity. It would be easy to find the watt-hours too since all it takes is the amp-hours * volts.
Our house battery is rated as a 75Ah 12V battery, which means that it should have about 900 watt-hours. It’s a little more complicated than that though since it depends on discharge rates among other things.
Your example is correct, but if you’re using an inverter I suggest multiplying the 16.67 by 1.105 to take the inverter efficiency into account. So using the 800W coffee maker for 15 min would use about 18.4 amps DC.
The inverter efficiency should be considered when calculating what a solar generator can do and for how long as well, and most companies advertise an 85% efficiency.
Let me know if you have any questions or if I misunderstood any parts of your questions. If somebody spots something inaccurate in my answer I’d appreciate a correction.
Thanks Jesse and sorry for late reply – work life, ugh… Anyway, at this point convinced to buy/build a portable solar generator. Just not sure what we are going to do with our little trailer at this point, so don’t want to spend the money to have someone install an inverter on it. Appreciate your help, I’ve learned a lot!
I have a portable solar panel connected to the batter of my travel trailer. Suddenly the ceiling lights, water pump, awning and slide were not working. I disconnect the solar panel from my battery and now everything works. Do you know why this is happening?
Hi Tina,
What panel do you have and how have you connected it to the battery?
It’s a DOKIO . Connected the clamps directly to the battery.
Ok, sounds like there might be a short. Does the charge controller seem to be working correctly when hooked up to the batteries? As in is it showing the battery voltage, amps produced etc?
All is shows is 9.9 v. I push the little buttons on there and nothing changes. when it’s not connected is reads 12 v
Can you try to connect only the solar charge controller to your battery (if possible) and tell me what the charge controller tells you.
We tested the panel and it is reading correctly.
Not sure what you mean by connecting only the charge controller to the battery. Do you mean by pass the solar panels?
Yes, the screen on the charge controller should tell you some information if you connect only the charge controller to the battery but not the solar panel.
The model is FSP-100M(50W*2)
Hi Jesse I agree with all the above, a great, well written information website. I am looking at solar portable panels for my Aliner Ranger camper trailer. Your site answered many of my concerns however in trying to better understand my electrical system I have two questions that if you could answer would help me going forward. (1)When my Aliner is connected to shore power is it the battery that is being charged and then an inverter changing the DC to AC for use of the AC outlet or is there two separate systems, one charging the 12v battery for DC power and another suppling AC power to the AC outlet ? (2) I want to hook the solar panels with the built in charge controller directly to the battery with alligator clips do I have to disconnect the battery cables that are on of the trailer first or is leaving them on while using the solar panels not a problem? Thank you for any assistance you can provide.
Hi,
1. Your camper has a converter charger that turns AC into DC. Both to charge the camper battery, and to provide power to the 12V system. So technically you don’t need the 12V battery when plugged into shore power.
Shore power reaches the RV distribution panel first. The distribution panel then supplies AC power to the 120V outlets in your camper, and supplies AC power to the converter charger that will power the 12V system and charge the 12V battery.
The 12V battery does not power anything until you’re disconnected from shore power, and when it does it goes through the DC fuses you can see on the same distribution panel.
2. You can leave the charge controller connected to the the 12V battery. It doesn’t matter if you’re plugged in to shore power or not. When you plug it in, the converter charger will just help charge up the 12V battery.
Hope I didn’t make it confusing, please let me know if you have any other questions.
Jesse,
I enjoyed reading your article. It confirmed alot of what I’ve been dealing with. (I installed a 10KW array at my home in GA). I now am retired, have sold that house and travel this country in a Class A RV. I was looking at the Charger/regulator you recommended in your article and want to inform you that Amazon states the following:
“Currently unavailable.
We don’t know when or if this item will be back in stock.”
Do you have an upgrade recomendation?
Joseph
Hi,
Sounds like you’re living the life!
Thanks for letting me know, I have updated the article and replaced it with a different solar charge controller. I have also added instructions on how to connect it to the panel and battery, let me know if you have any questions.
Hi Jesse,
Thank you for this article and other very helpful articles on your site. I especially liked the article on RV fridge issues in propane mode – very well written.
We purchased a Merlin Solar BXD95 panel. As the name implies, it’s a 95 W panel. The weight is only about 8 pounds which we appreciate. They claim the panel is “mil-grade”. So far, it has worked very well. The cost was a bit high though ($380). We use the Merlin Solar MST-TS15 MPPT controller in our setup. Charge power for 12V is 195 W. I believe the controller cost was $100. To connect to our RV battery we use a cool adapter we found online that connects to our trailer’s 7 pin plug. Go Power model GP-PSK-7PIN. I could have made this cable myself but didn’t bother. I also purchased an 8 AWG extension cable for our setup.
So far, it seems our lead acid battery is fully charged in about one hour or so. We switched all of our lights to LED types. We also take quick showers so the water pump and hot water heater are not on much. We don’t have a TV in our camper and we don’t play the stereo much either. We do charge both of our phones. But we were just camping last week here in Maryland and used the furnace a bit. I am curious if you have looked at Merlin Solar or have any comments on our solar setup? Thanks again for your excellent site!
Hi,
Thanks for your comment and sharing your setup, sounds like you’ve figured out what you need and chosen high quality parts.
I haven’t heard about Merlin solar before and I agree that the cost for your 95W panel was quite high. I hope they offer excellent warranty and support for that price, in addition to a great product.