Please note that this is a mod and it will void the warranty. I am not responsible for any damage.
Why Do We Want to Bypass the Solar Charge Controller?
UPDATE 2021: Renogy has released panels with a built-in bypass. For example, the Renogy 200W with kickstand, so you don’t need to add it yourself.
When I was looking for third-party solar panels to go with my Goal Zero Yeti 1000X (click to view on Amazon), I found the Renogy 100 Watt Suitcase solar panels (click to view on Amazon).
It’s two 50 watt panels connected that folds and stores easily in an included bag.
They’re a great option when you want portability and not a permanent solar install.
The Renogy 100W Suitcase is sold both with and without a charge controller.
I bought one of each. The charge controller included is the Renogy Voyager (click to view on Amazon), a 12V controller that can handle up to 20A.
Related Product: If you want a portable solar panel to recharge both 12V batteries and a power station/solar generator, I recommend taking a look at the Acopower 100W portable solar panel kit (click to view on Amazon) which has a built-in bypass.
Why Get A Solar Panel With A Charge Controller?
So why did I buy one with and one without?
Because I wanted to be able to use both panels with my Yeti 1000 but also my 12V RV battery. The panels come with alligator clips, ready for a quick connection to an RV battery.
To connect them to a Yeti power station, however, we want to bypass the solar charge controller since there is already a controller built into the Yeti.
See Also: How To Connect Third-Party Solar Panels To Goal Zero Yeti
This is what I ended up doing.
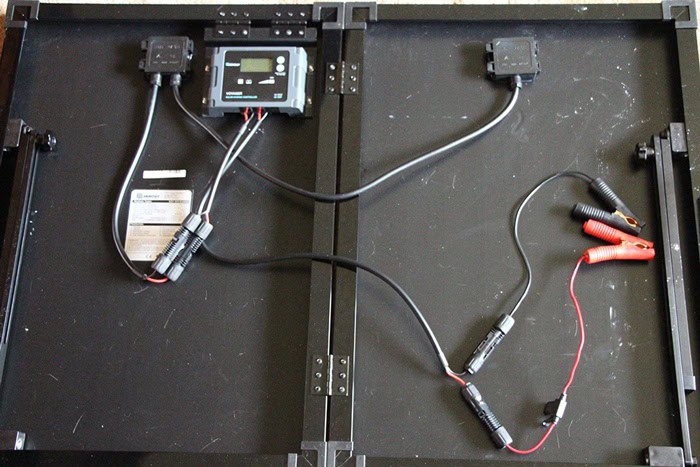
In the picture above, it’s ready to be connected to a 12V RV battery.
Note that in the image above I have also cut the alligator clips shorter to be able to make an extension cable out of the alligator cable.
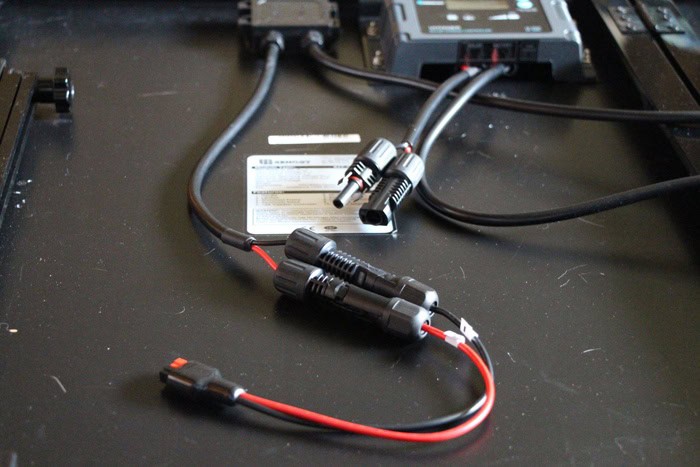
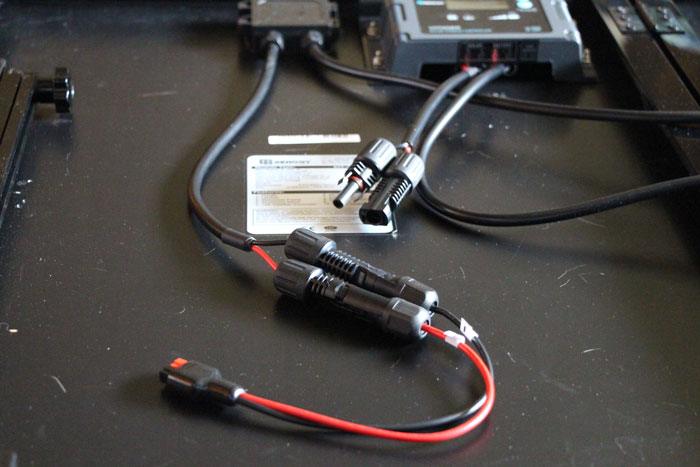
When I want to connect it to my Yeti 1000, it looks like in the next picture below (except I use an extra extension cable in between to reach the Yeti).
How To Bypass The Solar Charge Controller
The main thing I have done as seen in the pictures above is to add MC4 connectors between the conjunction box on the left solar panel and the charge controller.
By doing so, I can easily connect and disconnect the panels from the charge controller.
What You’ll Need
- MC4 Kit (click to view on Amazon) – This is a kit that comes with a wire stripper, a crimper tool, and 5 pairs of MC4 connectors. If you already have a wire stripper there are other kits that only include the crimper.
- Box cutter/Pocket knife – To remove the protection on the cables before we strip them.
How It Looks Out Of The Box
Before we get started, I want you to understand how the panels are set up with the charge controller when it’s shipped by Renogy. It is as follows:
- The right solar panel is connected with one cable to the left panel. This wire has both a positive and a negative. It goes into the conjunction box. We’re not going to mess with this wire at all.
- In the conjunction box, the left panel and the right panel are connected in parallel.
- One cable comes out of the conjunction box and goes into the solar charge controller. Note that the positive (red) wire goes into the + connection on the charge controller input with a picture of a solar panel. The negative (black) cable goes into the – input.
- From the solar charge controller, a cable with two MC4 connectors on the end comes out. As with the solar cord, the positive is red, and the black is negative.
- These MC4 connectors can then be connected to the included alligator clips. They only fit one way, but always make sure you connect positive to positive and negative to negative.
Bypassing The Renogy Solar Charge Controller
Now that we know how it’s all connected before we mess with it, let’s get started.
Step 1
One quick way to do this would be to cut the current wire between the solar panel and the charge controller, then install MC4 connectors.
However, I felt like there wasn’t enough cable between the panel and the controller to where I could do this without putting a lot of strain on the cable each time I connected/disconnected it.
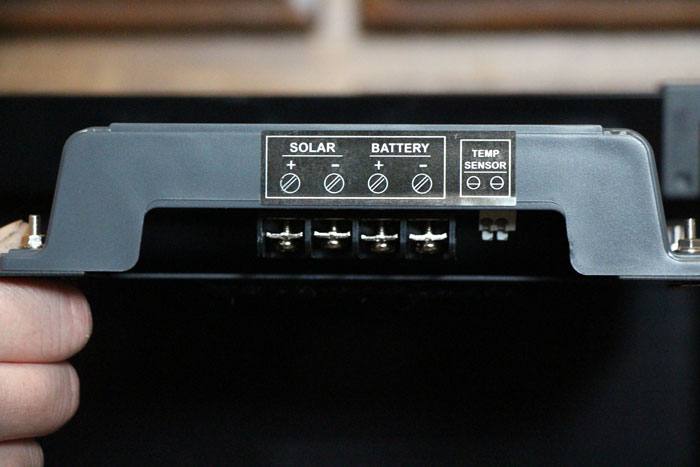
I removed both connections going into the solar charge controller first.
To do this, lift the weather protection piece and unscrew the screw on the back until the cables can be pulled out.
Step 2
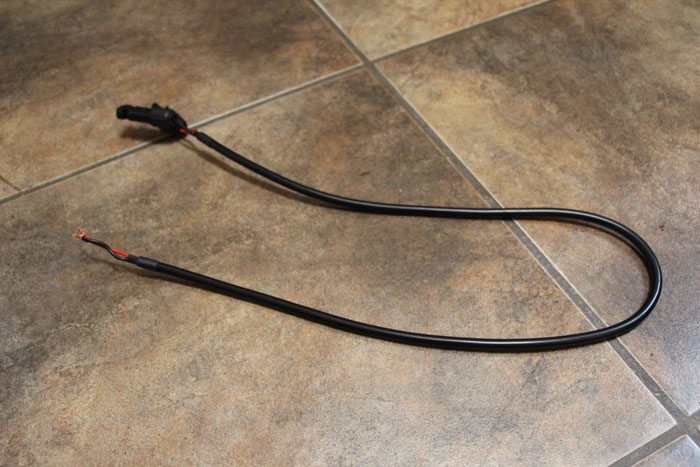
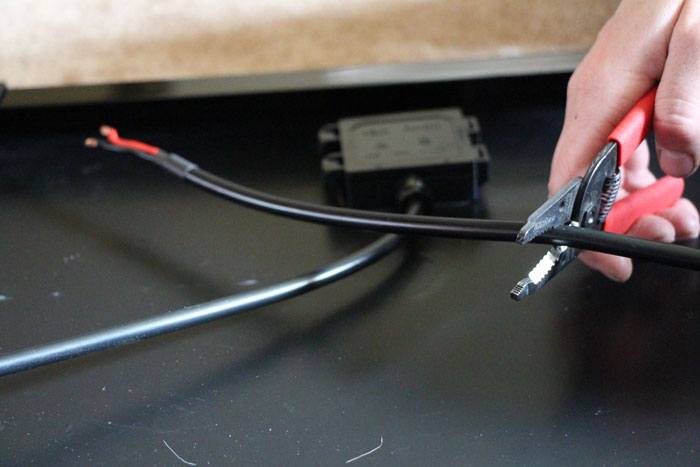
Then I cut the cable I took out of the charge controller with MC4 connectors on the end. I cut off about 7 inches.
Step 3
Now we have to get access to the positive and negative wire on the cables we just split.
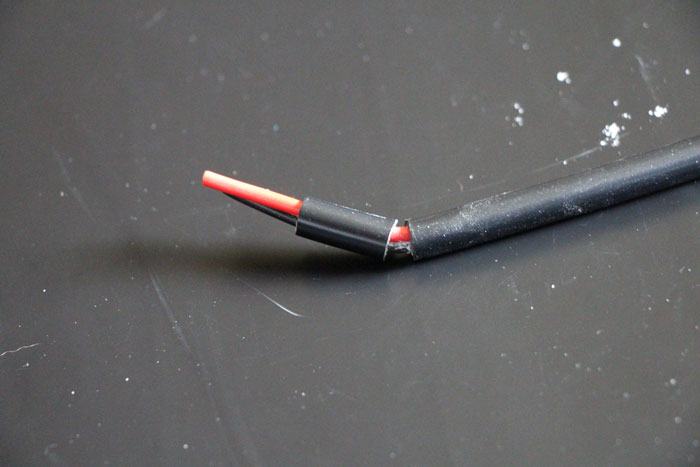
I used a box cutter, but you can also use a knife or a razor blade. This is pretty tricky since you have to be really careful and not cut into the red or black little wire.
Slowly work your way around, cutting into the thick outer protection on the wire, about two inches onto the cable.
I bent the protection while cutting to make it easier. In the picture below, I cut it twice to make it easier to understand what I am talking about.
Step 4
After you have cut both wires we cut earlier you should have one with wires coming out on both sides, and one with wires on one side with MC4 connectors on the other.
Step 5
Now we need to install MC4 connectors on one end of the cable that has wires coming out of both ends, and the solar panel wire we disconnected from the charge controller.
Installing MC4 connectors is an easy process, as seen in the video made by Renogy below. Watch the whole video, and then we’ll go over which connector goes where.
Step 6
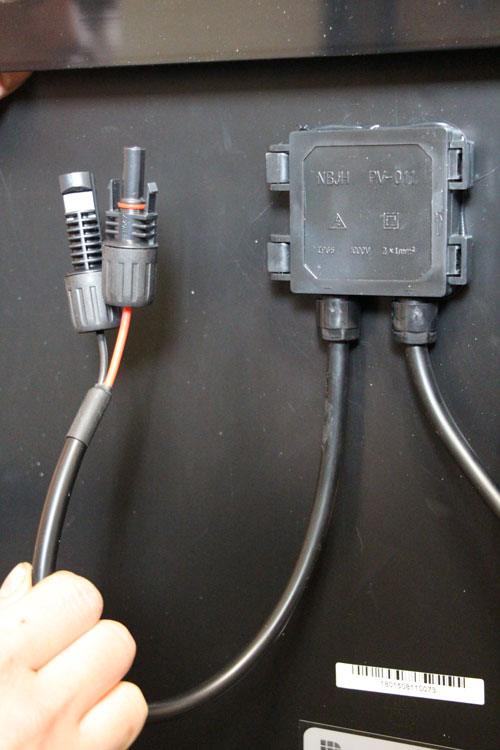
Since we’re going to make an MC4 connection between the solar panel and charge controller, we must put a male part on the positive (red) cable coming out of the conjunction box, and a female part on the negative (black) wire.
As seen in the picture below. Remove the protection, strip the wire (16 gauge) with the wire stripper, and install the MC4 connectors.
Step 7
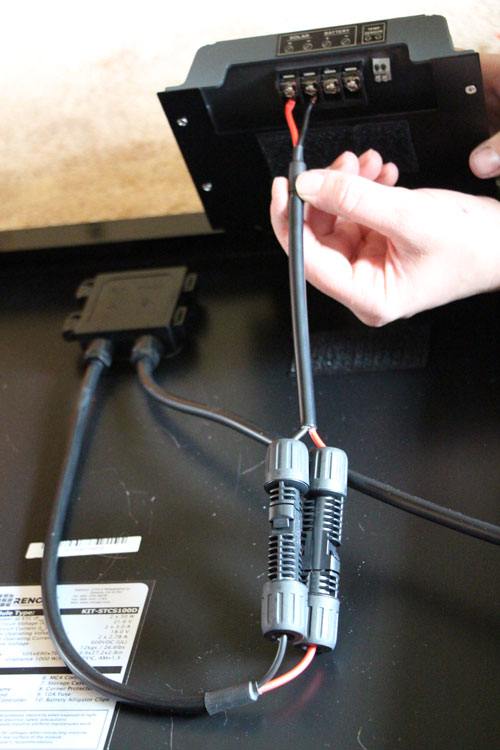
The short cable with wires coming out of both sides is going to make a connection with the cable seen above, so we need to put a female connector on the positive (red) wire, and a male connector on the negative (black) wire.
Step 8
When that is done, you should be able to connect the positive (red) MC4 connector from the solar panel to the positive (red) MC4 connector on the short wire.
This wire can now be screwed back into the charge controller. + is positive (red), – is negative (black).
Step 9
If you removed the black protection from the longer cable you cut in step 2, you can go ahead and use the wire stripper (16 gauge) to remove about an inch from the positive and negative wire to expose the wires.
If you haven’t removed the protection yet, do so before stripping the wire.
Step 10
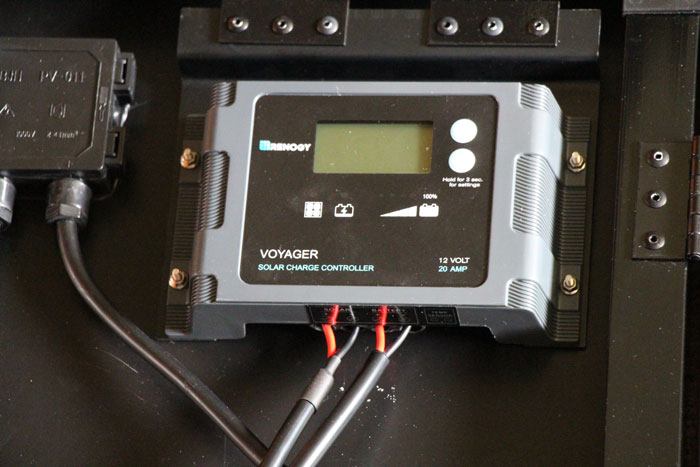
Now connect the cable with MC4 connectors on the other end to the side of the charge controller with a small battery on it.
Connect the positive (red) wire to the +, and the negative (black) wire to the -.
It should look like in the picture below when you are done. The little rubber piece protecting the connectors can be put back on by wiring the wires through it.
Step 11
Done!
Now you can decide whether you want to connect the MC4 connector coming out of the solar panels to your Yeti with an adapter, or if you want to keep the solar panels connected with the charge controller, and then the alligator clips to your 12V battery.
Bonus Info
As mentioned earlier, I also cut the alligator clips off and put MC4 connectors on each, then put MC4 connectors where I cut it, to make an extension cable I can use to connect two 100W panels.
You can connect two panels to your Yeti or charge controller by using a MC4 Connectors Y Branch Parallel Adapter (click to view on Amazon).
The way you use it is that you connect the positives, and the negatives together separately. Then you connect them to the adapter for the Yeti, or into the connector we made to the charge controller.
Note that if you’re using a Goal Zero Yeti, you must bypass the solar charge controller since the Yeti already has one built-in.
I’m not the best at describing how to do things, so please leave a comment if you have any questions and I will do my best to help you. There might be better ways to do what I accomplished above, but it worked for me and didn’t take too much work.


We have a Boulder 100 solar panels and want to use it to charge our 2 6voltnbattetsy in our Tab camper. What to I need to attach it?
Hey Chandra,
What you need is a Guardian 12V Plus Charge Controller. It appears that they’ve been discontinued by Goal Zero though, so I suggest giving them a call to see if they could sell you one.
Jesse
Jesse,
Little confused on your connection noted above in ‘Extras’ where you disconnect the alligator clips and connect MC4 wiring to connect your two 100w panels together? Your alligator clips go to the controller, don’t you want to by pass the controller? Do you have a picture of these two panels connected together along with the solar generator? I am using this same setup for my Bluetti
Hey Barry, sorry for the late reply.
Correct, when I use it with my power station I don’t go via the charge controller. But when I need to charge my 12V trailer batteries I wire both panels through the charge controller together.
So in your case with the Bluetti, you’ll just connect the two panels to each other and not use the charge controller at all.
Jesse
I am thrilled that you have a solution but I am having trouble understanding how our “problem” might be fixed, it seems very complicated… and I am very new to this. In our case we have a van with two170ah Renogy batteries and two 200-watt Renogy solar panels with the built in mppt charge controller.. connected in parallel. So, apparently if we want to take along our Yeti 1500 for extra power we cannot use our Renogy solar panels because of the charge controllers. I really do not want to buy additional solar panels for the Yeti because we have nowhere to store them in the van and also because of the expense. I have spoken to both Renogy and to Goal Zero and neither has a solution.. do I understand correctly that you are only using one of your 2 renogy panels for your Yeti? If we are using both of ours would that make this set up a little less complicated?
Hey Charlene,
Just so I understand, your current setup is two 200W panels connected in parallel on the roof of your van, wired down into the van where there is a charge controller and two Renogy batteries? And you want to be able to charge both the Renogy batteries and the Yeti at the same time?
Jesse
I just openedy new Renogy 100w suitcase with charger. It came with the modification you just detailed. Straight from Renogy! None of the images or description indicated the cable from the junction box into the controller had the MC4 connection added. It now functions exactly as your mod does, under warranty.
Hey Bill,
Thanks for letting me know, that’s awesome. I’m going to update the article to let people know this.
Jesse
Hi Bill, that is really good news as I was about to get one. Just to make sure this is the one you are talking about yes?
https://www.renogy.com/100-watt-12-volt-monocrystalline-foldable-solar-suitcase-with-voyager/
amazing solution, thanks so much! i’m looking forward to trying this.
Hey, thanks for information. I have a 200 watt renogy suitcase that I would like to use in series with others to charge ac200p AND have option to use for lead acid recharge when needed. Is series possible? Please help….
Hi,
Regarding the AC200p, yes a series connection is fine as long as the total voltage stays between 35 to 150V.
To use the same panels with lead acid batteries you should probably stick to a parallel connection, although it depends on what charge controller and battery system you plan on using.
If I want a permanent bypass can I just wire the solar panel and the battery wires together?
Yep!
I am researching how to bypass my controller on my suitcase 120w panels. I have a new campervan with grey Anderson
Plug for solar input but I must bypass the suitcase controller/regulator. Would I use the same plugs as you have, or use grey Anderson plugs to keep the same system?
Hi Jenny, sorry for the late reply.
You could do either, but it’s easier to install Mc4 connectors unless you have a soldering gun.
Just make sure the positive wire from the panel gets a male Mc4 connector, so you can use this adapter (click to view on Amazon) to hook it up to your camper.
My goal: Get a solar panel without a charge controller (or one that I can bypass) and plug it into the “Solar On The Side” port on our Winnebago Micro Minnie FLX trailer. If I touch that connector with a multimeter, it’s showing about 36.5v, and is wired into the existing MPPT charge controller. The trailer has 2 x 180w panels on the roof, in series.
Sounds like one of the Renogy panels (with charge controller bypassed) + MC4 -> SAE cables would do the trick, eh? The newer Renogy ones already have the MC4 cables attached?
Also to clarify, Anderson + the SAE (or solar on the side) plugs are not the same. right?
Cheers!
Interesting, didn’t know they did that. I’d want to make sure that the MPPT charge controller can handle another panel and its voltage. If you have the model that can handle up to 30A and 100V you’re fine.
The Renogy panels do come with MC4 connectors so you’re just going to need an MC4 to SAE adapter (click to view on Amazon) if that’s what’s on the side of your camper. Might want to get some Mc4 extension cables as well.
Before you connect the panel to the port on your camper, check the polarity with your multimeter.
No, Anderson and SAE connectors are not the same. There are different types of Anderson plugs but none of them will directly connect to an SAE connector.
As someone else noted, the Renogy panels I purchased last year came with the bypass built in and all I needed to get was one of the SolarEnz SAE Solar Connectors. Once I put the polarity reverse adaptor inline, it works well. The Renogy panels provide about 66W of power to charge my Jackery.
I already have a Renogy 200W 12V foldable suitcase with the “bypass” wired in from factory.
I received a Jackery Exlorer 300 for X-mas.
The “bypass” combines both panels prior to going into the controller, so I don’t have any easy way to just use one of the 100W panels to charge the Jackery. It looks like it can take a max input of 90W.
Any suggestions? Am I screwed/missing something? Would it be insane to just throw cardboard over one of the 100W panels when plugged into the Explorer 300 and call it a day?
Hi,
I have used a 200W panel with an old Explorer 500 that maxed out at 74W input. I think you will be fine plugging the panel into the Jackery even with the full 200W.
But to answer the question, no that is not insane and it would work if the panels are wired in parallel. I don’t know how Renogy wire them, but you can definitely cover a panel and see what it does to the input watts.