This Adapter Lets you Connect Solar Panels To The Explorer 1500
When the Explorer 1500 was released, Jackery stated that it had an 8mm input just like the rest of the Explorer power stations.
But when customers tried to connect their solar panels with an 8mm connector, the power station would not start charging.
Related Product: Looking for more power and portability than the SolarSaga 100W? Check out the Itehil 160W (click to view on Amazon).
The reason for that is that Jackery has changed the 8mm input to be different enough to where it’s not compatible with the typical 8mm.
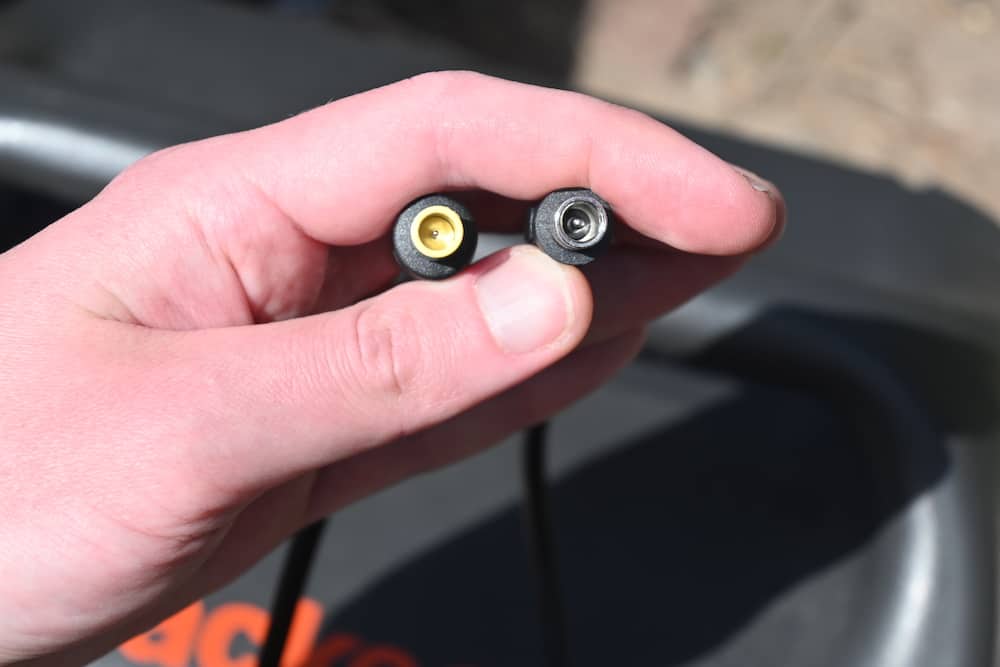
As you can see in the picture below, the new 8mm connector on the right has a thicker center pin.
When you connect the typical 8mm connector (seen on the left) to the input on the Explorer 1500, the center pin doesn’t make the connection and doesn’t work.

Not even the SolarSaga 100 uses the same connector, so if you want to connect Jackery’s own panels, you have to use a parallel adapter they include with the 1500.
Why would they do this? Yeah, we could discuss that but that’s not what this post is about.
Instead, I am going to tell you how you can connect both old and new 8mm adapters with the Explorer 1500.
As always, if you have any questions about a specific panel or setup, please leave a comment and I’ll do my best to help you as soon as possible.
The Adapter(s) You Need
Note that the special 8mm adapter is only required for the Explorer 1500.
If you have an Explorer 1000 or smaller, you don’t need an adapter if the panel comes with an 8mm connector. You do need the MC4 to 8mm adapter if it’s a panel with MC4 connectors though.
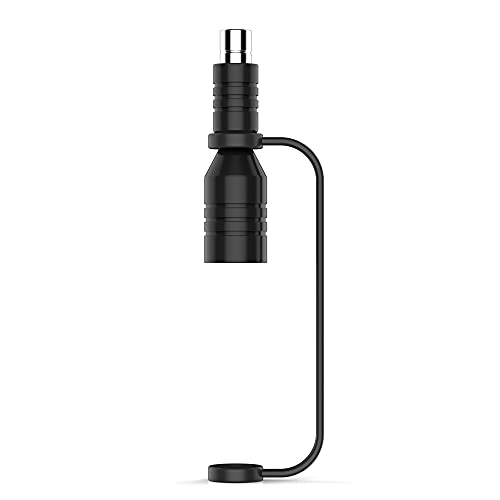
If you already have a solar panel with an 8mm connector, you don’t need anything other than this adapter by SolarEnz (click to view on Amazon).
The adapter above will connect to the 8mm connector on your panel, then you connect the adapter to the Explorer 1500.
It’s compatible not only with the SolarSaga 100W solar panels, but panels by other brands that include 8mm connectors like this one by Itehil.
If your panel has MC4 connectors, you’re going to need both the adapter above and an MC4 to 8mm adapter (click to view on Amazon).
This adapter will connect to a panel like this by Renogy, which has a positive MC4 male connector and a negative MC4 female connector.
The adapter above has a red MC4 female connector and a black MC4 male connector. This is very important to note, because there are other similar adapters wired the opposite way.
It’s important to note because most of the panels on the market that use MC4 connectors has a positive MC4 male connector, and a negative MC4 female connector, which makes it compatible with the adapter above.
If you have bought a panel and adapter, but don’t see any input on your power station, it is possible that you have bought one that is wired the opposite way.
What To Think About Before Connecting A Solar Panel To Your Jackery
While it’s important that you buy the correct panels and adapters to connect the panel to the Explorer, there are a couple more things you need to know.
The Voltage
The Explorer 1500 has a built-in solar charge controller that can handle voltages between 12-30V.
This voltage refers to the open circuit voltage of the panel, and you can usually find this either on the panel or in its manual.
A 12V 100W panel doesn’t actually output 12V, but around 18V. Therefore, it’s important that you check the specifications when choosing a panel.
If you connect a panel that has a voltage higher than 30V, the charge controller is not going to accept it and it’s not going to charge the battery.
The Solar Charge Controller
A solar charge controller regulates the voltage of a solar panel to safely charge a battery. Without a solar charge controller you risk overcharging the battery, causing permanent damage.
Most power stations, also known as solar generators, have built-in solar charge controllers. Therefore you should never connect a panel that already has a charge controller.
If you want to be able to use a solar panel with both a 12V RV battery, and a power station, I recommend the AcoPower 100W (click to view on Amazon).
The AcoPower panel has a built-in charge controller bypass, so you can choose whether you want to use the charge controller or not.
Solar Panels I Recommend For The Explorer 1500
The Renogy 100W – Great for permanent installations, like on van or RV roofs. I have used these for years, very reliable. Requires both adapters above.
The Itehil 160W – I have this panel, and this is the one I use most of the time with my Explorer 1500. It requires the extra adapter by SolarEnz (click to view on Amazon).
The EcoFlow 160W – I like this one because it’s both portable and durable. Since it’s rated IP67, it’s more waterproof than any other similar panel I have seen. Requires both adapters above.
The Renogy 200W Suitcase – This comes with a solar charge controller, but it’s easy to bypass it when connecting it to a power station like the Explorer 1500. It’s great for RVers, since you can use the charge controller to charge 12V batteries. Requires both the adapters above.
Please leave a comment down below if you have any questions.


Hi Jesse,
I’m new to solar and portable power stations (though I’ve bought and returned several packaged kits over the past couple years because there always seems to be a better option available) and recently bought a jackery E1500 and Renogy 200W suitcase panel. I also ordered a 30W Suner Power panel with MPPT controller to maintain the six gc2 batteries in my rv while in storage. My general questions are, do these sound reasonable and do you have any info about plugging the jackery into itself while charging? While the jackery was charging from my house 110V wall outlet, I plugged in the 12V cig lighter charger into the jackery output and second input. I’m not a complete idiot, I only left it plugged in long enough to see the input go up by over 100W and the output register at 0W, but my general feeling is if something is made in a way that I can that easily break it maybe I shouldn’t own it.
Hi,
Your setup sounds great, both with the Jackery and the 30W panel.
Plugging the Jackery into itself like that won’t hurt it, just waste electricity.
I have Zamp solar panels for my T@B RV and wanted to use these with my new Jackery 1500.
The Zamp is two panels with and SAE connector. Any idea on a cable that will connect
the two?
Hi,
Does the Zamp solar panel have a solar charge controller? If so, it’s going to have to be bypassed first since the Explorer 1500 has a charge controller as well. Let me know.
Hi, I have a jackery 1500 that came with two orange solar adapters. I want to hook up a 100 renogy solar panel. Do you know which adapter I would need.
Thanks
Hi,
Since you already have a connector you just need an MC4 to 8mm adapter (click to view on Amazon). This one also includes the type of connector you have, so you will have extras.