
Replacing RV Screens With Pet Proof Screens (How To Install Pet Screen)
We have two cats Taystee and Oako. They love being able to look out every window in our RV and enjoy sleeping by them.
We keep the windows cracked whenever we leave to make sure they’re getting enough air and staying cool.
Related Product: Add a Ownpets RV Screen Door Doggy Door (click to view on Amazon) to your camper’s screen door to allow your dog to enter and leave your RV freely.
We soon realized that we didn’t trust the thin screens that came standard in our travel trailer. It was way too easy for them to rip through them and we had damaged screens within a few days of moving into the RV.
After a quick online search, I learned about pet-proof screens that were not only strong enough to withstand cat claws but also dogs. I soon replaced every screen in the camper, including the screen on the door.
It’s been a few months, and so far neither of them has been able to rip holes in any of the screens and trust me, they have tried.
We can now leave the front door open without worrying about Oako or Taystee escaping and we all feel a little safer.
See Also: Best Dog Water Bottles + Travel Food Bowls & Containers
The only negative thing we’ve found so far is the fact that the windows let in less light since the screen is thicker.
We can still see through it, but it’s significantly harder with this thick screen. It’s still worth it for us though since it lets our cats stay cool in the RV and we know they are safe.
What You Will Need
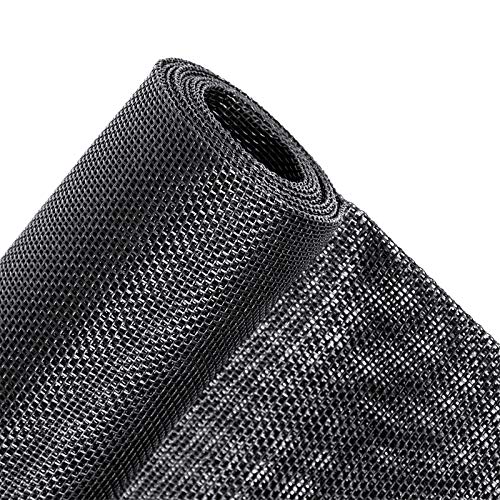
We used pet window screen like the MAGZO Pet Proof Screen 36×86 inches (click to view on Amazon) and were able to rescreen the entire travel trailer (32 feet travel trailer) with only two rolls and had plenty left over.
They sell other sizes, so it is a good idea to measure all the screens in your trailer first to know how much you will need.
It all depends on how many windows and doors you have. Our trailer has seven windows with screens and one door.
See Also: 6 Best Portable Dog Fences For Camping (RV & Outdoor)
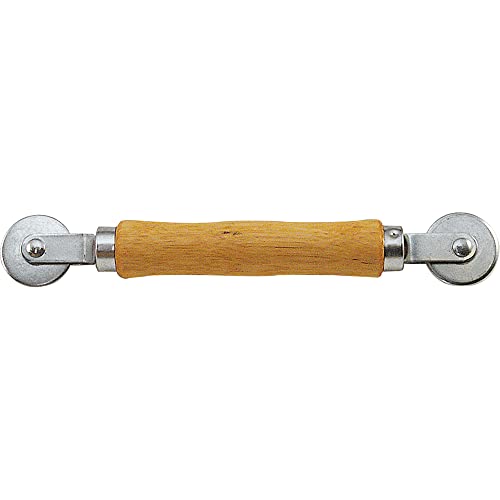
The additional tools needed are scissors, a box cutter, masking tape, a screen rolling tool (click to view on Amazon), and the proper size of spline material.
Because the pet screen is so heavy duty, I recommend using spline that is one size smaller than what is used for a standard screen.
To make sure we had the right size, we took out the existing spline from each window, measured the width, then bought one size smaller.
The 0.090 size like this one from C.R. Laurence (click to view on Amazon) seems to be good options for most RVs.

Some of the windows had tiny screens, and we were unable to find any smaller spline.
In that case, we just reused the spline. It was a little harder to rescreen, but it ended up working fine.
Step by Step Installation
Step 1 – Remove Old Screen & Spline
Remove the old screen from the frame by locating the spot where the rubber spline meets.
Pick out one side and pull it out of the frame. The screen should come right out once the spline is removed.
Step 2 – Measure & Cut Pet Screen To Fit RV Window Frame
To measure how much screen you will need, roll out the pet screen on a flat surface and place the frame on the screen.
You want to end up with about an inch to a half inch over the edge like in the pictures below.


The screen cuts easily with scissors, and you don’t have to worry about cutting the screen perfectly straight.
So long as there is some screen hanging over all four sides of the frame you will have enough.

Step 3 – Center & Tape The Pet Screen To The Frame
Once you have cut the pet screen, place the frame with the back side (the side with the grooves for the spline) facing up.
You may want to place the frame on a soft surface like a towel or a rug so it won’t be scratched while you are working on it.
Take the pet screen and center it over the frame. Use masking tape to tape three sides down so it won’t move while you are placing the spline on the first side.
See Also: What Backup Camera Is Your RV or Trailer Pre-Wired For?

Step 4 – Roll In The Spline
The spline roller has two different rollers on it, one that is grooved and one that is just a flat wheel.
I use the flat wheel side first to start pushing the screen into the groove.
Do this along the entire first side making multiple passes, so it makes a clearly defined indent in the screen.

Don’t worry about putting any tension on the screen as it will do that on its own. So long as the screen stays flat and even the screen should end up not too tight or loose.
Now you are ready to start with the spline. You can start wherever you want on the first side. I like to start about 3 inches from the corner.
Take the spline from the bag and find one end, you don’t need to measure and cut it yet because you can do that when you have done the entire screen.
See Also: How To Easily Replace An RV AC With A Fan, Vent, or Skylight
Begin by pushing one end into the groove. Use a blunt, flat head screwdriver to help get it started, once the first part is securely placed you can hold out the spline and use the grooved side of the roller to push it in.
It may take a few passes to push the spline in fully. I go about 3 or 4 inches then roll over the spline applying pressure until it is entirely in the groove and secure.

If it is too hard to fit the spline into the groove, you may have bought a size that is too large. It should fit securely but not be extremely hard to place.
The corners can be especially tricky. There were times when I had to use the screwdriver to push the spline in along the entire curve then use the roller to push it in completely after.
See Also: How To Install Solar Panel On RV Roof & Connect To Battery

Continue working the spline in along the whole frame removing the tape as you go.
Make sure the screen stays even and doesn’t have any folds in it.
By the time you get to the last side, the screen should start to tighten up slightly but not so much that it bends the frame. Once you reach where you began, cut the spline, so both ends of the spline are touching.
Step 5 – Cut The Leftover Pet Screen
The screen should look like this once the spline has been placed with about an inch of material sticking out.

Using a box cutter, cut the extra pet screen along the spline. You can cut the screen very short directly along the spine or cut it flush with the frame.
I like to cut it along the frame leaving about 1/8 inch sticking up from the spline.

Once you have cut off all the extra screen, it should look like this.

Step 6 – Replace The RV Window Screen
If the screen is having a hard time staying in or doesn’t fit like it did before you may have made the screen too tight.
Rescreening is easy. All you need to do is remove the spline on one side, adjust the screen and replace the spline. This is also how you tighten the screen if it is too loose.
See Also: Best Portable Solar Panel Charger For RV Camper/Boondocking


I did this a couple of months ago and our cats have been scratching with their sharp claws without damaging the screens.
We’re very happy so far and feel like it was worth it even though it took a couple of hours to get all the windows done.
Knowing that we can leave our trailer and go on a hike with the windows left open without the risk of the cats clawing through the screen and getting out or anything getting inside, has made the time and money worth it.
See Also: How To Maintain RV Holding Tanks To Prevent Clogs & Odors
Frequently Asked Questions About RV Pet Screen
How does pet-proof screen differ from regular window screen?
Pet-proof window screen is made from stronger materials such as vinyl-coated polyester or fiberglass to withstand scratching and tearing caused by cats and dogs.
It’s designed to be more durable and resistant to damage compared to standard screens. Because of this it’s a lot thicker and not as easy to see through as regular window screen.
It shades better than regular screen which can be a good thing for RV use since you want to keep the sun out as much as possible on hot summer days.
Des pet proof screen fit specific RV window sizes?
Yes! Since you can cut pet proof window screen with scissors, you can make it any size to fit any RV window or screen doors.
The main thing you need to measure is the window spline. Since RV windows are already smaller than regular home window screens the spline needs to be a lot smaller to fit the small window and thick pet screen.
Are there different installation methods for pet proof window screen in an RV compared to standard screens?
Installation is pretty much the same. It doesn’t matter if you’re installing pet proof screen in your home or RV, most window screen frames use the same technique.
Window screen is held into a frame using screen retainer spline. It’s basically rope made of vinyl.
You push the screen and retainer spline into a channel that goes around the window frame. This process is the same no matter what type of window screen you’re using.
The main difference is the screen thickness. Pet proof screen is often 2x thicker than standard window screen. It usually requires a smaller spline than the original screen.
How durable is pet proof screen against scratching and tearing from pets?
We’ve yet to test our RV pet proof screens against dogs, but for cats, it’s very durable.
Our cats have used our RV window screens as scratching posts, something to gnaw on, and their own personal climbing wall.
So far the pet proof screen has held up incredibly well and there has been no signs of wear even after a few years of use.
Does pet proof window screen affect visibility or airflow through the RV windows?
Yes, since the material is a lot thicker, the squares in the grid are a lot smaller.
This makes the screen harder to see through and it does limit some airflow. Not enough to really affect anything important, but it is something to think about if looking through window screens usually annoys you.
Have any questions about replacing RV screens with pet proof screen? Leave a comment below.
Thanks for sharing such a great article. You really shared such useful information with us which helped me a lot and I have bookmarked your page so that i can get to learn new things each time you share any great Information to us.
Keep up the Good Work!!
Thanks.
Thank you! Very helpful article!
Very helpful article!