
Disclaimer: Always talk to a professional before attempting any of the below. While I have done this myself, I am not an electrician. Talk to your RV manufacturer and/or Jackery before connecting a panel.
Can You Connect A Jackery SolarSaga Solar Panel To A “Solar Ready ” Port On Your RV?
Almost all new RVs, trailers, and even vans nowadays are advertised as “ready for solar” or as having a solar port.
These solar ports are basically a direct connection to the 12V house battery on your RV or trailer. Not the starting battery, but the battery that provides 12V DC power to example the lights, fans, and water pump.
Related Product: How charged is your RVs 12V battery? Get a precise voltage and percentage with the Renogy 500A Battery Monitor (click to view on Amazon)
How you connect a solar panel depends on what type of port you have. This article is going to be solely focused on connecting a SolarSaga panel to a solar port on an RV, but feel free to leave comments if you need help with panels from other brands.
Before we connect the panel, there are a couple of things we need to understand.
What You Need To Know
If you have a SolarSaga solar panel that you usually plug into a Jackery Explorer power station, you know that it’s as easy as plug-and-play.
However, if you’re going to connect a solar panel to a 12V battery like on your RV, we are going to need a solar charge controller between the panel and the solar port.
A solar charge controller regulates the electricity produced and charges the battery safely, without this we risk damaging the battery by overcharging it.
Portable power stations, also known as solar generators, like the Jackery Explorers have charge controllers built-in. Therefore you don’t need to use one when charging a power station.
When we connect wiring that carry electricity, it’s important that the polarity is correct. That means that our adapters and cables are set up to positive is connected to positive, and negative to negative.
Some of the adapters below include what’s called a reverse polarity adapter. These can be used if the positive doesn’t line up with a positive. Don’t use it unless you have to.
Here Is What You’re Going To Need
I recommend using SAE connectors because they are easy and quick to use.
8mm To SAE
First, we need an adapter that turns the 8mm connector from the panel into a SAE connector.
The SolarEnz DC8mm Female to SAE Connector (click to view on Amazon) does exactly this.

After connecting the adapter above to the SolarSaga solar panel, we can connect it to the charge controller.
If you’d like, you can connect extension cables either between the panel and the charge controller, or the charge controller and the solar port. Or even both.
For extension cables, I recommend the the Billion Wealth 10 AWG 20 Feet SAE extension cable (click to view on Amazon)
Solar Charge Controller
The Allto Solar Intelligent 10A MPPT Solar Charge Controller (click to view on Amazon) is a 10A MPPT charge controller that is going to do a great job.
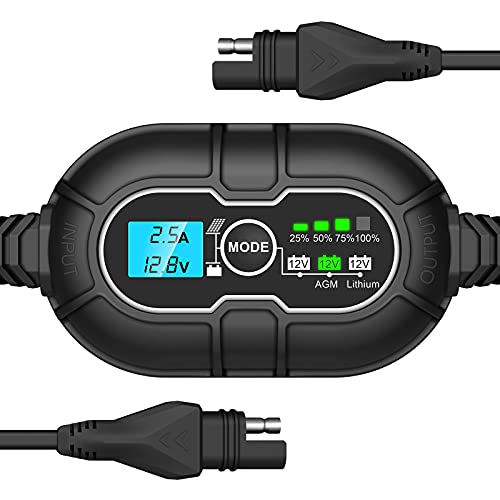
Connect the solar panel to the side of the charge controller that says “INPUT”.
The male part of the SAE connector on the input side of the Allto charge controller is positive, and the female is negative.
Therefore, it’s compatible with the SolarEnz adapter above without the use of the reverse polarity adapter. You’re going to need the reverse polarity adapter if you have a Zamp solar port as we’ll talk more about down below.
If your panel is outside in the sun when you connect the SAE connector, the screen will light up.
Now that we’ve connected a solar charge controller to our panel, we’re ready to connect it to the solar port on the RV.
Which Solar Port Does Your RV/Trailer Have?
To complicate things further, there are several different RV solar ports. All of the types I know of are direct connections to the house battery with a fuse in-between, but make sure that your trailer is set up the same way as mine by talking to the manufacturer.
Furrion Port
The Furrion port is round with two pins. One pin is positive and one is negative.
Furrion ports have a square cover that reads “Furrion Solar Charge 10A”. Since it’s 10A, the largest panel this port can handle is 120W. The Jackery SolarSaga 100 produces around 6A.
To connect the charge controller to a Furrion port, you need a SAE to 2 Pin adapter (click to view on Amazon).
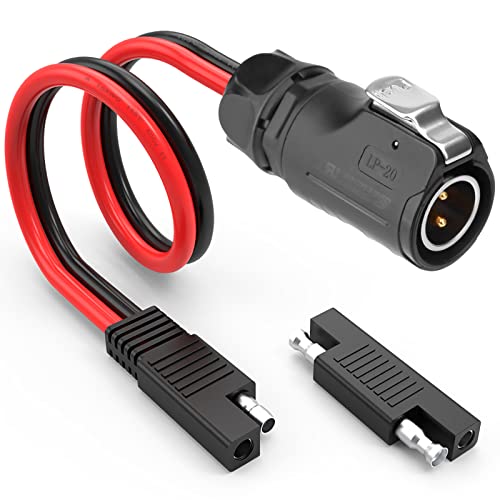
According to the manual of the charge controller, the male SAE connector on the “OUTPUT” side is positive, which makes it compatible with the adapter above without the use of the reverse polarity adapter.
After you have connected charge controller to the SAE to 2 Pin adapter it’s ready to be plugged into the Furrion solar port on your RV or camper.
Zamp Port
Zamp is an American company that manufacturers solar panels and charge controllers here in the US.
A Zamp port is actually a SAE connector. However, the polarity is known to be the opposite of a regular SAE connector.
The male side of the SAE connector on a Zamp port is the positive, and the female part is the negative. This is very important to know about before you connect the charge controller.
Since the SAE connector on the output side of the charge controller also has a positive male pin, we’re going to need to use a reverse polarity adapter.
As long as you’ve connected the reverse polarity adapter and made sure the polarity is correct, it’s ready to be connected to the Zamp solar port.
Extension Cables
For extension cables, I recommend the the Billion Wealth 10 AWG 20 Feet SAE extension cable (click to view on Amazon).
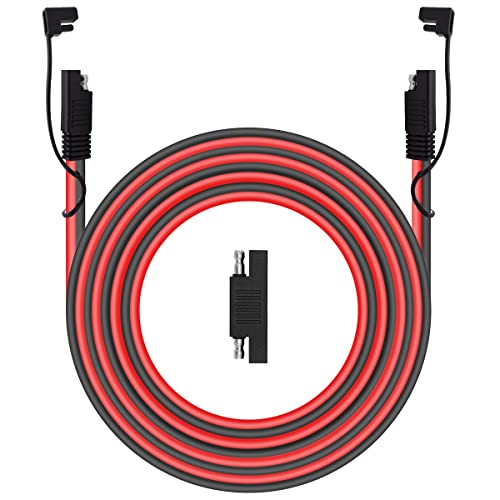
You do not need to pay attention to the color of the cables as long as the polarity is correct.
Frequently Asked Questions
The wire is red but it’s on the negative side of the connection?
The color of the wire does not matter as long as you’re sure the polarity is correct.
Is the Jackery SolarSaga 60W/100W/100X water-proof?
No, it is not and it should not be left out in rain.
Can I combine two Jackery solar panels?
Not with the products in this article.
You should also not upgrade or blow the fuse between the solar port and the RV battery, which is likely to happen if you combine two or more 100W panels.
Please leave a comment down below if you have any questions.
For clarification if I have the jackery solar panel and want to connect to my RV’s Zamp solar port all I need is the reverse polarity connector, but I will not need a charge controller because the Zamp port is the charge controller?
Hi,
No, you do need a charge controller. The Zamp port is just a direct connection to the battery. To use my solution you’ll need both the 8mm to SAE adapter and the Allto solar charge controller.
Your Jackery solar saga panels do not have a built-in charge controller, like the one that’s piggybacked onto a Zamp panel. Therefore, you’ll need a charge controller to “step down” the voltage of your Jackery(s) and regulate their output four your rv battery. The zamp port in your trailer or rv goes directly to the house battery of your rig, with a fuse. I’m looking forward to trying my solar saga panels with that nifty inline charge controller. Thanks Jesse for sharing.
Hi! Trying to go solar this year when boondocking. Still trying to learn! If I have a Jackery 1000 with two 100W panels can I make it so I can connect the panels to the Jackery and also to my Furrion port in my camper?
This is all very confusing to me… can I get a simple solution for this:
I currently have:
– 6 x solar panels on roof with their own solar controller.
– 1 x RV with SAE Solar Side Port plug that feeds its a separate solar controller.
– 1 x Jackery 1500 Solar Generator
– 4 x Jackery SolarSaga 100/100x panels
— Panels came with 2, two-panel combining connectors (that feed the four panels into the two Jackery 1500 input ports.)
When boondocking, I’d like to use all four of the 100 solar panels as input to my RV solar controller through the single RV side port as added power collectors to my existing 600 watts from the roof panels. The roof feeds through a single controller and the SAE side port has its own controller. These would both charge my 4 lithium house batteries.
What would I need to get procure to connect the 4 x 100 watt panels into the single, RV SAE Solar Side Port?
Thanks in advance for any recommendations!
Hi,
First I would like to make sure the solar port on your camper can handle four panels. They’re usually limited to 10A, which means that you can’t even connect 200W.
Is there a sticker or something by the port that tells you the max amps?
I have the 60 watt Jackery solar panel. Mainly just want keep my battery top off if I go off grid. I think this is a good solution for my set up.
Like others, I wish to keep my 12V battery on the RV topped up using just my SolarSaga 100W panel. I purchased the controllers above and also the SolarEnz adapter. The adaptor did not work with the panel 8mm end. It was too narrow and did not click in and just moved around in the connection. Had to return it. Another suggestions?
Hi,
Sorry to hear that, that is odd. They must have changed something, I have it and it works great.
This adapter includes a specific one for Jackery panels (click to view on Amazon) to make it fit better, so that’s what I recommend buying now.
Thanks for the detailed writeup. I’ve ordered the parts and am excited to give it a try
Jesse, thanks for the helpful advice. Followed and works well. Curious, I assume the Allto charge controller can take a larger input and step it down to 10A? If I plugged my Jackery power station into the charge controller, and then plugged the controller into the Zamp port, would the controller regulate the appropriate draw or do you think I’d blow circuits? I realize this is inefficient, but looking for a short term backup solution when RV batteries are low and I’m not getting sufficient sunlight. I appreciate your thoughts. Thanks!
Hi,
How are you going to plug the Jackery power station into the charge controller? I think buying a battery charger that plugs into the AC output would be the way to do it if you want to charge the RV batteries with the Jackery.