
What Does RV Hookups Mean?
If you’re just starting out in the world of RVing you’re probably checking out some of the different campgrounds and RV parks along the way.
Full hookups, partial hookups, and dry campsites are three phrases you’re going to read a lot when looking for places to camp.
In a nutshell, full hookups mean water, sewer, and electricity, patrial hookups mean water and electricity, and dry camping means no hookups.
Related RV Product: The Camco Screen Door Cross Bar Handle (click to view on Amazon) makes it easy to close an RV screen door and protect it at the same time.
RV camping with full-hookups is by far the most comfortable and best for longer stays.
Partial hookups are great for stays that will last about a week, and dry camping is good for a few days, or as long as your freshwater tank and RV batteries will allow.
If you are planning an RV road trip with the family you may want to consider adding a few campgrounds and RV parks that offer full hookups along the way so everyone can shower, dishes can be washed, and you can empty your holding tanks and refill the fresh water tank.
Related: Save 50% On Campgrounds All Over The United States With Passport America
In this article, I’ll go over the RV accessories you must have to use full RV park hookups and some of the extras that are highly recommended by experienced RVers.
Must-Have RV Accessories For RV Hookups
Sewer Hose & 4 in 1 Adapter
RV sewer accessories are the most unique and hard to find camping accessories that you absolutely will want to have with you before you take off on your next RV adventure.
All campers use what’s called “bayonet/lug fittings” on the sewer outlet pipe, and it’s most likely what your RV uses.
There’s technically one more kind of RV sewer hose connection type that’s called a “cam-lock” (click to view on Amazon) but they are usually an aftermarket addition that use an adapter that goes on the bayonet fitting.
So even if your RV has a cam-lock fitting you can most likely revert back to a more traditional RV sewer hose if you want.
You’re going to need at least two 10 foot sewer hoses and an elbow with a 4 in1 adapter.
There are kits you can buy that have all of the RV sewer basics, you can see a bunch of options and reviews in this article here.

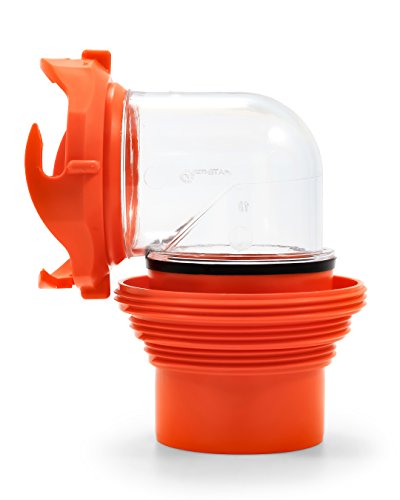
The elbow adapter (click to view on Amazon) is one of the most important things to have with the sewer hoses.
All RV parks and campgrounds require them because they seal off the sewer hookup and keep unwanted odors and smells from being released.
They also create a tight connection to the outlet by screwing into it which reduces the risk of spills.
It’s called a 4 in 1 adapter because it can fit 4 different sized sewer connections including RV dumps.
You’ll be able to use it to hook up to the sewer at any RV park or campground. You don’t want to go camping without one.
See Also: How To Set Up At An RV Park Or Campground For Dummies
Potable Water Hose & RV Water Pressure Regulator
A safe way to connect your camper to the water hookup is another absolute must have RV accessory.
While both the hookup and city water connection on an RV use garden hose fittings, it doesn’t mean you can use a garden hose.
Regular hoses that are not approved for drinking water may leak chemicals that can be harmful to humans.
Even if you don’t drink the tap water in your camper you don’t want to have lead contaminating your freshwater source. You want to use it for cooking or drinking in an emergency.
If a hose is safe for drinking/potable water it will be labeled as such. They’re usually white but they can be other colors as well.
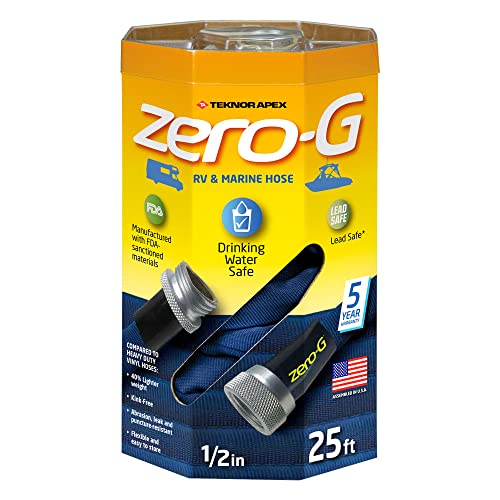
We use a Zero-G RV Water Hose (click to view on Amazon) because it’s lightweight and down to a very compact size.
But there are lots of options out there, including the ones in this review (click to see review of best RV drinking water hoses).
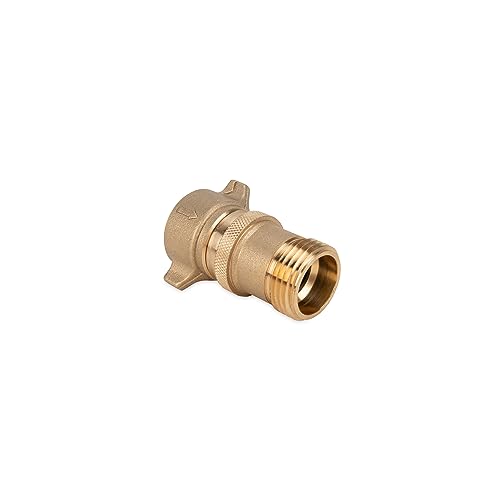
The second water hookup accessory you will need is an RV water pressure regulator. It might seem like an optional item, but it’s really not.
Campers are made with plumbing and faucets that are used to standard water pressure between 45 and 60 psi.
RV parks and campgrounds can have wildly different water pressures coming out of the hookups.
It’s not like a home with a regulated water system. A campground needs to supply water to lots of campers and if you’re at the beginning of the line the water pressure might be dangerously high.
Always using an RV water pressure regulator (click to view on Amazon) to stop any risk of your RV plumbing getting leaks from high pressure.
It will also keep your fresh water hose from swelling and getting worn out faster.
See Also: 7 Important RV Park & Campground Tips For First Timers
Electrical Adapters
Technically RV’s are pretty much plug and play, so long as the electrical hookups have the right outlet/amperage for your camper.
The two most common RV plugs are 30 and 50 amp. Smaller vans and travel trailers may have 15 amp plugs, but 30 amp is the most common.
Most RV parks will have at least 30 and 15 amp outlets. 50 amp is becoming more common every year though.
RV parks are starting to add 50 amp outlets, but many campgrounds still only have 30 and 20 amp electrical hookups.
On the other hand, there are sometimes newer places that only have 50 amp service and they rely on the RVers to bring their own adapters for compatibility.
You should have at least two adapters that can plug into the two other kinds of outlets just in case.
If you’re not sure what amperage your camper is the easiest way to tell is to look at the plug. 50 amp will have 4 prongs, 30 amp will have 3 and be bigger than a regular 15 amp plug.
A 15 amp plug is like what’s on your home appliances, it can plug into regular household wall outlets.
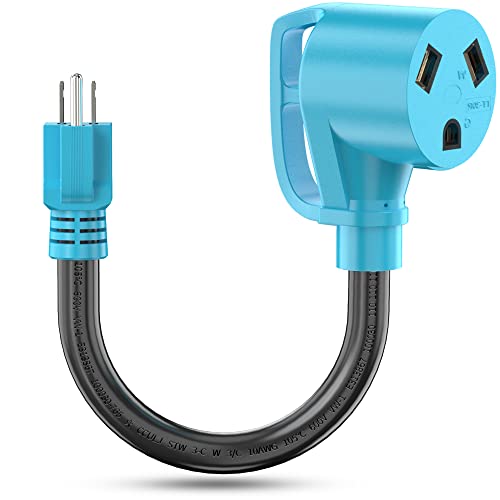
Adapters for 50 Amp RVs
- 30A Male to 50A Female (click to view on Amazon)
- For connecting a 50A camper to a 30 amp hookup. This is great for smaller RV parks and campgrounds that may only have 30 amp service. It happens more than you think and this is a good adapter to have on hand just in case.
- Normal 50 amp power supplies up to 12,000 watts of power but 30 amp will only supply 3,600. That’s about 1/3 the power. You won’t be able to run all appliances at the same time like you may be used to but you still have enough power for things like one AC and the microwave.
- Read more about the differences between 30 and 50 amp RVs here.
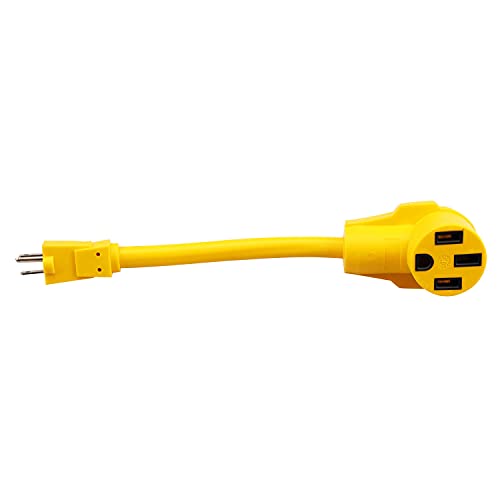
- 15A Male to 50A Female (click to view on Amazon)
- For plugging in your 50 amp camper to a regular wall outlet.
- You will probably mostly use this at home. Your RV will only be getting enough power to charge the RV batteries and run small appliances.
- An AC will not be able to run with this small amount of power and if you use the microwave make sure no other appliances are taking power.
Adapters for 30 Amp RVs
- 50A Male to 30A Female (click to view on Amazon)
- For connecting your 30 amp camper to 50 amp hookups. You will have full electrical service and be able to use your camper like normal.
- 15A Male to 30A Female (click to view on Amazon)
- For plugging your 30 amp camper into a regular wall outlet.
- This is the adapter most people use at home to plug in their RVs to keep the batteries charged and run the fridge on electricity.
- 15 amp power will not be able to run the RV AC (unless it has a special soft start on it) and if you use the microwave make sure nothing else is drawing power.
- With this adapter, you get half as much power as full 30 amp service.
Adapters for 15/20 Amp RVs
- 30A Male to 15A Female (click to view on Amazon) (Must-Have)
- If you need to plug a 15 amp RV or appliance into an electrical hookup that only has a 30 amp outlet you are going to need this adapter.
- I’ve been to more RV parks that only have 30 and 50 amp outlets than ones that have 15/20 amp outlets.
- This is a must-have for RVers with small 20 amp vans or travel trailers.
- 50A Male to dual 15A Female (Optional)
- Most RV parks and campgrounds have at least 30 amp electrical hookups that will be all you need for a 15 amp camper. That’s why this 50A to 15A is optional.
- The pro of this adapter is you will be able to plug in two 15A plugs. If you plug in your camper to one and use an extension cord to plug in a high electric appliance like a microwave or air fryer you won’t have to worry as much about blowing a fuse.
- You could use both of the RV adapters linked to above in RV parks that have 30 and 50 amp hookups to use a lot more appliances in your van or small travel trailer.
While it’s not 100% necessary I highly recommend getting a surge guard with EMS (click to go to review) to protect your RV. You can read more about them below or in the review I linked to.
Highly Recommended RV Accessories For RV Hookups
Sewer Hose Stand & Carrier
Many RV resorts and parks have a rule that the sewer hose needs to be off the ground. When we first started full-time RV living we ran into this issue a few times before we were able to buy a sewer hose stand.
I recommend getting one before you head out on your first RV adventure so you don’t have to employ creative solutions like what we had to do in the picture below.

The most lightweight and easy to set up RV sewer hose stand that I use and have seen the most at RV parks is the Camco Sidewinder (click to see my review of it).
There are other options, like this aluminum version by Camco (click to view on Amazon) or this one by Titan (click to view on Amazon).
You might also want to get a safe place to store your RV sewer hose. When we bought our travel trailer the previous owner had just thrown the sewer hose into one of the outer storage compartments.
It was a pretty nasty mess that required lots of scrubbing and bleach to take care of.
Some people use plastic totes but I recommend either using the bumper with airflow end caps like these (click to view on Amazon) or installing a hose carrier (click to view on Amazon).
Many people use the bumper method but some don’t like it because it could lead to a rusty bumper if there’s not enough airflow to dry out the sewer hose after use.
Some of the newer RV sewer hoses are a pretty tight fit for the standard RV bumper and some campers don’t even have a bumper. Plastic waste hose carriers like the one I linked to above are the perfect solution.
They mount easily underneath any kind of RV and they are adjustable to fit different camper widths.
It’s plastic so there’s no risk of rust and you can mount it next to the sewer outlet to make it super accessible.
You don’t want to contaminate your RV storage with raw sewage, and storing the hose outside of your camper will give it better airflow and keep unwanted odors away.
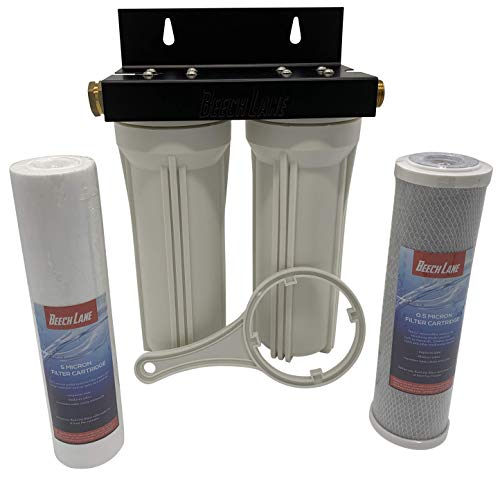
Water Filter
RV water filters are another highly recommended RV accessory you will want to use at any RV park or campground.
The water systems used to supply water to RVs aren’t always the greatest. The hydrants are sometimes a little old and rusty and there can be sediment in the water.
Common water contaminants are not only bad for your health. They are also bad for your camper’s plumbing and water pump.
I’ve replaced RV water pumps in multiple campers. All of them gummed up and burned out with sand and gunk from unclean water sources.
Using a simple RV water filter like this (click to view on Amazon) will help stop sediment and most contaminants from reaching your camper.
If you drink water from the tap I recommend something a little more heavy duty like this (click to view on Amazon).
You should even use an RV water filter when filling the fresh water tank to keep any sediment from collecting in the tank or getting to the water pump.
To see more RV water filter options and read reviews check out this article here.
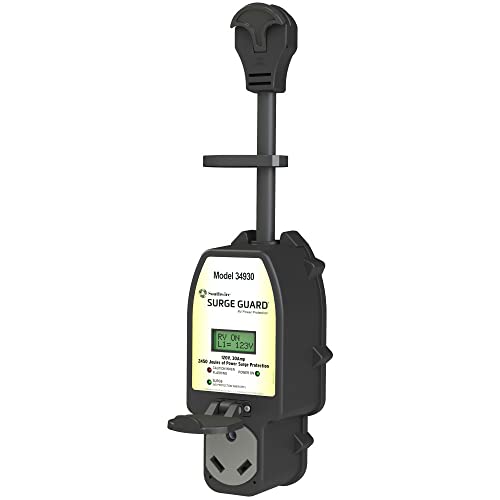
Electrical Surge Protector
Many RVers, including me, consider surge guards (also called surge protectors) to be a must-have RV accessory.
You technically don’t have to have one to connect to an electrical hookup. That’s why I’m adding it to this optional section instead of the must-have one. But it’s highly recommended.
Power surges aren’t common but they do happen. The risk for one is especially high in RV parks since they have large complicated electrical systems that aren’t always built right.
There are inline and portable RV surge protectors. Many motorhomes have inline surge guards already built in.
You should be able to tell if your RV already has one by looking in the manual or checking behind the RV converter. It’s a little black box that should say something about being an electrical management system or surge guard.

Most RVers use portable surge protectors. I recommend getting one with an EMS (electrical management system) like this (click to view on Amazon).
It will not only offer full protection from power surges but also test the power source it’s plugged into to make sure it’s safe.
If the power pedestal at an RV park or campground has been wired wrong or is faulty one of these should be able to warn you.
Make sure you get the right size for your RV. There are different versions for 50, 30, and even 15 amp campers.
It’s not an absolute must but we’ve been warned by our surge guard about unsafe electrical conditions at sketchy RV parks before.
They’re a lot cheaper than getting your camper rewired after a power surge.
To read more about surge protectors and to see reviews check out this article here.
RV Park Cable
Some RV parks offer free cable TV, but with wifi becoming more sought after it seems like RV park cable TV might be on its way out.
There may be a time when you stay at a park with cable TV. If you want to use it you will need to have a Coaxial Cable (click to view on Amazon).
Most RVs have a cable input somewhere on the outside.
They usually have covers on them like the outdoor outlets and many mistake them for extra outlets before they open the cover to see that it’s a cable TV plug.
Usually, all you have to do is connect your RV to the cable hookup with a coaxial cable.
Then make sure your TV is connected to the cable connection inside, switch the TV setting from antenna to cable, and scan for channels.
In rare cases, the RV park may be using satellite TV and you will need a box to use it.
Must-Have RV Accessories List

For 50A RV
For 30A RV
Last update on 2024-04-25 / Affiliate links / Images from Amazon Product Advertising API
Highly Recommended RV Accessories List


Last update on 2024-04-24 / Affiliate links / Images from Amazon Product Advertising API

Frequently Asked Questions About RV Hookups
How do Full Hookups Work?
Full hookups in RV parks and campgrounds are a way to supply everything you need to your camper.
They provide electricity via a power pedestal your RV can plug into.
Water is supplied by a hydrant or faucet you connect to your RV city water connection with a potable water hose.
Sewer is taken care of with a simple sewer hole you connect to the holding tank outlet on your RV with a sewer hose.
Where can I Find RV Hookups?
RV hookups can be found mostly in RV parks and resorts. But they are also common in large campgrounds.
Many state parks and even national parks will have at least one campground with partial hookups and even full hookups if the location allows.
Some casinos will even have RV hookups for their guests.
There are many websites you can use to find camping with full-hookups by adding filters with your specific needs.
Our favorite is campendium (click to go to website).
How Long Does it Take to Set Up Hookups at an RV Park?
For experienced campers, it’s usually just a quick 10 minute process.
But if you’re new to your camper and setting up at RV parks it might take a little longer.
If you have all the must-have RV gear that’s listed in this article things should go fairly quickly and smoothly.
Always plan on things taking a little longer than they should so you don’t get stressed.
I would say around 30 minutes to get the hookups ready is a good time to shoot for. But that’s after your RV has been leveled and unhitched.
Remember it’s all a part of the fun and every camper around you has been a beginner too.
RV park and campground management are usually very helpful when it comes to setting up. You can ask them for help if you need it.
Have any more questions about what you need to use hookups at an RV park? Leave a comment below.