Is Replacing Trailer Leaf Springs Hard?
With the proper tools and the right size of leaf springs, replacing trailer leaf springs isn’t that difficult.
The main thing to remember is to always be safe. Put your trailer on jack stands and tighten all the nuts and bolts to the proper torque.
Related Product: Stabilize your dual axle RV using BAL X-Chocks (click to view on Amazon)
We recently had a leaf spring on our travel trailer break while driving on a bumpy highway.
When we pulled into our campsite, we saw that one tire had worn down a lot from the top of the trailer’s wheel well.
After further inspection, we realized the leaf spring on the front axle on the passenger side of our travel trailer had completely broken at one end.
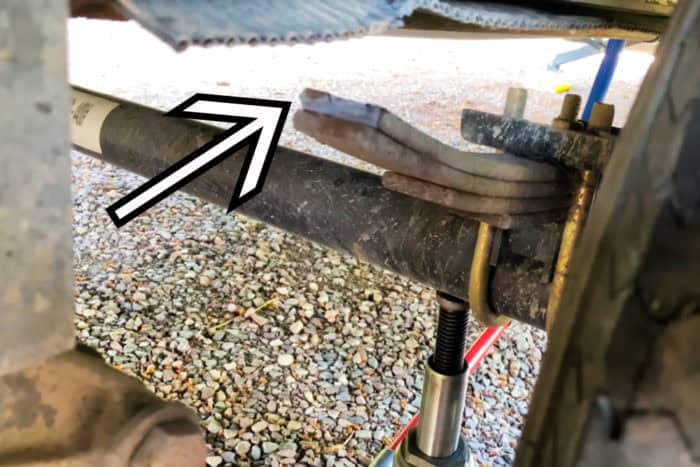
We were in a bind and had to call someone to replace the broken leaf spring for us.
The repairman recommended we replace the other 3 leaf springs as soon as possible, or at least replace the one that was on the same side as the new leaf spring.
It’s important to always replace leaf springs on a tandem or dual axle trailer in pairs.
See Also: Best Tire Pressure Monitoring System (TPMS) For RV
We ended up having to replace all four because all of them looked worn and almost flat. It just seemed like the safer option to replace them all with leaf springs that were slightly more heavy duty.
This is how we replaced our travel trailers’ leaf springs. Keep in mind we are not professionals and any work you do on your RV or trailer is at your own risk.
Always be careful when working on your own equipment and be sure to be safe and only do what you feel is within your wheelhouse of skills.
If you don’t feel comfortable working on your own trailer, have a professional do it for you.
How To Measure For A Replacement Trailer Leaf Spring
The hardest part about replacing leaf springs on any trailer is getting the correct size. There are tons of different sizes out there. You want to get the closest match possible.
The first thing you need to know is the weight rating of the trailer axle. Most of the time, you can find that information on the axle itself.
There’s normally a sticker that will tell you the weight rating. If you can’t find it, you may need to get that info from the manufacturer or the trailer’s owner’s manual.
See Also: Best RV 5th-Wheel & Travel Trailer Tires Review/Buying Guide
Next, look at the leaf springs to figure out what length, how many leaves, and what kind of spring you need.
Our travel trailer uses a double eye leaf spring (click to view on Amazon) but there are also slipper springs with a hook end and slipper spring with an open eye end.
Most dual or tandem axle trailers use double eye leaf springs and because that’s the kind we know how to replace, that’s the kind this article will be about.
To measure for a replacement double eye leaf spring, measure from the center of one eye to the other.
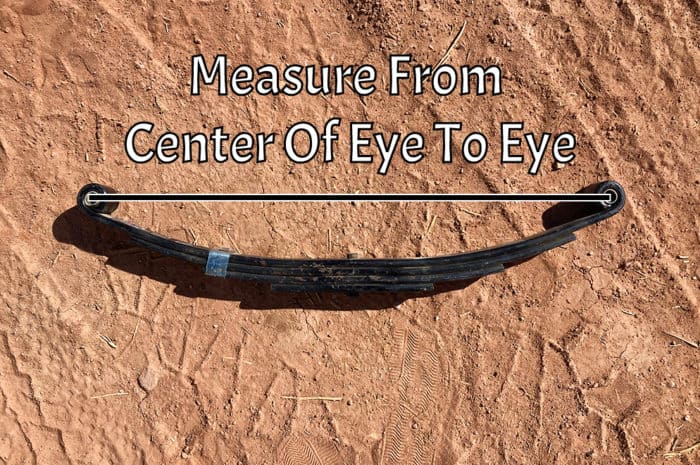
It’s recommended to remove the old leaf spring and measure it with no load on it, but sometimes that’s not always possible.
If your leaf springs are old, they may have flattened out.
We were told by the repair guy that there were tons of different sizes of leaf springs and it was really hard to get the correct size, so you need to measure carefully.
We didn’t have the option to take off the spring first. We measured from eye to eye with the spring on the trailer and tried to find the closest match in the number of leaves, weight rating, and width.
See Also: Best Electric Tongue Jack For Trailers (RV & A-Frame)
The leaf spring on our 32 foot travel trailer was 26 inches from eye to eye when on the trailer. We found that most travel trailer leaf springs with 4 leaves were around 25 1/8 -25 1/4 inches from eye to eye.
We figured the springs had spread about an inch, so we went with the 25 1/8 inch leaf spring.
We also got springs that were rated for a little more weight than the original ones. Our axles are rated for 4,400 lbs. We choose to get 6,000 lbs leaf springs.
They had the same number of leaves and everything fit perfectly. The only difference was a few of the leaves were slightly longer on the new ones.
You can also get new leaf springs with more layers than the originals. You will just have to buy longer U-bolts.
If you get larger leaf springs or ones that are rated for more weight than the old ones, don’t go too high.
Leaf springs are meant to cushion your trailer as it bumps down the road by bending. If you get leaf springs that are too heavy duty, they won’t move under the weight of your trailer.
It will be like having no suspension system at all.
It doesn’t matter if a leaf spring is mounted on top of the axle or under it, the process will be almost identical.
Each style also uses the same type of leaf spring. There is no differentiation between bottom mounted or top mounted ones.
See Also: What Backup Camera Is Your RV or Trailer Pre-Wired For?
Other Trailer Suspension Parts You Will Need
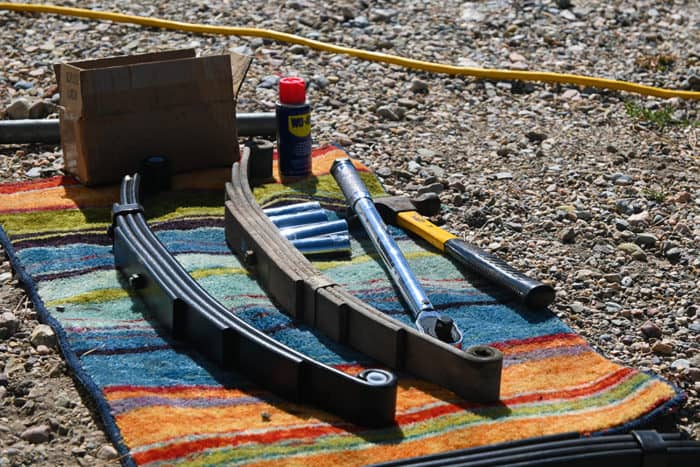
Once you get the proper size of leaf springs, you will also need a few more parts to do a proper replacement.
You should always replace the U-bolts (click to view on Amazon) whenever you change out any leaf springs.
U-bolts should never be reused because they stretch when you tighten them to the proper torque.
Also, when you undo a U-bolt, the nut will cross thread on its way out and a reused U-bolt may come loose.
See Also: 5 Best 12 Volt Lithium RV Batteries Reviewed + How To Charge
The U-bolts I linked to may not be the proper size for your trailer’s leaf springs. Make sure you check what kind you will need to go with the size and style of leaf spring you are using.
Another thing to replace is the shackles and equalizer (click to view on Amazon).
The shackles on a trailer suspension system are usually the first thing to wear out. You can replace the shackles and keep the old equalizer if you want to, but sometimes it’s better to just replace both.
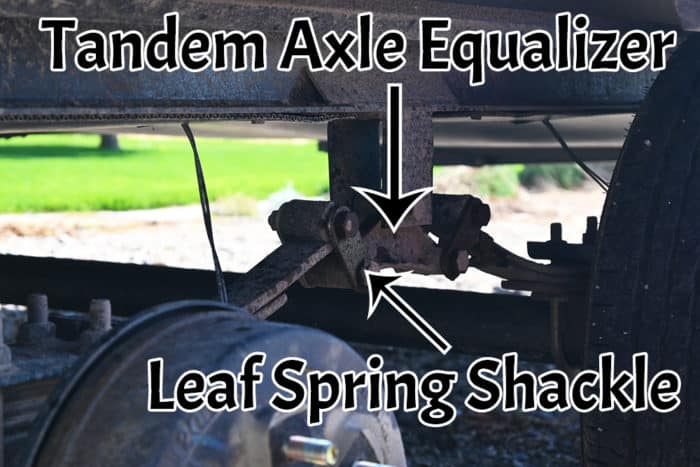
Note the shackle/equalizer kit for a tandem axle trailer I linked to may not be the exact one needed for your specific trailer.
You need to make sure the equalizer matches the leaf springs or the axle’s weight rating.
Tools You Will Need
Some of the basic tools you absolutely need are:
- A torque wrench that can do up to 150 ft-lbs (click to view on Amazon)
- Socket set, you may need the thin wall/deep style to remove your trailer’s tire depending on the style (click to view on Amazon)
- A breaker bar to loosen stubborn lug nuts and bolts on the leaf springs (click to view on Amazon)
- Rust Penetrant, for rusty nuts and bolts ()
- A jack to go under the axle. It doesn’t need to be heavy-duty, just strong enough to lift the axle into place as it will fall once you remove the leaf springs. We used a 2-ton floor jack. (click to view on Amazon)
- Jacks to lift the trailer so you can remove the tire. Make sure you get jacks that are heavy-duty enough to lift your trailer safely. We used two 4 ton jacks. Bottle jacks work great, using two is recommended. (click to view on Amazon)
- Jack Stands, especially if you are only using one jack (click to view on Amazon)
- Hammer, preferably rubber. We really wished we had one when we did our replacement. (click to view on Amazon)
You may also need a grinder (click to view on Amazon) depending on how rusty things are under your trailer. Sometimes you have to cut off the U-bolts just to get the leaf springs off.
How To Replace The Leaf Springs On A Tandem/Dual Axle Trailer
Once you’ve got all the parts and tools necessary, you are ready to replace the leaf springs.
Spray rust penetrant on all the nuts and bolts you are going to be working on to make them easier to remove.
1. Break The Lug Nuts
Before you do any lifting, break the lug nuts on the tires.
Do this first because if the lug nuts are on super tight or a little rusty, you won’t be able to loosen them as easily once the tire is off the ground.
You don’t want to take off the lug nuts completely. Just get the first turn done so you know they will come off easily later.
2. Jack Up The Trailer
Depending on the size and weight of the trailer, this could be an easy or a fairly difficult task.
Our travel trailer weighs 9,000 lbs, so it took 2 large jacks to get one side off the ground. You want to place the jacks close to the wheels and use the frame to lift on.
See Also: Best Weight Distribution Hitches With Sway Control
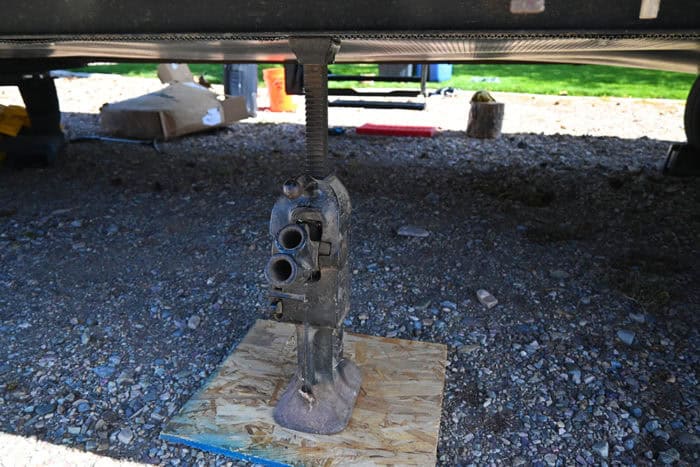
Make sure you are using wheel chocks on the other side of the trailer so it won’t be able to move around.
If you are using two jacks, be sure you lift the trailer evenly until the tires are off the ground.
Once you’ve got the trailer where you want it, you can lower the weight of the trailer onto jack stands or set them up for safety.
3. Remove The Tire
You can now remove the first tire.
I only take off one at a time because I like the second tire to be in place just in case something happens.
4. Position Jack Under Axle
You can now place the jack under the axle you just removed the tire from.
I use a small floor jack, but a bottle jack will work as well.
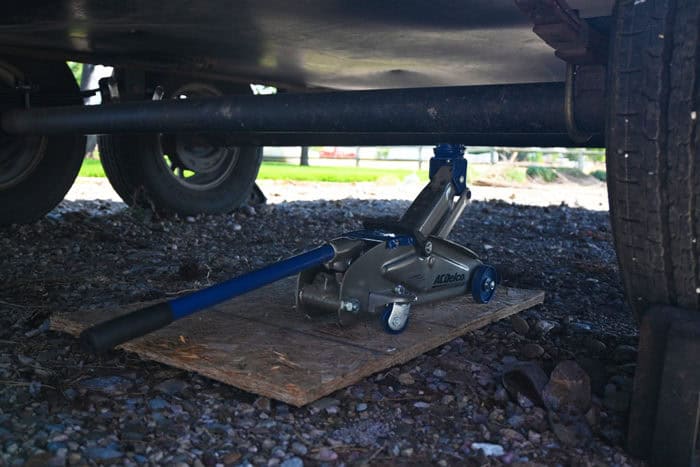
I also placed a block of wood under as well, just in case something happened to the jack.
When the leaf spring is removed, the axle will fall if nothing is there to catch it. That’s why you want the axle jack in place before you take off the leaf springs.
See Also: Find Cheapest Gas/Diesel Near You When Traveling
5. Start Loosening Bolts
Now it’s time to work on all the nuts and bolts that are holding the leaf spring in place.
I started by loosening the nuts on the top center of the leaf springs. The ones that are connected to the U-bolts.
If the bolts are rusty and just won’t come off, you may need to cut them off later.
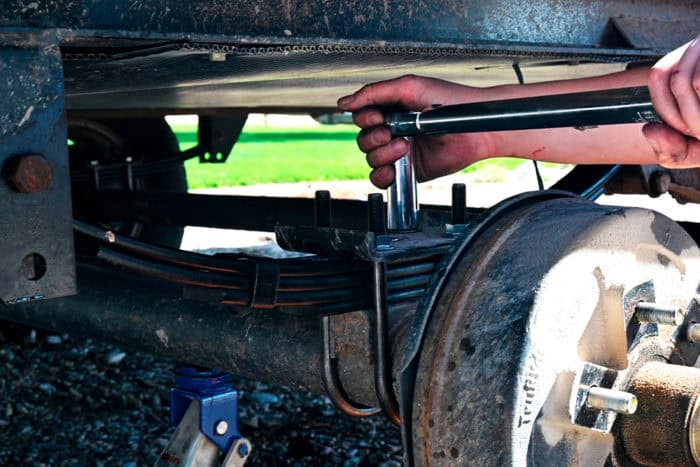
Next, loosen the bolts holding the two eyes of the leaf spring into place. It’s easier to start with the center bolt, which is the one connecting the shackle to the equalizer.
These can be a little difficult to remove. If they just won’t budge, you can use a torch to heat the bolt, which will hopefully loosen it.
See Also: Best 5th Wheel Hitches (Reese, B&W, Curt, Andersen, Blue Ox)
Once you’ve got the nuts removed, you may have to hit the bolts with a hammer to get them to come out.
If you lift the axle with the jack a little, this may make it easier for the bolt to come out.
It’s a good idea to get a replacement for this bolt as you may damage it when removing it or you may need to cut it off.
6. Remove U-Bolts & Leaf Spring
Once the main bolts holding the leaf spring to the trailer are removed, the only thing holding up the axle is the jack.
Be very careful to not put your hands, feet, or legs under the axle just in case it falls.
You can now finish removing the nuts holding the U-bolts. Once you’ve removed the U-bolts and U-bolt plate, you can take the leaf spring off.
7. Place New Leaf Spring
Your new leaf spring will have a bolt on the top and bottom in the center.
This bolt will align with the leaf spring hanger on either the top or bottom of the axle, depending on the trailer’s suspension system. It will also help you center the leaf spring.
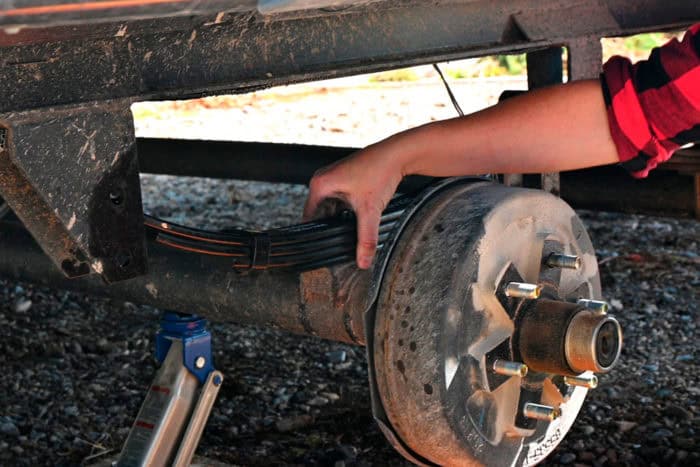
Once the leaf spring is in place, you can install your new U-bolts. I reused the U-bolt plate because it was better quality than the new one.
You can use the new ones or reuse the old one if it seems better. It’s up to you. The only thing you should not reuse is the old U-bolts and U-bolt nuts.
Tighten the U-bolts so they are snug, you do not need to torque them to the correct poundage yet.
8. Insert The Bolt Equalizer Side First
You can now insert the bolt through the eye of the leaf spring on the equalizer side (inside).
It’s easier to do the equalizer side first because you may need to adjust the axle position to get the holes to line up with the other side. If you are replacing the shackles, you can do this now.
See Also: How To Wire Multiple 12V Or 6V Batteries To An RV
The bolt goes through the first shackle, then the leaf spring eye, then the second shackle. The nut is secured to the bolt on the inside.
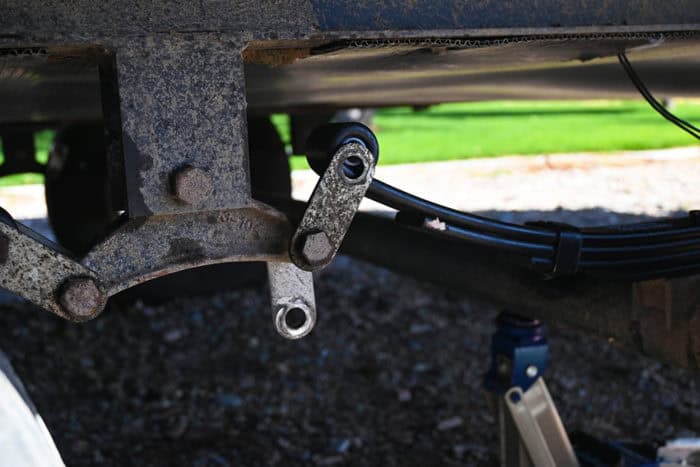
You don’t want to tighten the shackle bolts too snug. The trailer’s suspension system is made to move freely, which means the nut should be tight enough to stay in place, but the shackles can still move.
9. Insert Bolt On Other Eye Of Leaf Spring
Now it’s time to put the bolt on the other side of the leaf spring.
If you have the correct length of leaf spring, it should be easy to line up the eye with the holes of the leaf spring hanger.
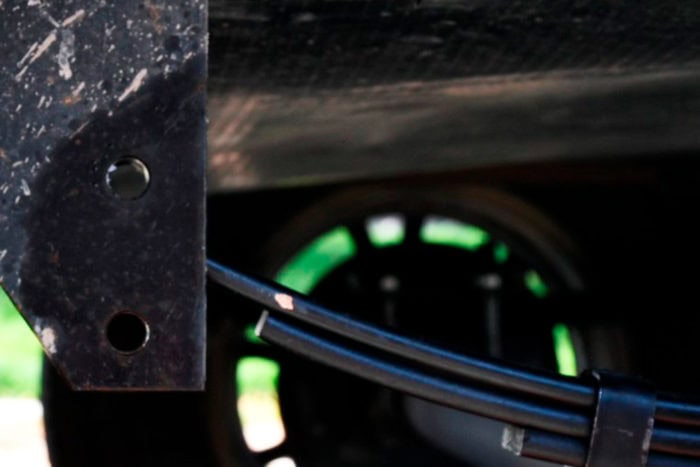
The reason I used a floor jack for the axle is to make it easier to line up the trailer leaf spring with the mounting hole. A floor jack can move around and it’s easy to jack up or down.
Once you’ve lined everything up, you can insert the bolt. Make sure the nut is on the inside of the trailer.
You can tighten this more than the shackle side, but you still want it to be loose enough to allow the leaf spring to move and bend.
10. Remove Axle Jack
Once you have secured the bolts to the leaf spring eyes and have the U-bolts installed around the leaf spring and axle correctly, you are now ready to remove the jack holding up the axle.
Once you remove the jack, the axle will be held up by the leaf spring.
11. Use Torque Wrench To Tighten U-Bolt Nuts
Earlier you secured the nuts on the U-bolts so they were snug. It’s time to torque them to the correct poundage so the U-bolts can stretch securely around the axle and leaf spring but also allow for the proper amount of movement.
See Also: The Surprising Differences Between 30A & 50A RVs
To find the correct torque poundage, look up what the U-bolt manufacturer recommends.
For my trailer’s U-bolts, the recommended torque was 70 ft-lbs.
12. Replace Trailers Tire
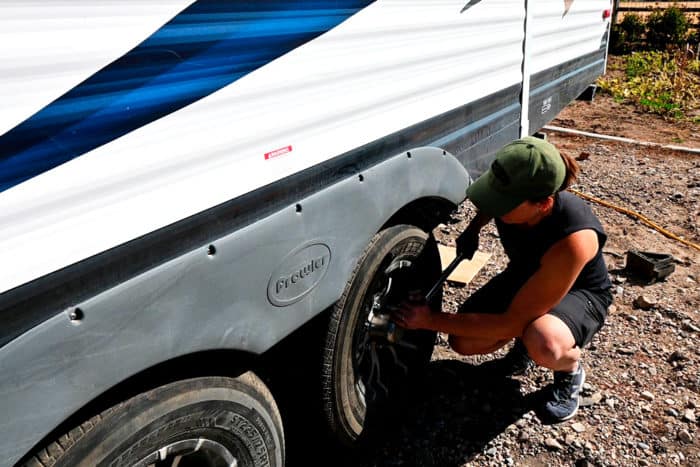
Once everything is tightened and secured, it’s time to put the tire back on. Remember to tighten the lug nuts in a cross pattern.
Tighten the lug nuts as much as possible by hand or with a small wrench. Once the lug nuts are snug, lower the trailer slowly and evenly until you can remove the jacks.
13. Finish Tightening Lug Nuts
Once the tires are on the ground, use a torque wrench to tighten the lug nuts to the proper ft-lbs.
My 15-inch rims on my travel trailer required 90-110 ft-lbs of torque.
14. Replace The Other Leaf Springs
You should never replace just one leaf spring, they need to be replaced in pairs or all of them.
If you only replace one, it may cause uneven wear and improper alignment of your trailer tires.
If you are putting on a different size of leaf spring, you must replace all 4 so they match.
See Also: What Do I Need To Use Hookups At An RV Park Or Campground?
15. Check Everything After Your First Trip
Do a regular check of all the nuts and bolts after your first couple of camping trips.
This is especially important during the first miles of travel. Tightening all the lug nuts on the tires after about 50 miles is recommended.
And that’s how you replace the leaf springs on a tandem or dual axle trailer.
The process is basically the same for a single axle trailer you just won’t have an equalizer to deal with.
Have questions about replacing the leaf springs on a tandem or dual axle trailer? Leave a comment below.

