
)
Round RV Sliding Bathroom Door Problems
In our years as full timers we’ve had a travel trailer and a small motorhome.
In our travel trailer, there were two sliding pocket doors to the bedroom. We never had any issues with the rollers on this type of RV door and they were pretty easy to remove when we wanted.
Related Product: We level our RV with the innovative Andersen RV Leveling Set (click to view on Amazon)
The design also worked really well since the rollers were holding the doors from above.
Then we got our small 24 foot Thor Freedom Elite motorhome. The only door inside of it is a small tambour style sliding door that closes off the bathroom in the corner.
It uses a curved track and 4 flexible door panels to create more room inside the bathroom when closed.

This RV sliding door is an absolute monster that is constantly coming off track.
All of the nylon rollers are cracked which means the metal bearing part pops out of the nylon part and the entire roller assembly comes off all of the time.
See Also: How We Fixed A Leaky Slide-Out On Our RV/Travel Trailer

We dislike this RV bathroom door a lot but we haven’t come up with a better solution. So for now we’re just going to have to replace the broken rollers with new ones and hope for the best.
If you are unlucky enough to have a door like this in your RV, whether it’s the shower or the bathroom door or both (our shower door uses the same kind of rollers as well) then this is one way to at least fix the nylon rollers when they break.

What You Need To Replace The Rollers On A Round RV Sliding Door
The roller assembly was in ok shape and it made more sense financially to just replace the nylon rollers because that was the broken part.
I figure if I can find a good way to fix the rollers I’ll know what to do when they inevitably break again.
I didn’t need too many tools to get the door off or to replace the rollers. Here’s a list of everything I used including a link to the right size of roller.
- Pliers
- Philips Screw Driver
- Small Socket Wrench
- 3/8″ Socket
- 1/4″ Socket
- 1″ Nylon Screen Door Rollers (see link below)
The Replacement Rollers
Prime-Line Products B 707 Roller
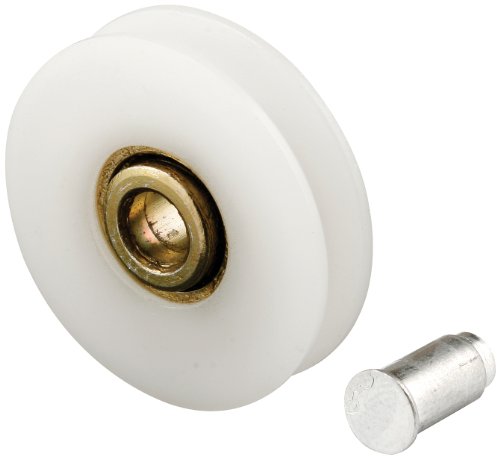
It can be hard to find exact replacements for RV parts. After doing some research online the closest thing I could find to the original nylon rollers were these Prime-Line screen door replacement rollers.
They ended up being an exact match.
If the rollers on your RV sliding door are 1 inch in total diameter then these will probably work as well.
Make sure you measure first though. Prime-Line makes other sizes as well if your RV sliding door rollers are a different size.
See Also: How To Easily Replace An RV AC With A Fan, Vent, or Skylight
How To Remove A Tambour Style RV Sliding Door
The first thing you need to do is get the RV sliding door off of the track so you can remove the roller assembly.
Usually, there’s just a screw or bolt at the end of the track that stops the rollers from sliding out.

In the picture above you can see the screw at the end of the roller track. It was easy to remove with a Philips head screwdriver.
After that’s removed you need to slide the door out.
In our motorhome, the sliding shower door is right behind the bathroom door track. So it takes a lot of folding, pulling, and yelling to get all of the rollers out of the track.

I recommend having someone help hold the door so it doesn’t break the plastic roller assembly as well.
Side note: it’s even harder to get the door back in once the rollers are fixed.
Once the sliding door is removed you can unscrew the bolts on the top of the roller assemblies that are holding them into place. You can’t remove the bolts when the door is on the track because there isn’t enough space for the bolts to come out.
See Also: How To Change An Automatic 2-Stage Dual RV Propane Regulator
Quck Roller Assembly Plastic Nut Fix

The bolts screw into a threaded plastic piece that’s secured to the door.
On the first roller assembly, the threads had been stripped so there was nothing for the bolt to screw into to attach the roller assembly to the door. We needed to fix that part as well.

To fix it, I drilled out the bottom of the plastic part and used a bolt that was 2 1/2 inches long to secure the roller assembly to the door.

This might not be a problem your RV has but I wanted to show how I fixed it since these plastic anchors are just waiting to break or have the threads stripped.
How To Replace The Rollers On An RV Sliding Tambour Style Door
Removing the old broken rollers and putting on the new ones ended up being the easiest part of this DIY RV sliding bathroom door fix.
All I had to do was use pliers to hold the bolt head and use the right size socket wrench (I think it was 1/4) to undo the lock nut on the back.

The new Prime-Line screen door rollers were the exact same size as the old ones so the old bolts and lock nuts worked great.
Make sure you tighten the bolts down well so the nut on the back doesn’t stick out and scrape against the metal track.
Once the new rollers are on and the roller assembly has been replaced on the tambour RV sliding bathroom door it’s time to rehang it on the track.
This is by far the hardest part.
RV Life Hack: 6 Things You Can Do To Fix A Broken RV Outlet
Make sure the door is being put back the same way it was taken out.
In our motorhome, the bathroom door has a magnetic strip on one side to hold it in place when it’s closed. It also has a plastic strip on the other side to close the gap between the end of the door and the wall.
It’s going to take some major door folding and pushing to get the rollers back in the track but it’s possible, even though it doesn’t seem like it is at times.
Once we got the door back in place and put the stopper screw back the door was sliding well and working like it’s supposed to.
Conclusion About Tambour Style RV Sliding Bathroom Doors
I think because of the way the door is designed, bumpy roads, and vibrations from driving, the door rollers will definitely break again.
The nylon part of all 8 rollers was broken in the exact same way. That tells me it’s more than just a misuse issue and more of a design problem.
When we bought our used motorhome the bathroom door was already broken and we found a repair invoice in the glove box from the previous owner that showed he had had the rollers replaced once before.
The RV is only 10 years old with very little use. The sliding door shouldn’t be breaking as much as it is.
I’ve been brainstorming and trying to come up with something else to replace the door with but so far I haven’t come up with anything that I think will be as private.
See Also: RV Rubber Roof Repair: When to Repair, Reseal or Replace
Originally the panels in the tambour bathroom door were actually mirrors and the door weighed at least 50 lbs. We think the heavy weight of the door was the main reason it was breaking before.
We replaced the mirror panels with lightweight 1/8 inch masonite and now that we’ve fixed the nylon rollers I think the door will last a little longer.
But as soon as I think of something better I’ll make a post about that too.
In the meantime good luck with fixing the curved sliding door in your own RV. If you have any ideas of your own on what to replace this awful style of RV sliding door with be sure to let me know in the comments section.
Have any questions about replacing the rollers in a tambour style RV sliding door? Leave a comment below.
You can save yourself a lot of trouble by getting the whole assembly including rollers . Go to Swisco.com an order
part no 10-071. These people are great on this kind of stuff!
How did you take the mirrors out of the doors?
Hi Karen,
If you take the doors off completely and look at the bottom there are screws in the corners of each panel frame. If take out the screws the bottom part of the frame comes off. You can then slide the mirrors out the bottom.
The rubber seal strip will come out with the mirrors, make sure you save that because you will it around whatever you want to replace the mirrors with.