
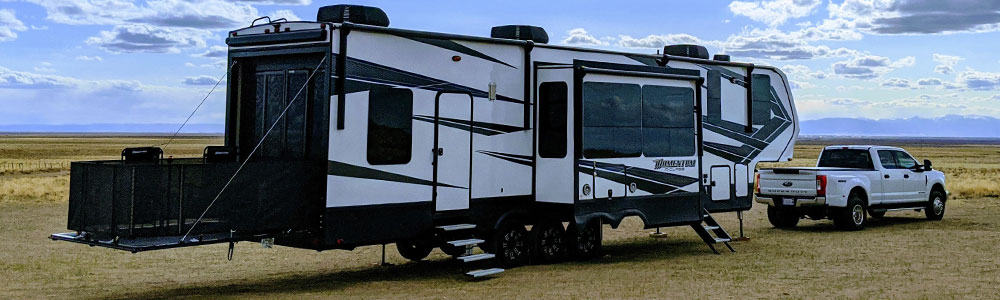
Converting A Toy Hauler Ramp To A Patio/Deck
Toy haulers are starting to become a common sight at any campground or boondocking spot. They can be 5th-wheels or travel trailers and the one thing they all have in common is a giant ramp in the back.
I’m not sure when it started exactly but somewhere down the line toy hauler manufacturers found out that you could use the ramp as a deck or patio once all of the toys were unloaded.
Recommended RV Product: See how level your RV is using an App on your phone with the LevelMatePro Wireless RV Leveling System (click to view on Amazon)
Pretty soon toy haulers weren’t just for OHV and ATV owners. Regular campers want them because of the cool enclosed patio you can easily set up on the ramp.
Most of the newer campers with ramps already have a patio kit and a way to turn the ramp into a deck. But a lot of older toy haulers don’t have this feature because it hadn’t been invented yet.
Or maybe the dealer you bought your RV from just didn’t order the patio kit.
Either way, there are a few easy ways you can convert your RV ramp into a patio. But for some, there’s a catch.
Some of these solutions like adding cables and brackets may void the warranty on your RV.
Because of this, any additions you add or things you do to turn your ramp into a deck are at your own risk.
See Also: 6 Best RV Stabilizer Jacks For Trailers & Campers
The Cable Method
Toy haulers that come with the patio kit normally use the cable method to hold the ramp up so it becomes a deck.
These toy haulers are built for this and the frames are reinforced to hold weight at the connection points.
If you add cables to your own ramp you need to make sure you are securing the brackets to a strong spot that can hold the weight of the ramp and the people on it.
Also, this method is the one that will most likely void your RV’s warranty if it still has one.
You can find steel cables and brackets yourself or get a patio conversion kit like the one reviewed below.
Dirt Warrior Accessories Toy Hauler Patio Conversion Cable Kit
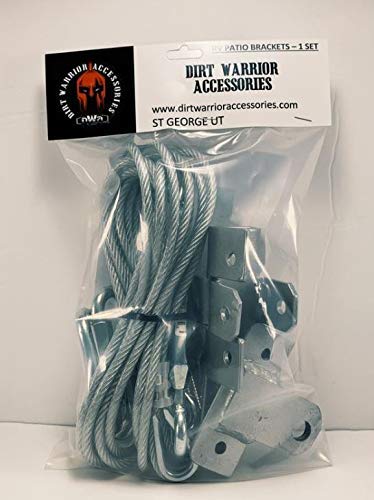
This toy hauler patio kit is very simple but effective if your camper’s ramp has a good spot for you to secure the brackets too.
The anchor point on the door frame is also important. You want to be able to make a secure connection on both ends of the cable.
On some kinds of ramps, the brackets get in the way and make it so it can’t close. Make sure there’s enough of a gap to fit the brackets when closed.
The kit includes brackets, screws, and steel cables with adjusters.
This version is made for door heights that are 6 feet 6 inches tall to 7 feet 4 inches tall. If you need a different length you can see more options on Dirt Warrior’s website.
See Also: Best 5th Wheel Hitches (Reese, B&W, Curt, Andersen, Blue Ox)
Make sure you pre-drill the holes so the screws can make it through the aluminum tubing.
The weight rating of the cables is 1800 lbs but that doesn’t mean the ramp and frame can hold that much.
The Dirt Warrior Accessories Toy Hauler Patio Conversion Cable Kit requires the most work to install initially but once the brackets are in place it’s pretty easy to set up at the campsite.
The benefit to the cable method is unlevel ground isn’t an issue. But the downside is they create a lot more sway inside the trailer and can sometimes be bounced around by the wind.
PROS
- Easy To Set Up At Campsite
- Great For Unlevel Ground
- Pretty Easy Install
CONS
- May Void Warranty
- Not For All Styles Of Ramps
- Could Potentially Damage Frame
The Jack Stand Method
Probably the least risky way to go as far as your RV warranty and preventing damage to the frame is to use RV jack stands to hold up the ramp.
This method can require a little bit of work to alter the stands and it takes longer to set up at a campsite than using a cable.
But it’s much easier on the ramp and the trailer’s frame and it helps reduce shaking inside the camper when people are on the ramp.
Below are some reviews of the RV jacks people commonly use on their toy hauler ramps to make them into patios.
Camco EAZ LIFT Heavy Duty Slide Out Support
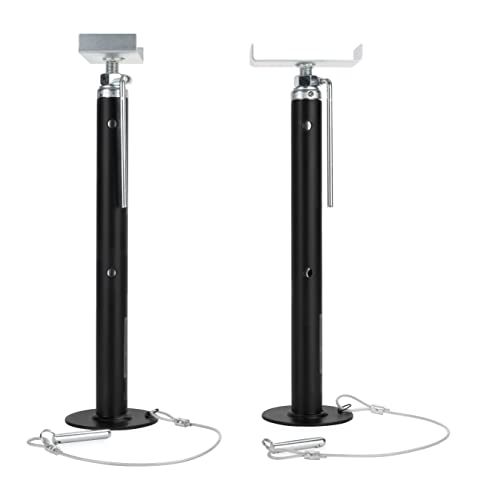
Since toy hauler RVs normally have a high clearance you are going to need a jack stand that can get pretty tall in order to turn the ramp into a deck.
The most common jack I’ve seen used on ramps is the Camco slide out supports.
These tall jacks can adjust from 19 inches to 47 inches tall. They have a flat top that’s great for supporting a ramp without damaging or scratching it. And they can each support up to 5,000 lbs.
The only adjustments you will need to make is to cut off one of the edges from the support on the top of the jack.
This can easily be done with a grinder or a hacksaw (click to view on Amazon).
It’s necessary to add some cushion to the jack so it won’t scratch or damage the ramp. Rubber mats cut down to size work great for this (click to view on Amazon).
See Also: Best RV Wheel Chocks (Plastic, Rubber, Metal, X-Chock)
Many ramps have rubber bumpers on the top you can put the jack under as well.
It’s also a good idea to clamp the top of the jack to the ramp so it won’t fall down if the trailer shakes from people walking around. Simple clamps like these work well (click to view on Amazon).
The Camco EAZ LIFT Heavy Duty Slide Out Supports are technically made for RV slide outs but because of the high weight capacity and height, they are a fantastic option for holding up a ramp to turn it into a deck.
If you go this route just make sure the jacks are placed where the ramp is strong. Many RV ramps have a thin aluminum trim around the edges that may bend under your weight over time.
Usually, the front of the ramp that is made to take weight on the ground is a good spot to put jacks.
PROS
- Won’t Void Warranty (In Most Cases)
- Makes Deck & Trailer More Stable
- Can Take More Weight Than Cables
- Puts No Pressure On Trailer Frame
CONS
- Set Up At Campsite Takes Longer
- Must Alter For Ramp Use
- Not Great For Uneven Ground
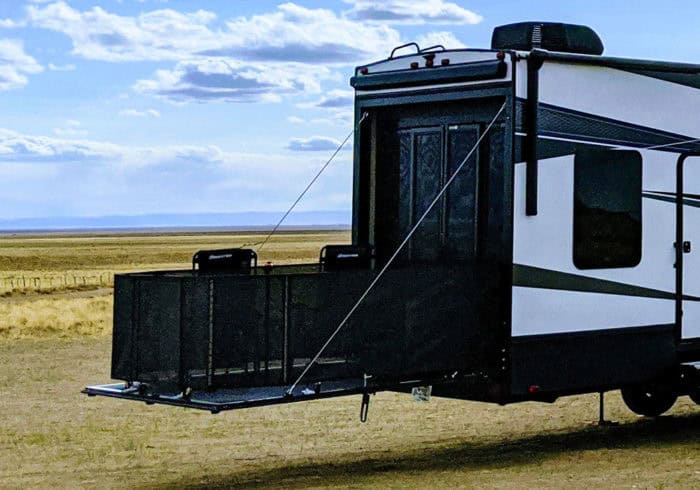
Toy Hauler Patio Door Kits
Once you’ve got the deck part figured out the next addition to your new RV patio is going to be a door to help keep bugs out or your RV while the ramp is down.
Classic Accessories Over Drive Toy Hauler Screen
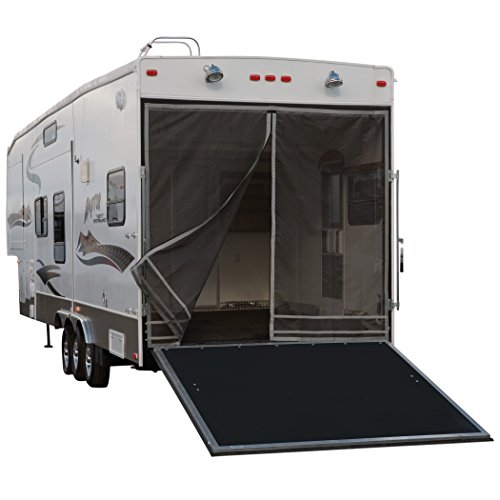
The Classic Accessories Over Drive Screen closely matches the kind of patio door kit newer toy haulers come with.
It’s basically two large flexible screen panels that use a zipper to connect together in the center.
This version can fit rear trailer openings that are 90.5 inches tall and 98.5 inches wide.
There are two versions. One for steel frame campers that is secured around the edges using magnets and one that’s for fiberglass and aluminum frames that uses velcro strips you screw around the frame to hold the door in place. It also makes it easy to remove.
The magnets are the main complaint people seem to have with the product. I recommend getting the more secure rip-and-grip option over the steel frame version.
The material used is a coated screen that is resistant to tears and shades the inside of your toy hauler while still letting air through.
See Also: Best Folding Camping Chairs For RV & Camp Use Reviewed
For added protection against the elements and privacy, there is a privacy screen included that attaches to the patio screen using the rip-and-grip straps.
It’s a great way to be able to keep your trailer enclosed at night without having to take apart the patio and lift up the ramp.
The Classic Accessories Over Drive Toy Hauler Screen is the perfect way to make having a ramp to RV patio conversion nicer and more usable.
Bugs are everywhere and having the entire back of your camper open all of the time lets in a lot of pesky critters.
Getting a simple toy hauler patio door kit like this will keep the bugs out and still let you enjoy all the benefits of having a deck on the back of your camper.
PROS
- Keeps Bugs Out Of Camper
- Shade Inside
- Lets Breeze Blow Through
- Easy To Open And Close
- Quick Install
CONS
- Magnetic Version Not So Secure
Conclusion About Toy Hauler Patio Kits
Turning the ramp of your toy hauler into a deck does take a little work and if you have a new RV it’s probably better to get one that comes with the patio kit already installed.
But if you have an older trailer any of these two methods usually work great.
See Also: RV Truck & Trailer Towing Capacity – How Much Can I Tow?
Just remember that not every ramp was made to take a lot of weight for extended periods of time.
Don’t ever overload an RV patio and make sure you are bolting things down to the inner tubing and not just the ramp board.
As a final reminder, using the cable method may void the warranty on a new toy hauler ramp. Using a toy hauler patio kit is done at your own risk.
Have any questions about toy hauler patio kits and decks? Leave a comment below.


You talk about the cables and stands, which are pretty much available everywhere—- but you don’t say anything about the fence, which is impossible to find.
This is really not much help.
Hi, thanks for your comment. I see what you mean and I’ll look into what other RVers are doing about the fence issue and update this article if I find any good solutions.
I agree. I would like to have the fence all so. But I can’t find it either. it would be nice for the dogs.
This is exactly the info I was looking for! Unlike Bob, I don’t need a fence. The deck height is only 10”.
Thank you…
Very good and helpful information. Good pointers.
I agree. I would like to have the fence all so. But I can’t find it either. it would be nice for the dogs.
Not sure why the fence is so difficult to purchase. I called Lippert today (door/ramp manufacturer) and they said contact the rig OEM…but it’s a Lippert door. I made my cables and have the patio level but still need the fencing surround to keep the dogs in.
I’m not sure either, it’s one of the few RV parts with no aftermarket alternative.
You could try making a fence with panels from a metal dog fence. Might end up being stronger than what the RV industry makes.
I have aluminum Livin Lite Axxess toy hauler. I use two bottle jacks at the corners where there is a rubber bumper where the door contacts the ground. These are easy to adjust and if I need more height, I just add a board or plastic leveling pads to get it right. Haven’t had any issues, and as stated in the article, this method is very sturdy. No dogs, so don’t need a fence.
I just purchased a used 2019 Grand Design Momentum 350G …. It came with the LCI Lippert patio fence walls for the ramp…. but when I went to put them in place to check it out the frame around the rear opening does not have the hinge hardware for it to attach to.
No big deal as I’m not going to use it anyways…. probably just lean up against the wall in my home garage…
So if anyone is interested in purchasing the fence walls I would be willing to sell…
I’m located in SE Michigan , Ann Arbor area…..
I think Lippert wants around $2k for the kit…. I’d be looking to get around $700 for it…. email for pics
Joel jawarford1@gmail.com
Do you still have the patio panels?
Very informative article. Than you for sharing.
You talked about everything except how to get the decking screens ??
Hi Deanna,
The deck screen/fence is one of the hardest RV Patio parts to find.
One thing you can do is get a dog fence (click to view on Amazon) you can secure to the toy hauler door with clamps. The screen part can be added using privacy screen (click to view on Amazon).