When to Repair, Reseal, or Replace An RV Rubber Roof
The roof of an RV can be easily forgotten since it’s very much out of sight, out of mind. But every kind of camper roof requires preventive and routine maintenance. And sometimes emergency repairs as well.
In this article, I’m going to focus on RV rubber roofs since they are the most common kind of camper roof and the kind that I have lots of experience with.
Related RV Product: Reseal RV windows and trim with the highly rated Geocel Pro Flex RV Sealant (click to view on Amazon)
If you don’t know what kind of roof your RV has or what kind of rubber it’s made of (there are two main kinds), check out this article for more information.
Once you know your camper roof is rubber, and you know if it’s TPO or EPDM you can use this guide to learn the basics of RV rubber roof repair, resealing, and replacement.
How do I know when to do what?
Well, it depends a lot on the situation. If you’re out camping and there’s a hole in your RV rubber roof, you’re going to need to do some quick repairs.
If it’s the end of the camping season and you want to get your camper roof ready for winter, you may need to do some preventive resealing.
If nothing has ever been done to maintain or repair your camper’s roof for many years, you may need to think about replacement.
See Also: Best RV Roof Coatings That Seal & Protect (All Camper Roofs)
RV Rubber Roof Repair
Let’s say you’re out camping and a tree branch falls on your RV. You climb up there to check out the damage and you see that a hole has been made in the thin rubber roof membrane.
This is going to call for some immediate repair.
What to Use for RV Rubber Roof Repair
RV Roof Patch Kit
I recommend always having something on hand that’s made for RV rubber roof repair. Whether it’s an RV roof patch kit or sealant tape.
If you don’t have either of those things even some RV sealant (self-leveling or non-sag) could be used as a temporary fix. But you should replace it with a proper RV roof patch later.
Many full-time RVers, including me, recommend EternaBond Roof Seal Tape (click to view on Amazon) for RV rubber roof repairs and even resealing, which I’ll talk more about later.
EternaBond repair tape has been around for a while. Many RVers have put this stuff to the test and the feedback has been super positive. I’ve used it myself and my camper roof hasn’t had any leaks yet.
Using what’s called “MicroSealant” EternaBond can adhere to pretty much any surface, that includes TPO and EPDM rubber RV roofs.
It’s super durable as well, the company claims it can last 18-35 years. So far that seems to be true.
Cleaner and/or Primer
The prep is the most important part of any camper repair. If it’s not cleaned right, nothing will work as it should.
Eternabond makes a EternaClean Spray Cleaner (click to view on Amazon) and an EternaPrime Adhesive (click to view on Amazon). They are great options to have if you want to use them but they aren’t required.
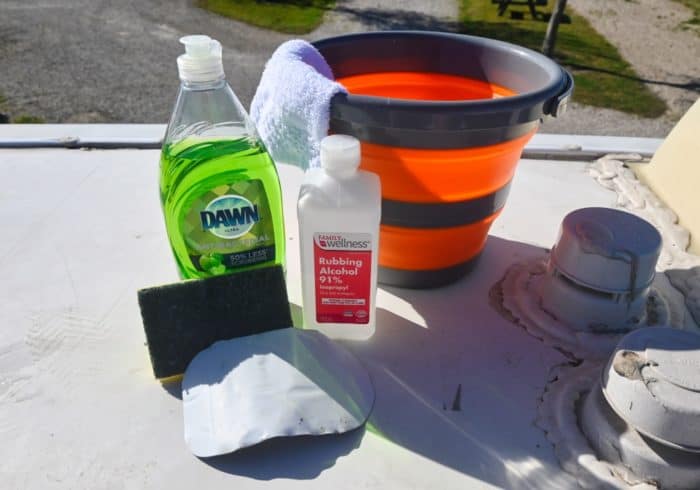
I use dish soap and 91% isopropyl alcohol because that’s usually what I have on hand.
Roller
If you are just patching over a small hole you won’t need a roller but if it’s a long scratch or cracked seam you are going to want one.
Steel rollers like this one (click to view on Amazon) are recommended for best results when applying RV roof sealant tape.
How to Repair a Hole or Short Scratch in an RV Rubber Roof
The thin membrane that is an RV rubber roof is what’s stopping water from leaking into your RV. The only thing underneath it is wooden boards that make up the roof.
Even if there’s just a small hole in the rubber roof membrane, it will let in water. You don’t want any amount of water leaking into your RV.
It causes not only water damage over time but can quickly lead to mold growth. Mold can cause major damage inside an RV and you want to do everything you can to prevent it.
1. Clean the Area
Prep is the most important part of RV rubber roof repair. All dirt and oils need to be removed so the adhesive on the roof patch can bond properly.
Since the roof is made of rubber you don’t want to use anything too abrasive.
Start with a bucket of warm water and dish soap. Using a plastic brush or sponge, scrub around the damaged area plus a little bit more. Be careful not to get water inside the hole.
Once all dirt has been removed, rinse off the soapy water with a wet rag.
Then, use isopropyl alcohol to thoughroly clean the same spot again. You can also use denatured alcohol, acetone, mineral spirits, or the EternaClean if you have it.
Do not pour any of these products directly onto the camper rubber roof.
These harsh cleaners could potentially damage the rubber if used in large amounts. Always apply it using a rag.
(EternaClean can be applied directly, it’s the only exception.)
2. Get Your Patch Ready
If you are using a pre-cut RV rubber roof patch kit like this version by Dicor (click to view on Amazon) you should use the entire thing.
Even for a small hole, a 6×6 inch patch is the safest way to go, even if it seems like a lot of extra material.
If you use a lot now you won’t have to repatch or reseal it ever again.
No matter what you’re using to make the patch you should always round the corners.
Sharp corners have a much higher risk of peeling up over time than rounded ones. The wider the radius the stronger the corner bond will be.
That’s why many patches are circular instead of square, RV roof patches should be no different.
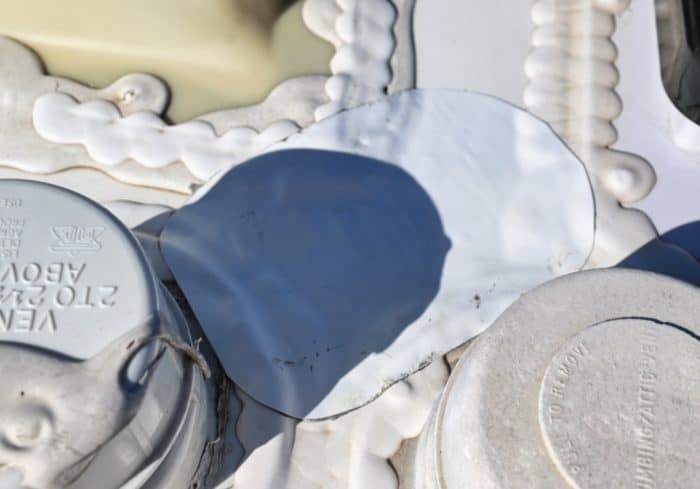
3. Apply The RV Rubber Roof Patch
It’s time to cover the hole or scratch with the patch.
Sometimes the plastic cover on the back can be hard to remove. If you carefully use the tip of a boxcutter you can use it to get a grip on it and raise it enough to pull back with your fingers.
Apply the roof patch evenly so there are no air bubbles or wrinkles. It’s not hard to do with just your hand when using a small patch. No roller should be necessary, but if you have one, use it.
Press against the patch for a few seconds to make sure every part of the adhesive gets a good grip.
You are now done with the RV rubber roof repair.
How to Repair a Long Scratch or Cracked Seal on an RV Rubber Roof
You can also use EternaBond Roof Seal Tape for longer scratches or to reseal the molding and trims on the roof. It can even be used around vents and fans.
The repair steps are very similar to the ones used for small holes or scratches.
The only difference will be the tape will need to be cut longer and you will want to use a steel roller to make sure you get all of the air bubbles out.
If you are patching over old caulk you don’t need to remove it. Just make sure it’s clean and you can put the EternaBond tape right over the top of it.
See Also: 6 Best Exterior RV Caulks For Camper Window, Molding & Trim
Also, make sure a few inches of tape are going past the edge of the old caulk to get a really good seal.
You can even overlap Eternabond tape to make a wider patch.
It’s not required but I recommend using a steel brush or something abrasive to rough up the outer shell where you are going to be overlapping it. This will help the sealant part bond even stronger.
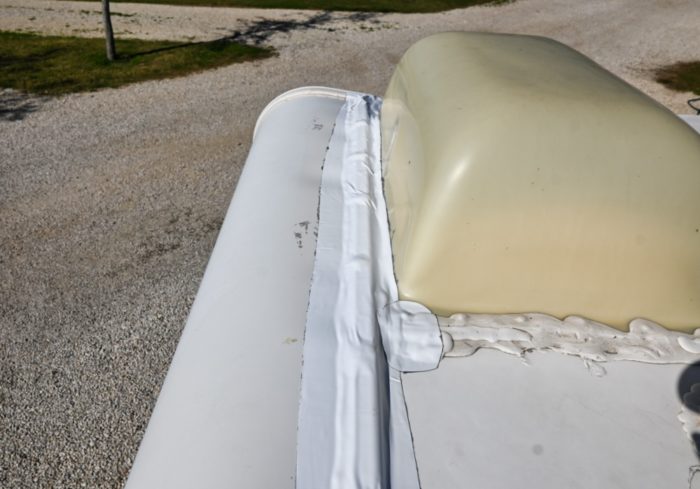
It’s very common for the area of the rubber roof membrane along the sides of campers where it’s curved down will start to form cracks and peel back.
Many RVers use EternaBond to repair this kind of damage by starting the tape on top of the roof and curving it down and onto the drip rail.
It works well and I’ve even seen RV repair shops do this since it’s much easier than replacing the entire roof membrane.
RV Rubber Roof Reseal
Resealing your camper roof is something that should be done regularly. Many RVers do it every year, but sometimes you can go a few camping seasons without having to do a full reseal.
Especially if your RV spends most of its days in covered storage.
How to Tell if Your RV Roof Needs A Reseal
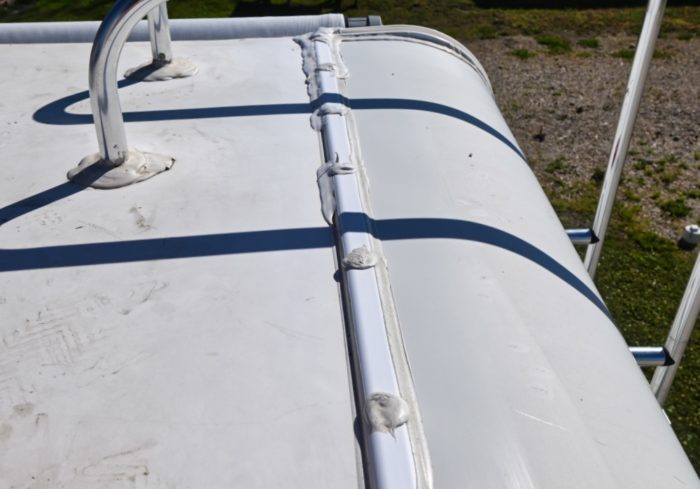
To see if it’s time to reseal your RV roof you can usually tell just by looking at the sealant. If any cracks or holes are forming in it you know it’s time for a reseal or touchup.
You can also test the sealant by taking a metal scraper and pressing it into it. If the sealant is still soft and the scraper just makes an indent, it’s still good.
If it’s dry and brittle and the scraper pokes a hole in it you will want to remove the old sealant and add new or use EternaBond over it.
Traditionally people use RV self-leveling lap sealant (click to see a review of the best ones) to keep all of the roof accessories and edges of the RV roof sealed and weatherproof. And that’s a great time tested way to go.
Just make sure you remove all the old caulks and thoughroly clean the roof just like you would for patches before applying the new RV sealant.
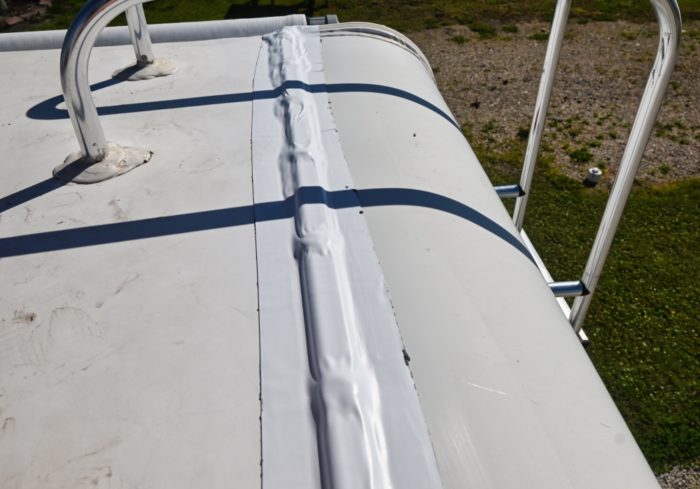
Using EternaBond Roof Seal Tape To Reseal Rubber RV Roofs
Lately, I’ve been seeing more and more RVers using EternaBond Roof Seal Tape (click to view on Amazon), which is the stuff I recommend for RV rubber roof repairs, to reseal the entire roof of their campers.
That includes around the vents, skylights, and fans.
There are a few reasons why more and more people are starting to go with EternaBond over traditional lap sealants.
EternaBond Pros
For one, it takes a lot less time.
If you’re going to reseal the traditional way you will need to remove all of the old caulking first, which takes a ton of time.
When you use EternaBond tape you just need to make sure the old RV sealant and caulking is clean and you can tape right over the top of it.
Some people will remove the caulk that’s on the heads of screws to make the surface more even. I do this as well but some campers don’t find it necessary.
The second and probably the best reason is the durability of EternaBond sealant tape is way better than self-leveling lap sealants.
If you use EternaBond properly you won’t have to reseal your RV rubber roof every year anymore. You might never have to reseal it ever again if done right.
It’s advertised to last at least 18-35 years. Those seem like crazy numbers but from what I’ve seen it does last a very long time.
EternaBond Cons
While it’s some fantastic stuff and an excellent way to go for a long lasting camper roof sealant it does have a few downsides you may want to consider.
First, the upfront cost is more than traditional RV sealants. It seems to pay for itself after just a few years but just be aware that it’s less budget friendly in the beginning.
It’s also very difficult to remove.
I talk about the easiest method to remove EternaBond RV sealant tape in the FAQ section below, but even with a few tricks, it’s still not easy to remove.
You shouldn’t have to ever remove it, but if you need to it won’t be easy.
One way to minimize the difficult removal would be to use the tape in areas you know you won’t ever have to mess with.
Like along the edges of the roofline and use easier to remove self leveling lap sealant for vents and fans that sometimes need replacement.
There’s an aesthetic reason as well. If you use it along the sides of your RV roof you will be able to see it. I think it looks great and it matches the paint job on my camper but some people don’t like the look of it.
If you have a new RV with a warranty on the roof using EternaBond tape my void the warranty.
RV Rubber Roof Replacement
Knowing when to fully replace an RV rubber roof can be a little more difficult than knowing when to repair or reseal.
EPDM roofs usually start to look more worn faster because it’s a black rubber layer with a white coating on top.
The coating can wear off pretty quickly and make the RV roof look worn and damaged but most of the time white roof coating is all it needs.
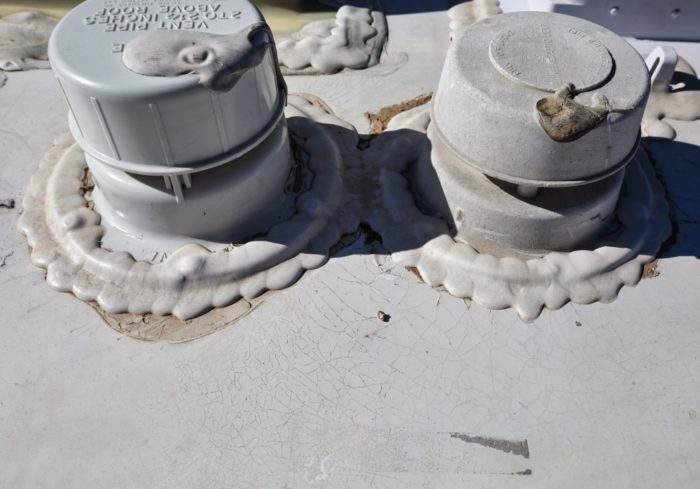
TPO roofs always appear white or grayish and they can look pretty ok when in reality they are worn and in need of replacement.
How Long Should a Rubber RV Roof Last?
A properly maintained and cared for rubber roof should last around 20 years. But there are a lot of factors that can reduce life expectancy a lot.
An RV that’s always been stored outdoors and has been exposed to the sun all of its life is going to need a new roof a lot faster than one that’s been in covered storage.
See Also: How To Easily Replace An RV AC With A Fan, Vent, or Skylight
The climate can also play a big role. The hot desert sun and dry air can do a number on RV rubber roofs. Campers from states like Arizona and Nevada might need a new roof a lot sooner than an RV from a more moderate climate like Montana.
How to Tell When an RV Rubber Roof Needs Replacement
Age
Looking at the age of your camper is a good place to start. Many of the manufacturers of camper rubber roofing materials will have a 10-15 year warranty on their products.
You should expect at least that much out of both TPO and EPDM rubber camper roofs with the proper maintenance and storage.
But numbers don’t necessarily mean that your RV roof is going to last as long as it should. If you’ve recently purchased a used camper you should always check the roof to see what kind of shape it’s in.
How It Looks
Visually, a rubber RV roof should have no wrinkles, no dark or brown areas that could mean sun or water damage, and you shouldn’t be able to see a weaving pattern.
If you can see the weave of the bottom layer it means the rubber outer layer has worn off and a replacement is necessary.
Water leaks are another key sign that either the roof or the sealant is damaged or old. Usually, it’s the sealant that lets in water but if all of the seals seem watertight and there’s still water getting in it might be the rubber roof to blame.
How It Feels
Something to feel for when you are on your camper roof is soft spots. Underneath the rubber roof membrane is a thin layer of plywood, foam, and then more plywood.
It usually has a little give but if you find spots where it’s weaker than other areas that could be a sign of rotted wood that has lost its integrity.
The damaged area will need to be replaced which requires removing the rubber roof membrane. Most RV rubber roofs don’t survive removal and it will almost certainly need to be replaced with a new one.
How to Replace an RV Rubber Roof
Many RV repair shops and dealers offer RV roof replacement, but it will cost you. Not only do the parts cost a good amount, the amount of work involved to take off the old roof and put on the new one is pretty high.
You can also do it yourself, and there are some really good RV rubber roof kits (click to view on Amazon) that come with almost everything you need like the rubber roof membrane, adhesives, putty tape, and lap sealants (no tools included).
Make sure you get the right size of RV rubber roof to fit your camper.
Choosing between TPO and EPDM is up to you. Each kind has its pros and cons. You can read more about it in this article here.
I’m going to make a quick list of the steps involved when replacing the rubber roof on a camper to help you get an idea of what’s involved. This is mostly so you can decide if it sounds like something you want to do yourself or hire someone else to do.
I’m not going to go into great detail since there’s a lot to it. If you think it’s something you can do I recommend checking out this awesome YouTube video by C.L.S. Allinone (click to view).
He explains every step well and even shows how to replace the plywood underneath the membrane.
DIY RV Rubber Roof Replacement Steps
- Remove all RV rooftop appliances and accessories. (AC, vents, fans, fridge vent cover, TV antenna)
- Remove all the termination bars, end strips, and caps. These are found on both ends, and the sides of the camper.
- Don’t forget about the sidebar that usually also has a drip rail attached.
- These are often secured with rivets that will need to be drilled out.
- Remove the old RV rubber roof.
- It’s glued down with adhesive and removal can take time, especially if the roof is old and brittle.
- Inspect the plywood underneath and replace any pieces that are damaged or soft.
- Clean off the plywood to prep it for the new rubber roof.
- Add seam tape to all of the gaps in the plywood roof. You want to do this after cleaning so the seam tape will stick.
- Put the new rubber roof membrane on either the front or back of the RV.
- You don’t need to roll it out yet but if you are a little unsure if you got the right size this is a good time to quickly roll it out to make sure it’s big enough.
- Once you know roll it back up so you can apply the adhesive.
- In small sections at a time, apply the roofing adhesive.
- Don’t worry about adding adhesive underneath where the roll of rubber roof is sitting. You will be able to go back and do that part later.
- After applying adhesive to the entire roof surface let it sit until tacky.
- Now start rolling out the rubber roof membrane little bits at a time.
- To do this properly you will need to roll out any air bubbles and wrinkles as you go.
- This requires patience and something to push the wrinkles out with.
- Make sure you mark where the holes in the camper roof are. You will need to cut them out later and you don’t want to fall through them.
- When it’s rolled out all of the way you can return to the starting point to add adhesive there and roll out the roof onto that spot.
- You can tuck the roof fabric under the front piece on your camper to secure it better.
- Cut the fabric where the roof holes are and secure the pieces to the inside of the roof using staples or screws.
- Mount the side termination bars. Make sure you put putty tape on the inside of the side bars.
- You can use self sealing roofing screws instead of rivets.
- Cut the excess fabric underneath the newly mounted side termination bar.
- Install the termination bar on the other side.
- Now install the back and front termination bars.
- Apply lap sealant or EternaBond tape to both sides of the front and back termination bars making sure to cover the heads of the screws.
- Also apply lap sealant to the top of the side termination bars. You can use EternaBond tape here as well.
- Install your RV roof appliances and accessories.
- Don’t forget to use butyl (putty) tape and lots of lap sealant.
- Enjoy your fantastic new RV rubber roof.
Frequently Asked Questions About RV Rubber Roof Repair
What’s the Easiest Way to Remove EternaBond Tape?
EternaBond tape is very difficult to remove, which is part of the reason it’s one of the best camper roof sealants.
You may need to remove it at some point and your best friend is going to be heat.
Heat makes the adhesive soft which loosens it and makes it possible to pull up. Combining heat with a razor to cut any stubborn strands that don’t want to release makes EternaBond removal a lot easier.
One great way to soften it up is to let it sit out in the hot sun for a day and start removing the sealant tape in the evening. You can also use a heat gun or hairdryer to keep it hot.
See Also: Best RV Tire Covers (Spare, Trailers, Trucks, Campers)
Once the tape part is removed there will be some gray adhesive leftover. If you will be reapplying Eternabond tape or even lap sealant to the area you just need to keep it clean and you can apply the new sealant over the top.
If you want it completely gone it’s going to take some work, especially if your RV has a soft rubber roof.
You don’t want to scrape too hard and damage the soft roof membrane.
Keep the adhesive warm and loose while you scrape it away. Turpentine works pretty well on EternaBond adhesive and will help you get the stubborn leftovers off.
You may not be able to get 100% of the adhesive off but most of it should be removed at this point. It’s much easier to remove from a hard and smooth surface like aluminum, fiberglass, or glass but the process of heat and scraping is the same.
Have any more questions about RV rubber roof repair, reseal, or replacement? Leave a comment below.


One thing you don’t talk about is using a roof sealant to cover the entire roof. I have been looking at a product called crazy seal (https://crazyseal.com/crazy-seal/?gclid=EAIaIQobChMIkr7Eot6e-AIVUm5vBB0Efw-xEAAYASAAEgIQxvD_BwE) which is expensive but appears to reseal everything without having to tear off the old rubber seal.
Do you have any experience with this? Does appling crazy seal to a older roof that has not leaked extend its life by another 20 years? Anyway I would be interested in your opinions.
Hi Kevin,
I don’t have any experience with Crazy Seal but it seems like a solid product. If you do the prep work correctly I don’t see why it wouldn’t extend the life of an older RV roof, so long as it’s not too worn.
You can check out some more RV roof coatings in this post here (click to view) if you want to read about some other options.
Hi Jenni. I just noticed in my 2013 Vista a small star crack in the roof. If I just cover it with a patch of Eternabond will the crack eventually expand? Or should I drill out the crack and plug the hole and THEN cover it?
Hi Tony,
From my experience, Eternabond does stop more cracking if the entire crack was covered.
So I think you should be good, but I would check it every now and again to make sure.
I am trying to apply a coating over mt rubber roof but I have noticed some small bubbles in a few areas, the largest being 2″ x 4″. My question is should I cut the bubbles, single knife cut and glue it down before I coat the roof or just coat over it?
I would cut and glue down the bubbles before coating the roof.
If you don’t, they’ll probably get worse over time. Since you’re resealing it anyways, I think it’s a good idea to fix it now.
I have a pre-owned 1998 Bigfoot Oakland 10’11’C 3000 series camper but no history on the vehicle. The brochure says the roof is rubber but doesn’t specify TPO or EPDM rubber. It has definitely been recoated/sealed with a white product. I went on the roof to clean it with soap and water when I noticed that the surface started developing grey spots several inches in diameter. They disappeared as the roof dried. Does this suggest the material is absorbing the water and needs to be resealed? If so, do you happen to know what type of rubber would be on this roof and the most appropriate roll on coating to use?
Love the camper and want to keep it happy.
Sean
Hi Sean,
Could the grey spots be the original roof showing through the coating when it’s wet? If there’s water leaking through you should be finding soft areas in the roof or see water spots inside the RV.
If everything seems like it’s in good shape and there’s no signs of water leaks it should be fine.
For help identifying the material your RV roof is made of, check out this article here.
I resealed my rubber roof and the day after there are bubbles popping up. What can I do to fix this issue?
Thank You for your assistance
Bob
Hi Bob,
You can cut a small opening in the center of the bubble and add some adhesive to glue the membrane back down. Once the glue has dried you can make a patch with Eternabond RV Roof Tape (click to view on Amazon) to put over the cut and reseal the roof.
He we sustained some damage to the edge of our rubber roof. Caught it on a shed oops.
Can we use eterna bond tape to fix this? And should we pull up the undamaged trim to tuck it under while fixing?
Hi Sara,
It depends on what the damage is like. I could see eternabond tape being a good option for piecing the roof back together, but if it’s a big hole or gap it might not be enough.
As for the trim, I’m not exactly sure what you mean by that, but you could put the eternabond over the trim.
Good RV rubber roof article. Thanks for sharing. Well, I have an EPDM rubber roof in my mobile home, and to reseal and repair I use Liquid Roof for example “RV Roof Magic” rubber roof sealant as it has given me the best outcome due to its incomparable properties and mesmerizing features. It effectively seals all kinds of leaks, gaps, and minor openings and holes and dries into a watertight, flexible coating that stops leaks immediately extending the RV’s roof service life for 15 to 18 years and giving long-term peace of mind. RV Roof Magic can be applied to almost all types of roofing material making it highly resistive in heavy rainfall, hailstorms, and snowfall as it can withstand ponding water 365 days a year.