
Why Get New RV Decals & Graphics?
RVs spend a lot of time outside. They are exposed to all kinds of weather that makes them look worn out and aged.
Sun exposure is the biggest reason the decals and graphics on RVs fade and even start to crack and peel.
Related Product: Track your travels with a fun RV State Sticker USA Travel Map (click to view on Amazon)
UV rays dry out the vinyl and glue, which makes the decals lose color and start to fall off.
This can make an RV look old even if it’s not.
Fresh RV decals can make a camper look brand new again, which helps with resale value and even getting into fancy RV parks and campgrounds with RV age rules.
You can even get custom RV decals that fit your style better or help match a camper renovation.
See Also: Best RV Awning Cleaners That Actually Work Reviewed
Should I Revive or Replace The RV Decals?
There are a few ways you can protect RV decals to stop them from fading and cracking in the first place.
The easiest is to spray them with a UV blocker like 303 Aerospace Protectant (click to view on Amazon). It will also help bring some color back into the decals.
You can even revive faded RV decals that haven’t started cracking using automotive sandpaper. You can read more about that in this article here.
If the decals on your RV are faded and slightly cracked but not peeling you can sometimes paint over them to make them look new again (click here to view post about painting RV decals).
But if the decals on your RV are peeling and falling off in pieces they are too far gone to revive or paint over. It’s probably time for some new RV decals and graphics.

Where To Get Replacement RV Decals
If you want to replace the decals on your RV with the exact ones that are already on it you will need to contact the manufacturer.
For example, I would need to contact Thor Motor Coach to get exact RV decal replacements for my Freedom Elite motorhome.
Buying RV decals from the manufacturer is one of the most expensive ways to go. Companies will charge a lot for the exact replacements.
The upside is it will cover the place where the old RV decals were and you won’t see outlines from them.
See Also: Best RV Covers Reviewed (Trailer, Class A, C, & More)
A second option that might end up costing more than the first option is to go to a shop that can design and print custom decals that will match the old ones.
This is a good choice if you want the size and shape of the RV decals to be the same, but you want to change the colors and patterns.
Another choice is to look online for pre-made RV decal kits that will work for your type and size of camper.
Here’s an example of an RV decal kit that can be used on a small motorhome, travel trailer, toy hauler, and even a 5th-wheel.
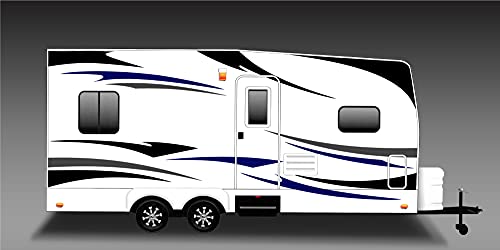
There are actually a lot of different options to choose from out there and it’s not a bad idea if you are looking for a more cost effective way to replace old RV decals.
The main downside is the new patterns won’t line up with the old RV decals and you may see some slight color variation in the area where the old RV decals were removed.
But there are things you can do to help get rid of outlines from old RV decals you can read more about later on in this article.
A pro to totally different RV decals is you can get creative with the placement of the new RV decals and totally change the look of your camper.
You can even get graphics that match your style a little better.
Here’s an example of a graphic that can go on any kind of RV or vehicle.
Minglewood Trading Store RV Graphic
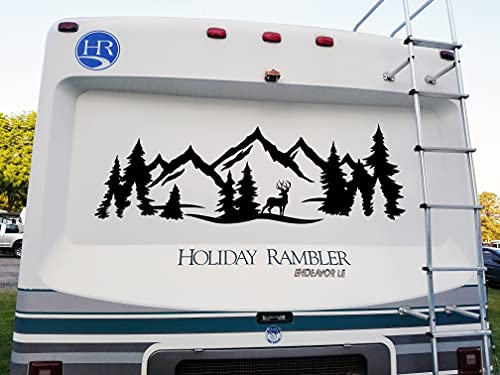
There are even some options available that try and match the original RV graphics for different models of RVs.
Valley Trail Camper Mountain Scene RV Graphic

Can I Put New RV Decals Over the Old Ones?
Now for the main question. Is it ok to put the new RV decals over the old ones?
This question is mostly for those who have gotten new RV decals that are exact replacements.
The general advice for placing new RV decals is to always remove the old ones, no matter how good of shape they are in.
This is because the adhesive on the back of the old RV decal is never going to be as strong as what’s on the new one.
If you place a new RV decal over an old one it will most likely peel and fall off much faster than it would if you had put it on a clean, decal free surface.
See Also: Best RV Tire Covers (Spare, Trailers, Trucks, Campers)
There’s also a higher risk of bubbles during applications since the surface will be uneven.
You might even see bumps and cracks outlined on the new RV decal, which will ruin the fresh new look you are going for.
The only time you could potentially put a new RV decal over an old one is if the RV is relatively new and the decal that will be covered isn’t damaged in any way.
The only reason I can think of to cover a new RV decal is to change the color scheme of your camper to match your tow vehicle.
99.9% of the time a new RV decal should not be placed over an old one.

Ways To Easily Remove Old RV Decals
The good news is the removal of old RV decals doesn’t isn’t super difficult if you use the right tools.
It will take some time since the decals on RVs are large and sometimes require a ladder to reach. But it’s worth the time and effort if you want your RV to look new and for the decals to last.
There are a few different methods that can be used to remove RV decals. The best method for you will mostly depend on what kind of shape the decals are in.
Heat Gun Method
For this method, you use a heat gun (click to view on Amazon) to heat the vinyl decal so the adhesive becomes soft and loose.
It makes it so you can simply peel off the decal with your fingers or a plastic scraper.
This method works best for RV decals that are still in pretty good shape. It’s not a good option for cracked or peeling decals that are already missing pieces.
Some adhesive is always left behind when using a heat gun. You will need to use an adhesive remover to safely get it off.
I recommend RapidTac Adhesive Remover (click to view on Amazon). Once the RV decal is removed just spray it on and wait a few seconds.
Then using a plastic scraper like this (click to view on Amazon), wipe away the now loose adhesive.
Make sure you use a plastic scraper instead of a metal one so the gel coat underneath the adhesive won’t be scratched or damaged.
After scraping off the adhesive use a rag to wipe away the leftover adhesive remover.
PROS
- Lighter Work When Compared to Eraser Wheel Method
- Fast Removal if RV Decal Isn’t Cracked
CONS
- Can Damage Gel Coat Underneath Decal If Overheated
- Hot Heat Gun & Decal Can Burn Hands
- Extra Step for Adhesive Removal
3M Decal Eraser Wheel
For a more hands on approach, a decal eraser wheel is always a good option for every kind of worn RV decal.
I recommend using a high quality 3M Eraser Wheel (click to view on Amazon) it only leaves light dust behind that’s easier to remove than the sticky gunk other kinds of eraser wheels leave.
You should also get the version that comes with a mandrel you can use to attach the wheel to a drill.
To use, attach the RV decal eraser wheel to a drill and lightly run the eraser over the decal you want to remove.
The 3M wheels are designed to take up to 4,000 rpm, which means even the highest speed setting on a drill will be ok to use with it.
Both the RV decal and adhesive should easily rub off.
The wheel will slowly disappear after use and you will need to use a couple of them for the entire RV.
Wash the RV or wipe it down after all of the decals have been removed to get rid of any dust left behind by the eraser wheel.
PROS
- Won’t Damage Finish Under RV Decal
- Removes Adhesive & Decal at the Same Time
- No Messy Cleaners or Chemicals Required
- Good For Removing All Kinds Of RV Decals (Cracked, Peeling, Faded)
CONS
- Will Need Multiple Wheels for Entire RV
- More Physical Than Other Methods
- Leaves Dust That Will Need To Be Wiped Away
- Drill Required
Even though it takes a little more physical strength I recommend the 3M Eraser Wheel method for RV decal removal.
It works better for cracked and peeling RV decals and it takes away both the adhesive and the decal in one step.
It only requires an eraser wheel and a drill. You don’t need to have a bunch of tools on hand to get the job done.
See Also: How To Install Solar Panel On RV Roof & Connect To Battery

How Do I Make the Clean Area Underneath the RV Decal Match the Rest of the RV?
If you aren’t planning on replacing the removed RV decals with exact copies, or you aren’t going to put on new RV decals, you may be wondering how you can get rid of the outline left by the old RV decal.
The area underneath the old RV decal has been protected from dirt and UV rays by the decal.
It’s always going to be a lighter color than the rest of the RV unless your RV is new.
Sometimes it’s impossible to get the RV decal outline to completely disappear, but there are a few things you can do to blend it in with the rest of the RV body.
The reason the part of the RV that has been exposed to the elements is looking darker is oxidation.
See Also: The Tool That Makes Cleaning RV Water Heaters Fast & Easy
The gel coat has been slowly broken down by UV rays and is now left with a dull layer that doesn’t shine and picks up dirt and grime easier.
Getting rid of the oxidization is one of the best ways to get rid of the outline of the old RV decal.
Make sure you use an oxidation remover that’s safe for fiberglass gel coats like Meguiar’s M4916 Marine/RV Oxidation Remover (click to view on Amazon).
You can apply the Meguiar’s by hand but using a high quality buffer (click to view on Amazon) and pad (click to view on Amazon) are going to give you the best results.
This process will take time but the end result should be a clean RV with very little decal shadow showing.
Top it off with a good petroleum distillate free RV wax (click to view on Amazon) and your camper should be looking good as new.
Removing the decals use “GraphXOff”. Works like a charm. There’s a youtube out there from “The Flippin’ Tilbys” and she tried all and everything and reports on it in detail. She finally used GraphXOff Vinyl Adhesive and Paint Remover Gel and it finally worked with the least effort. Worth watching her youtube. Hope this info helps others as well. Here’s the link:
http://www.youtube.com/watch?v=nNtYBZjmy5I