
How Does an RV Blowout Plug Work?
Winter is on its way again. That means it’s time to clean the RV, blow out the pipes, add some antifreeze, and park it before the temperatures go below freezing.
An RV blowout plug is a cool gadget that helps with winterizing a camper. It’s an adapter that screws into the city water connection fitting on the outside of an RV.
Related Product: Easily drain the RV water heater with this Dual Hex Wrench for RV Anode Rods (click to view on Amazon) or this RV Water Heater Drain Plug Wrench Kit (click to view on Amazon)
From that connection you use the an air compressor to blow air through all the freshwater pipes. This forces out the water and ensures there’s not left to freezer over the winter.
In this article, I’ll review some of the most popular RV blowout adapter plugs on the market today. There are a few different styles to choose from but some are better than others.
I’ll also give some instructions on how to use RV blowout plugs since it can be a little bit risky for the freshwater system if you don’t know what you’re doing.
See Also: Best RV Antifreeze For Winterizing Your Camper Reviews
Summary (Links to Amazon)
- Best Overall – BUTTIKU RV Blowout Adapter

Best Overall
Last update on 2024-04-25 / Affiliate links / Images from Amazon Product Advertising API
Most Popular RV Blowout Plug Adapters Reviews
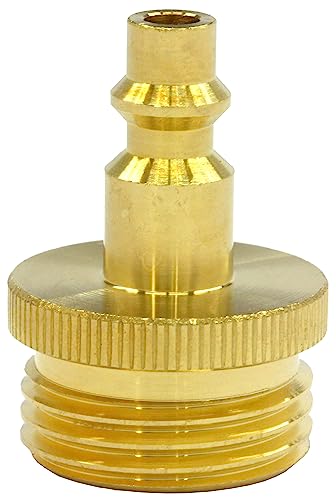
1. Vibrant Yard Co. Quick Connect RV Blowout Adapter
This version of an RV blowout plug adapter by Vibrant Yard Co. is an old classic.
It’s simple and effective but there are a few things to think about before getting this style to winterize your RV.
It’s made with quality lead free brass, which means it’s going to last forever.
One end has a male garden hose fitting for connecting to the city water connection, the other has an air compressor quick connect.
This style of RV blowout plug adapter is very compact and extremely durable. But there are a few downsides to the design.
See Also: What Backup Camera Is Your RV or Trailer Pre-Wired For?
First, there’s no shut off valve, which means when you connect your air compressor you will have to disconnect the hose to stop the airflow.
Also, you won’t be able to control the amount of air going into the camper from the adapter, it will have to be done from the air compressor.
This can be a safety issue if the blowout plug comes loose from the RV city water connection while the air compressor is attached.
The adapter will have to be removed to stop the airflow and it’s really hard to do this when unregulated high pressured air is shooting out.
Not having a shut off valve built into the blowout plug isn’t a deal breaker for everyone, but it’s something to think about.
Unhooking and reconnecting an air compressor hose using a quick connection can be a little challenging for some people.
Those who aren’t used to using air compressors or with limited mobility in their hands often have trouble using them quickly.
The Vibrant Yard Co. Quick Connect RV Blowout Adapter is a very simple but effective option.
It’s a fantastic choice for RVers who are building their own RV blowout plug adapters or people who are used to using air compressor quick connect fittings.
PROS
- Super Durable
- Small Size
CONS
- No Shut Off Valve
- Cannot Regulate Air Flow from Adapter
- Must Use Air Compressor Quick Connect Fitting Every Time
- For RV Use Only
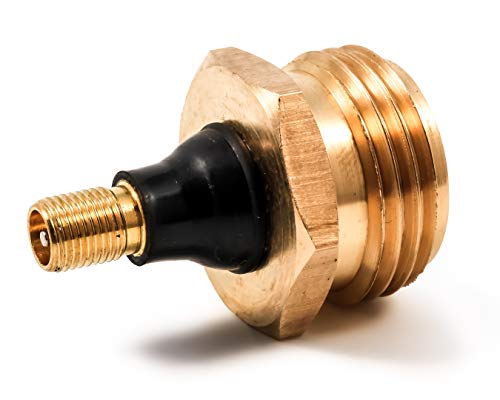
2. Camco Schrader Valve RV Blowout Plug
Similar to the style of RV blowout adapter plug reviewed above, this version by Camco is compact and very simple.
Instead of an air compressor quick connect it uses a Schrader valve. Which is the kind of valve you normally find on bicycle tires.
It’s made of lead free brass with rubber connecting the Schrader valve to the garden hose fitting.
This type of adapter technically makes it possible to connect a bike pump or tire inflator to your city water connection.
While the pipes in an RV can be sort of blown out using a tire inflator or bike pump with the right equipment and know how, it’s not recommended.
To properly blow out water pipes for winterization you need a high volume of air, not high pressure.
That’s why you should always try and use an air compressor when winterizing an RV, even when using a Schrader valve blow out plug.
See Also: Best RV Covers Reviewed (Trailer, Class A, C, & More)
So who should get this type of RV blowout adapter plug?
Not everyone has an air compressor, but one place that does is a gas station.
I’m not talking about the tire inflator machines that some gas stations offer, those won’t do much good.
But many gas stations have air compressors connected to a hose that’s usually hanging up somewhere outside the main building.
Most of the time, gas stations will have a Schrader Valve fitting built into the hose, so no one can steal it. That’s why a Schrader valve RV blowout plug is useful in this situation.
Just drain your RV fresh water system as much as possible, then take your RV to a local gas station that offers compressed air for filling flat tires.
Then blow out your RV with this adapter.
I recommend talking to the gas station attendant before doing this, just to make sure it’s ok with them.
They might ask for a little compensation but it usually isn’t much.
The Camco Schrader Valve RV Blowout Plug by Camco is for a very specific situation, but it’s still useful to some RVers who blow out their RVs at gas stations.
It still has the issues the version reviewed above has, there’s no way to regulate the airflow, so you need to be extra careful.
PROS
- Can Use Gas Station Compressors
- Easy to Connect & Disconnect
- Durable
- Lightweight
CONS
- Must Press Air Hose to Valve the Entire Time
- Cannot Regulate Air Flow from Adapter
- No Shut Off Valve
- For RV Use Only
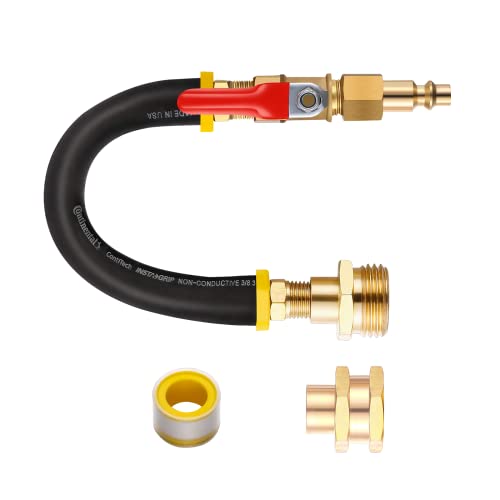
3. BUTTIKU RV Blowout Adapter
This style of RV blowout adapter uses a durable reinforced rubber hose with a shut off valve, an air compressor quick connect on one end, and a male garden hose adapter on the other.
The hose is 12.8 inches long, and it’s there to relieve some of the pressure that would be put on the city water connection if the valve was connected directly to it.
The shut off valve is an easy to use turn handle that is fully open when parallel to the hose and closed when perpendicular to it.
You can use this valve to regulate the airflow going into the RV.
See Also: Best Deep Cycle Battery Chargers Reviewed (12V, 6V, RV, AGM)
It’s great for slowly increasing the volume and fully shutting off the air without having to disconnect the air compressor hose.
All of the fittings are made with durable lead free brass and the hose is a strong and durable reinforced synthetic rubber.
Included with purchase is a second adapter that can be used to turn the male garden hose fitting into a female one.
This can be used for winterizing outdoor faucets and sprinkler systems.
Because of the second garden hose adapter, the rubber hose to relieve pressure on the city water connection, and the shut off valve, the BUTTIKU RV Blowout Adapter is the best option for RV winterization in this review.
PROS
- Shut Off Valve
- Rubber Hose
- Adapter for Sprinklers & Outdoor Faucets
- Durable
- Easy to Use
- Can Regulate Air Input
CONS
- Rubber Hose Could Dry & Crack Over Time
4. Kbrotech Winterize Blowout Adapters
The final style of RV blowout plug is this one by Kbrotech.
This is a pair of compact RV adapters. One has with a male garden hose fitting the other a female one. This is to compensate for different kinds of fittings found on RVs, sprinkler systems, and outdoor faucets.
The hose fittings are attached to a shut off valve followed by an air compressor quick connect.
It has all the benefits of the blowout plug reviewed above but there are a few cons.
The weight of the adapter combined with the length puts extra pressure on the RV city water connection fitting. It could potentially damage it and cause a leak.
But they’re very compact and easy to store.
See Also: Best Heated Water Hoses For RV Campers, Barns & Livestock
The fittings are all made of lead free brass which makes it extremely durable and there’s no rubber that can dry out and degrade over time.
The Kbrotech Winterize Blowout Adapters are super durable. Each one has a shut off valve that is almost a must have for safely blowing out RV water pipes.
If you are willing to hold this adapter while it’s connected to the RV so it doesn’t strain the city water connection it’s a fantastic choice.
PROS
- Super Durable
- Shut Off Valve
- Easy to Use
- Can Regulate Air Input
CONS
- Puts Extra Pressure On City Water Fitting
Best RV Blowout Adapter Plug Style
While some of the simpler RV blowout plugs have been popular for a long time the kind that includes a shut off valve is better overall.
Being able to regulate the airflow to reduce the risk of cracking a pipe or getting a leak in a connection is a huge pro.
I recommend the version that also has a short rubber hose between the shut off valve and the garden hose adapter like the BUTTIKU RV Blowout Adapter (click here to view on Amazon).
It’s easier on the city water connection and harder to lose than the smaller blowout plugs.
But if you live in an especially dry climate that seems to dry out rubber hoses really quickly the other style that has a shut off valve and no rubber hose is an excellent option as well.
See Also: How To Maintain RV Holding Tanks To Prevent Clogs & Odors

How to Use An RV Blowout Plug for Winterization
When using an air compressor to blow the water out of the pipes in an RV it’s important to follow these steps so you don’t over pressurize the system.
High pressure in RV pipes could cause them to crack, get leaks, or even break a connected faucet.
1. Drain the RV Water Lines & Tanks
The first thing you need to do before blowing out the RV water pipes is to get as much water as possible out of the RV using the drains.
Make sure you dump the RV and clean the holding tank thoroughly.
There will be some water getting into the black and grey tanks after blowing out the lines.
You will have to dump a little after as well but you don’t want to be doing this with full holding tanks.
Drain the freshwater tank by opening the drain valve underneath it, you can leave this valve open for the duration of this process.
Also, drain the water heater by removing the plug or diode rod.
Drain the water lines by opening the low point drains.
Turn on the water pump so it will pump water out of the drains. When there’s no water going through the pump, turn it off.
See Also: Fix For Hard To Open & Close RV Black Or Grey Tank Valves
2. Open All Faucets
Open all of the faucets in the RV. You want the air to be able to escape so no pressure gets built up in the water lines.
Also, leave the freshwater tank and low point drains open, and don’t put the plug back into the water heater.
3. Screw the RV Blowout Plug to the City Water Connection

4. Attach the Air Compressor Hose
If you’re using an RV blowout adapter plug with a shut off valve make sure it’s in the closed position before connecting the air.
If your RV blowout plug doesn’t have a shut off valve double check to make sure the faucets are open so you don’t pressurize the lines.
After connecting the air compressor slowly open the shut off valve (if you are using one).
5. Let Air Blow Through the RV Lines
At this point, there should be water spraying out of the faucets, low point drains, and water heater.
Blow out the lines until no water can be seen coming out of any of the drains or faucets.
Make sure you flush the RV toilet as well. Hold down the flush valve for a few minutes to make sure it’s fully drained.
You can close and open some of the faucets to direct more airflow to certain areas like the water heater.
When the water heater is fully drained you can bypass it by closing the connected main lines and opening the bypass line so you can blow out the faucets and freshwater lines better.
When all of the faucets and drains have not more water coming out of them you can disconnect the air.
You can leave the faucets open all winter long.
6. Empty the RV Black & Grey Tanks Again
The water that was blown out of the RV freshwater system went into the holding tanks.
Make sure you empty them again before you add antifreeze to the system.
7. Add Antifreeze
It’s recommended to still put antifreeze in the RV lines even after blowing out the pipes.
You can read more about RV antifreeze in this article here.
Frequently Asked Questions About RV Blowout Adapter Plugs
Can I blow out my RV water lines using a gas station tire inflator?
You can use a Schrader valve RV blowout plug adapter like this (click to view on Amazon) to winterize an RV using an air hose at a gas station.
The gas station air hose must be connected to an air compressor. The machine that you put money into that’s just a tire inflator won’t work.
Make sure you ask first since you will be using more air than usual.
The gas station might require a small fee but it’s still going to be more budget friendly than buying an air compressor just for winterizing an RV or going to a dealer to get it winterized.
Can you blow out an RV black and grey tank?
There usually isn’t any way to connect an air hose to an RV black or grey tank and blow it out.
If your black tank has a saniflush you could connect a blowout adapter to that, but it’s mostly just going to blow out the saniflush pipe.
An RV blowout adapter plug mainly blows out the freshwater pipes, water pump, and water heater.
Can you blow out an RV freshwater tank?
There’s a valve inside the RV water pump that keeps water coming from the city water connection from getting into the RV freshwater tank.
This valve also stops air from the RV blow out plug.
Luckily freshwater tanks have a drain so you can empty them for winterization.
You can also add antifreeze if you are worried about it freezing.
Are all RV blowout adapters the same size?
Yes, since the city water connection on all RVs is a garden hose fitting, all RV blowout plug adapters use that style.
The only difference is the garden hose side might be female instead of male. RVs require the male adapter while the female adapters are for sprinkler systems or outdoor faucets.
Can using the wrong adapter cause damage to my RV?
Yes, an adapter with the wrong thread type might damage the threads on your RV city water connection.
It will also leak out air instead of forcing it into the pipes, which reduces the effectiveness of it for clearing water out of the pipes.
Have any more questions about what kind of RV blowout plug adapter is best for winterization? Leave a comment below.