RV Roof Vents vs Fans
RVs can never have enough fans. 12 volt roof fans are great for getting the air moving on hot summer nights and keeping the humidity out during the winter.
Related Product: Darken the inside of your RV or insulate it better by covering the roof vent and fan holes using Camco RV Vent Insulators (click to view on Amazon)
Many campers come with just one roof vent fan in the bathroom, but there are usually multiple roof vents placed throughout the RV.
Oftentimes there’s a standard RV vent over the main bed in the camper and in the main room.
RV roof vents are nice for letting in air, but a fan works much better.
12 volt RV roof fans look very similar to standard RV roof vents. They have a lid that can open and close, they have bug netting on the inside, and they are made to fit the same standard 14×14 inch square hole.
Replacing a non-powered RV vent with a 12 volt RV fan is usually pretty simple. You won’t need to change the size of the roof hole and if you use the proper sealant it’s not hard to waterproof the new fan so the roof is protected.
The biggest challenge is usually finding a way to get power to the new fan.
See Also: RV Roof Repair: When to Repair, Reseal or Replace
Getting Power To A 12 Volt RV Fan
The easiest way to get power to a 12 volt RV fan, if there wasn’t one already installed, is to run wires from the nearest ceiling light.
The lights in an RV all use 12 volt power which means the power supply is compatible with 12 volt RV fans.
Sometimes the wiring for the lights will actually be routed through the RV vents.
If you’re lucky you will see wires when you remove the inner plastic cover (garnish ring) for the vent you want to replace.
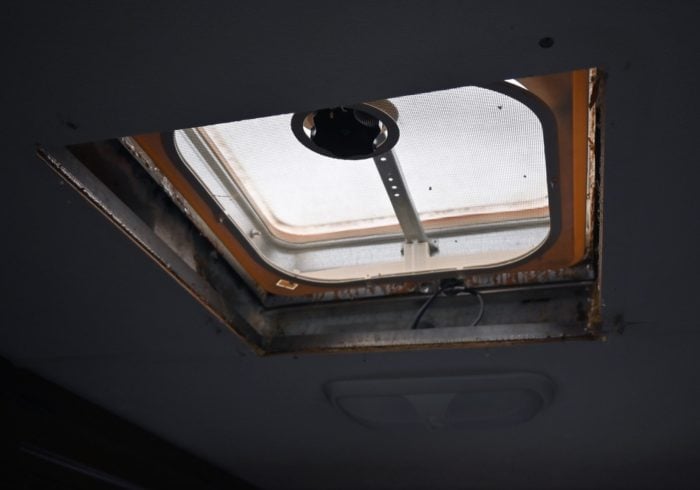
Removing the garnish ring for the vent you are going to replace is the first step to figuring out the wiring situation.
It lets you not only see if there are any wires, but it also will give you a glimpse of the roof material and design.
Most travel trailer roofs are made of wood, which is a fairly easy material to work with. But lots of 5th-wheels and motorhomes have aluminum frames and roofs which can make routing wires a little more difficult.
For any square hole in the roof, manufacturers will usually build a frame around the inside to help protect the insulation and to give the screws that hold the vent in place something to grab onto.
See Also: 12 Volt Air Conditioners That Can Be Powered With Batteries
If you need to run wires from a nearby light you can drill a small hole that’s just big enough for the fan wires to go through in one of the wooden beams.
Another option for those of you who don’t like the idea of drilling holes into the roof frame you can always just route the wires on the outside of the fan and light by running them along the ceiling
This option actually works pretty well. You don’t need to spend time trying to feed wires through the roof framing and insulation and the wires are so small you don’t really need to do that much to hide them.
How To Replace An RV Vent With A Powered RV Fan
So long as you can find a way to run wires from a nearby light replacing a non-powered RV vent with a powered RV fan is actually pretty easy.
Below I’ve written some step by step instructions, including a list of all of the parts necessary.
We replaced our vent with a Maxx Air Fan (click to view on Amazon) but you can use any 12 volt RV fan so long as it’s made to fit the standard 14×14 inch square hole.
Other popular options include Fan-Tastic Fans (click to view on Amazon) or the traditional RV roof vent fan (click to view on Amazon) with a small fan on one side.
Click the links below to view products on Amazon
Tools & Parts For Removing RV Vent
- Drill
- Robertson/Square Head Drill Bits (most RV manufacturers use different sizes of Robertson head screws for inside and outside the RV)
- Scrapers (plastic and metal)
Tools & Parts For Installing RV Roof Vent Fan
- 12 Volt RV Roof Fan
- Philips Head Screwdriver
- Butyl Seal Tape
- (will need 1-2 tubes)
- Caulking Gun
- RV Roof Screws (can use the ones from the old roof vent)
- Wire Connectors
- Extra 14 Gauge Wire (for routing power from RV light to fan)
- Wire Strippers
1. Remove Old RV Roof Vent Garnish Ring
To remove the vent that you want to replace you will need to first remove the inside garnish ring. This usually is secured by 4 screws around the edges.
They are normally the same kind of screw that’s used on the roof as well. In most cases, you will need a square Robertson drill bit or screwdriver to remove it.
When I removed the garnish ring to the vent on our motorhome I was happy to find that the cables to the nearby light were routed behind the garnish ring.
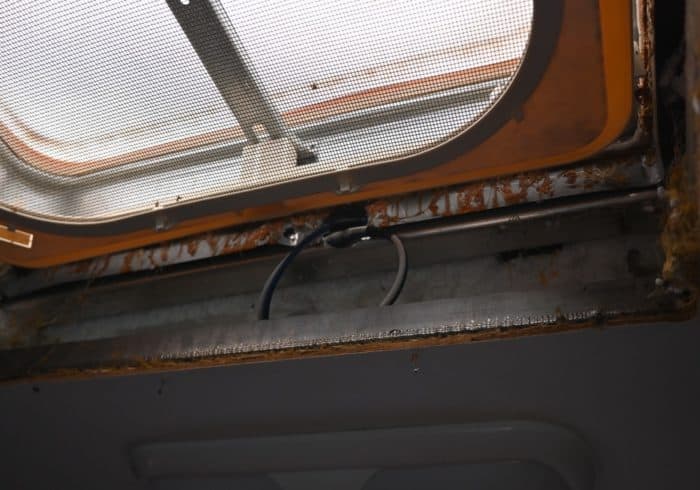
That meant there was already a way for me to get the fan wires to the light where all the wires in the circuit were connected together.
2. Make Sure You Can Route Your Wires
When the old roof vent is removed you are going to have a big hole in your roof until you install the new fan.
I recommend having the fan ready to go so you can install it the same day.
Even though I knew I was going to be able to get power to the new fan via the 12 volt light I wanted to make sure everything would work before I took off the vent.
I first disconnected the shore power to the RV and then the power from the RV batteries.
Then I removed the 12 volt light to get to the spot where all of the wires in the circuit were connected.
There were already 6 wires (3 positive and 3 negative) being joined behind the light in the ceiling. Multiple lights are normally connected together to create a circuit in RVs. That’s why there’s usually a lot of wires.
I removed the electrical nut connecting all of the wires to expose the stripped ends. I then connected my Max Air fan using some 14 gauge wire with alligator clips on each end (click to view on Amazon).
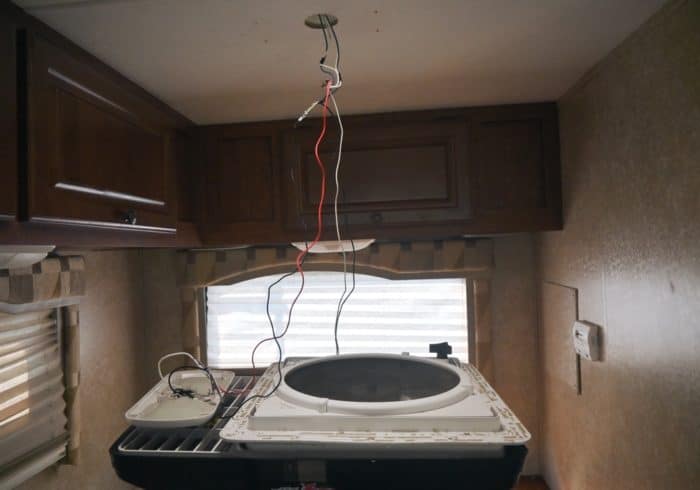
After connecting all of the wires I reconnected the RV battery and turned on the fan to make sure it could get power and all of the lights in the circuit would still work.
Everything worked great and the fan started right up.
I always test things like 12 volt fans before installing them to make sure they work. If the fan was damaged from the factory and I had already installed it I would have had to remove everything to return it.
See Also: How To Easily Replace An RV AC With A Fan, Vent, or Skylight
3. Remove the Old Vent on the RV Roof
Next, you are going to need to remove the old vent. There’s going to be a lot of sealant covering the screw heads and the corners of the vent.
Take off the old sealant first using a scraper. Make sure you don’t damage the roof fabric when you’re doing this.
It takes some time but it’s possible to remove the sealant without hurting the roof’s membrane. I like to use a plastic scraper for this part.
Once the old sealant is removed and the screw heads are exposed you can use a drill and the right size of Robertson drill bit to unscrew them.
Make sure you save the screws because you can use them to secure the new fan to the roof.
The vent will also be secured to the RV roof with butyl tape. You are going to need to pry up the vent with a scraper.
Again make sure you are careful not to damage any of the fabric on the RV roof.
Once the old roof vent is removed the old sealant still left on the roof needs to be cleaned off as much as possible.
It’s ok if there’s a little left since it’s almost impossible to get everything off without damaging the roof fabric but you don’t want any large pieces left.
Lastly, wash the area around the hole on the roof so no dirt or oils get between the new sealant and roof fabric.
4. Install the New Fan onto the Roof
At this point, you can install the part of the fan that goes on the roof so it’s sealed and waterproofed as quickly as possible.
To properly seal the edges around the fan you will need to place butyl tape around the bottom edge of the fan without any gaps.
Make sure the tape covers every screw hole so the screws will be sealed as well.
You can read a little bit more about how to do this and see some pictures in this article here.
The holes for the new fan probably won’t line up with the holes from the old fan. Most of the time you have to just center the fan and screw it into the RV roof making new holes.
The butyl tape and lap sealant will seal the old holes and stop any water leaks.
Once the fan is secured to the roof you can apply the self leveling lap sealant.
There are more pictures in the article linked to above but you basically want to cover the edges of the fan and all of the screw heads.
The sealant will spread out as it drys making the sealed area even larger which creates a strong waterproof bond.
I normally use at least 1 tube of self leveling lap sealant when installing fans and vents.
It’s not a good idea to get stingy with the sealant when it comes to RV roofs since water leaks are so damaging to campers.
5. Connect the Wires
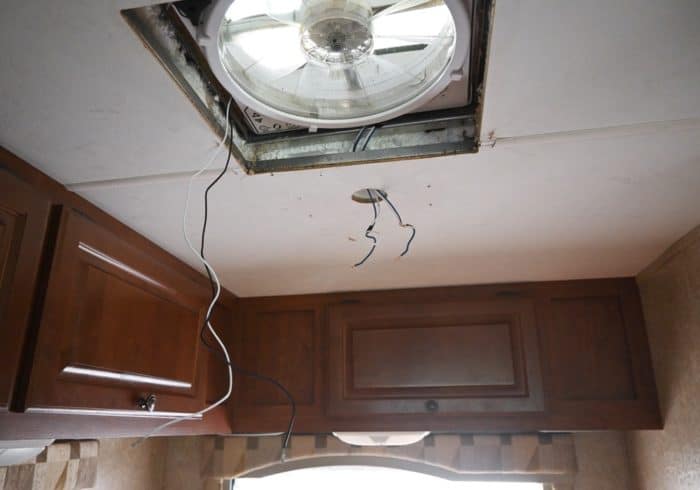
Now that the roof part is over with it’s time to connect the wires. Hopefully, you’ve already run your wires from the light to your fan or tested it to make sure everything works.
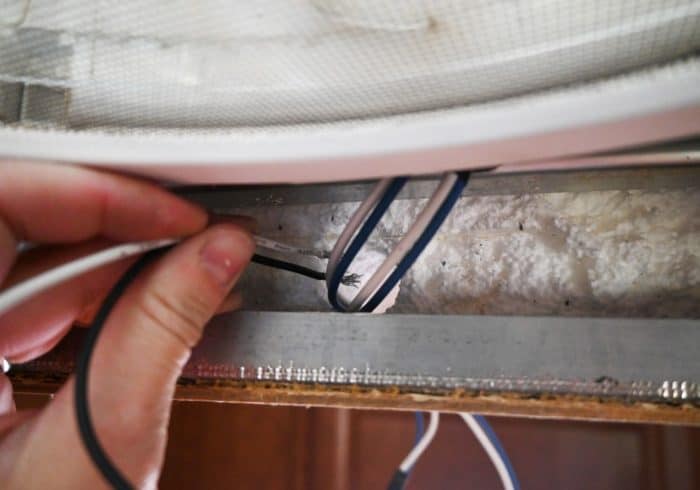
Instead of splicing into the wires that were near the fan it was easier to just run the fan wires to the point where the light was connected since it was so close.
You could also cut into the wires that are right next to the vent and wire them there. Just make sure you keep the circuit going by connecting all 4 wires plus the fan wires.
See Also: Best Deep Cycle RV Battery (AGM, SLA, 12V, 6V)
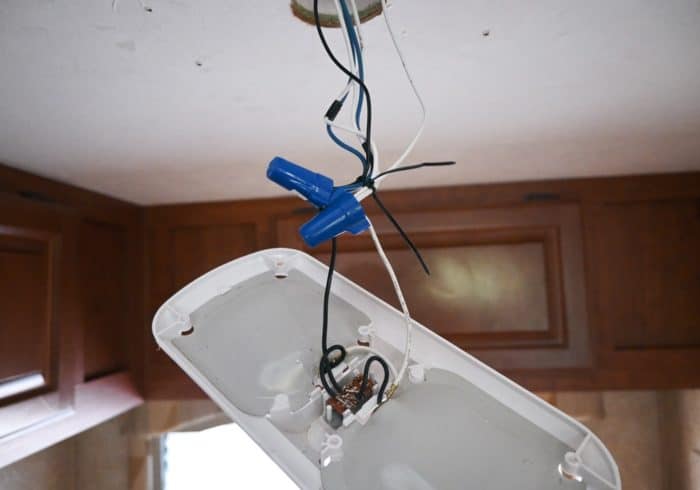
In the photo above there are 4 positive and 4 negative wires all connected together.
Two wires come from the fan, two from the light, 2 from the wires that are being run from the breaker box, and two that continue to more lights that are on the same circuit.
6. Hide the Wires with the Garnish Ring
Now that all of the wires are connected you can replace the light and put the garnish ring on the fan.
Garnish rings that come with vents and fans usually need to be cut to fit the shape and thickness of your RV roof.
Make sure you follow the instructions that came with the fan you purchased to cut it properly.
You may also be able to use the garnish ring that was on the vent you replaced.
The garnish ring hides the roof beams and the wires.
If you ran your wires on the outside of the ceiling you can still put them on the inside of the garnish ring. Just have them poking out of the outside edge.
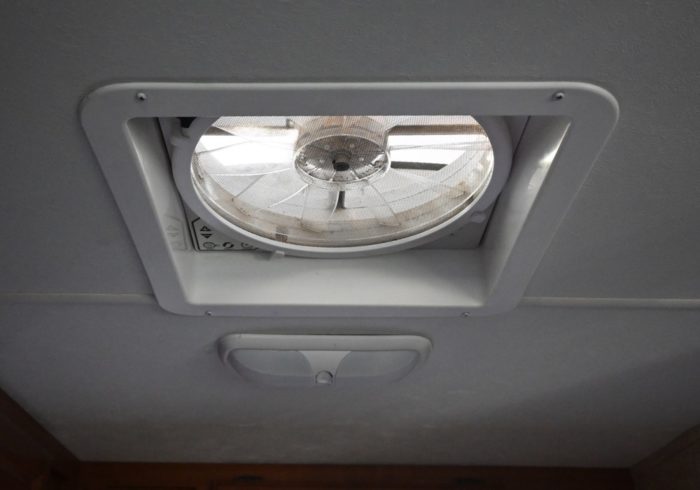
Once the garnish ring is on you now have a 12 volt powered RV fan installed in place of a non powered RV roof vent.
See Also: How Long Will An RV Battery Run The Furnace? + Calculations
Frequently Asked Questions About RV Fan Installation
What gauge of wire should I use to power my RV fan or lights?
It’s recommended to use 14 gauge wire when working with the 12 volt system that runs the RV lights and roof vent fans.
14 gauge wire works with 15 amp fuses which is normally the size of fuse connected to that 12 volt system in an RV.
How many watts does a large RV fan like a Max Air or Fan-tastic Fan use?
Even though they are much larger than the traditional RV fans that many of us are used to, the larger fans still don’t use a ton of electricity.
On low many of these fans will only use around 6 watts and around 50 to 60 watts at the max settings.
If you have multiple fans running at the same time and you are using your RV batteries the watt usage can really start to add up throughout the day.
Make sure you are monitoring your RVs power usage so you know how long you can run the RV fans on battery power.
Getting a solar panel that can charge an RV battery like one of the ones in this article (click to view) will help keep your batteries charged so you can run your 12 volt RV appliances for longer without having to use a generator.
Have any more questions about replacing a non-powered RV roof vent with a powered RV roof fan? Leave a comment below.

